
Acdsee free Archives
acdsee free Archives
ACDSee Photo Studio Ultimate 2020
In summary
Photo Studio Ultimate 2020 is worth considering if you’ve already had experience using image editors and want an application that combines workflow management with editing and raw file conversion.
It can also be considered as an affordable alternative to subscription-based programs like Photoshop and Lightroom and it’s a lot more versatile than applications such as PaintShop Pro, DxO Photo Lab (Elite) and On1 Photo RAW 2019.6, which have similar levels of complexity.
Serious photographers may find the range of adjustments limited.
Full review
ACD Systems has been creating software since 1994, starting with file management, adding image editing in 1999 and launching its first Photo Editor in 2013 (although we weren’t invited to review it). The first version of ACDSee Ultimate followed a year later, with the ACDSee Photo Studio suite arriving in 2017. Developments have followed apace in the last few years and for our first review of this application we have the latest version, ACDSee Photo Studio Ultimate 2020, which combines digital asset management with advanced image editing and special effects capabilities.

Box shot of ACDSee Photo Studio Ultimate 2020. (Source: ACD Systems International.)
ACDSee Photo Studio Ultimate 2020 is a complex and powerful application that can be used for an entire imaging workflow, from importing files through to various output options. From the time you open the software and connect a camera or card reader this program lets you decide where images will be stored, categorise and rate files, view, edit and enhance individual images, convert raw files into editable formats and resize, rotate or rename files before outputting them as slideshows, prints multi-page layouts or in multimedia formats.

The user interface of Photo Studio Ultimate 2020 (shown above) is complex and it will take a while for new users to work out the best path to take from the time a set of images is ingested into the catalogue through to the editing and outputting stages. On the positive side, moving between different modes is quick and the interface can be customised to make frequently-used tools faster to access. A context-sensitive Help function is also available at a mouse-click to help users master the various tools and functions.
Who’s it For?
The main target audience for Photo Studio Ultimate 2020 is photo enthusiasts who want a complete workflow solution (ingesting, editing and outputting images) that includes raw file conversion. For such users, this program is more capable than most of the software we’ve reviewed in the past few years and provides a wider range of editing functions. For professional users, however, it doesn’t replace Adobe’s Photoshop.
There are a number of similar programs available that provide non-destructive editing (which lets you undo adjustments at any time up to a certain point) and offer raw file processing. As well as Photoshop Lightroom Classic CC, you’ll find pedigreed applications like Corel PaintShop Pro, Skylum Luminar and Serif Affinity Photo as well as the freeware application GIMP. When it comes to raw file converters with editing capabilities, Capture One, DxO Optics Pro 10 and ON1 Photo RAW are the best alternatives.
When deciding on software at this level, you need to have a clear idea of the functions you need and how you’ll use them. You must also decide whether it would suit you better to pay a monthly subscription fee (which will mount up surprisingly quickly) or buy the application outright and pay for updates if and when they provide new functions you need.
Photo Studio Ultimate 2020 is worth considering because of the number of features it offers, the breadth of its adjustments and its competitive pricing relative to alternative applications. It’s certainly worth a try if you want an all-in-one application that includes file management plus plenty of special effects.
If this is your first foray into ‘serious’ image editing, you may find it overwhelming, although there’s plenty of help available through online tutorials and a downloadable instruction manual that is relatively easy to follow. You just have to spend the necessary time working through them.
What’s New?
New features added to the latest version of Photo Studio Ultimate 2020 include facial recognition and detection features, focus stacking, HDR merging, a blended clone tool and text tool updates. The software will automatically add file information and thumbnails to the database as you browse.
Once the folder you are browsing has been catalogued in this way, as you open other folders, they will be scanned to find the faces located in the first folder. All subsequent folders will be scanned for faces as you open them.

Improvements to facial recognition and detection enable the software to suggest possible matches for the faces it finds as well as searching on suggested names, images that were auto-named and unnamed files. Users can also embed face data within an image to facilitate future searches.
You can also toggle face detection on and off via the Tools>Options>Face Detection control. Merging tools are also improved, with High Dynamic Range (HDR) merging providing more details and focus stacking now supported. (Details below) Both merge multiple frames to produce a single file.

The new Blended Clone tool (shown above) combines the Smart Erase and Clone tool and enables users to copy pixels from a source point and smoothly integrate them into the target area. It is ideal for removing unwanted elements from an image.
Text support is now available within layers, providing support for non-destructive text replacement and refinement. Users can also resize the canvas around layered content, expanding or cropping, or adding solid backgrounds. Rulers and guidelines are now available image in a variety of units (inch, cm, pixel) and users can snap layers, selections, and text to specific positions.
Raw Support
Raw files from most currently-available cameras are supported in Photo Studio Ultimate 2020. Click here for a list of cameras for which raw file support is provided. By our assessments it’s not quite as comprehensive as Adobe’s Camera Raw (missing out on the Leica Q and Q2 and the Canon EOS-1D X Mark III, for example). But both had issues with some Fujifilm raw files and neither application supported the Olympus OM-D E-M1 Mark III when this review was published.
The developers welcome input from users whose cameras are not listed on the website; they ask these users to submit sample raw files as single images or Zip files containing multiple images with a limit of 128MB per file. According to the website ‘we may accommodate your format in a future update’. (There’s no absolute guarantee of support but this offer appears to be unique.)
Installation and Set-up
Most people will purchase Photo Studio Ultimate 2020 online via the company’s website. The website is also where you’ll find the link to the trial download. Click here and select the cyan ‘FREE TRIAL’ button to download a trial version of the software.

The web page for ACD See Photo Studio Ultimate 2020.
If you opted for a trial version you’ll be notified as the end of the trial period approaches and offered the chance to purchase the software. You’ll receive an activation code once you’ve paid for the software; simply enter it and you’ll be ready to go. The application opens with the two screens shown below.
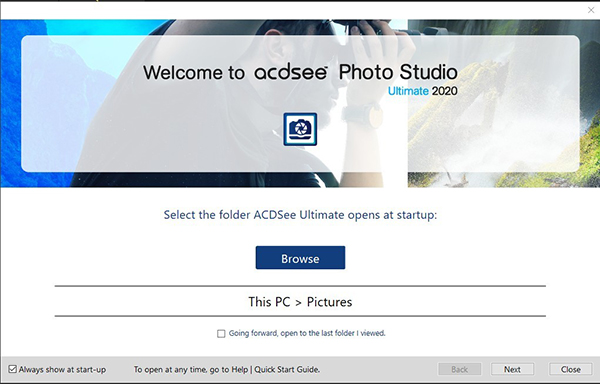

It will then step you through an online Quick Start Guide that takes you through the various features of the software and shows how to access them. The first page is shown below.
The workspace in Photo Studio Ultimate 2020 provides seven modes: Manage mode, Photos mode, View mode, Develop mode, Edit mode, 365 mode, and Dashboard mode. Unless you’ve opted to always show the Quick Start Guide on start-up by de-selecting the box circled in red, Photo Studio Ultimate 2020 always opens with the Manage mode.

In this mode you can catalogue your entire image collection via the Catalog button in the Panes dropdown menu. This process will take a long time if there are a lot of files and folders in your image library.
Image Organisation
The Manage mode lets you import, browse, preview, locate, compare and sort your files and folders and access the relevant organisation and sharing tools. It consists of 15 panes, of which the File List, which displays the contents of the folder you have selected, is always open.

To the left of the File List – and shown above – are three tabs: Folders, Catalog and Calendar, which provide different file sorting options. As you move between them, the bar will change, depending on which option you select. The Folders pane shows the directory structure of your computer and can be used to browse folders anywhere on your computer.
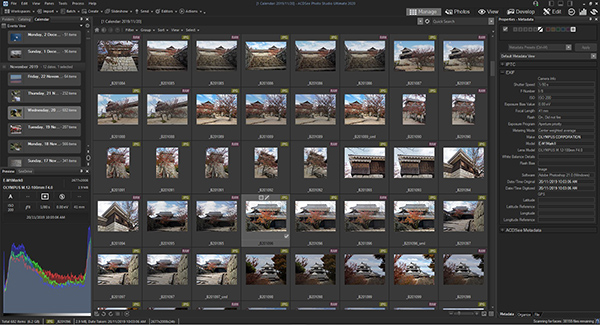
The Catalog pane lets you group images into various categories as well as tagging and rating them and applying keywords to make them easy to locate in searches. If you choose the Calendar view (shown above) the panel to the left of the File List changes to a list of the date the images were taken. Clicking on a tab opens the folder of images shot on that day.
The View tab in the File List toolbar lets you change the ways in which thumbnails and file details are presented. Options include the default Thumbnails view, Thumbs+Details, Filmstrip, Tiles, Icons, List, Details, Toggle Overlay mode and Highlight Overlay.

The Filmstrip view is one of the options available in the Manage mode to enable you to organise your files.
You can set the Details view to automatically resize columns, display or hide grid lines or browse one row at a time and customise the column order. The user manual provides a long list of keyboard shortcuts that can replace the need to click on icons. You may wish to print it out for reference if you prefer using them.

Other panes are shown in the screen grab above. They include Folders, Catalog, Calendar, Collection, Shortcuts, Private Folder, Preview, See Drive, Task Pane, Properties, Map (for geotagged images) and Image Basket. The Image Basket (shown below) is a special temporary storage location for images you want to edit, print or share without moving them into a separate, more permanent, folder. Up to five Image Baskets can be created.

There are two sets of dropdown menus in the Manage mode. The top one – outlined in red on the screen grab below – has tabs marked as follows: Workspaces, Import, Batch, Create, Slideshow, Send, Editors and Actions. The lower one – outlined in green on the screen grab below – has five tabs labelled Filter, Group, Sort, View and Select.

These tabs are largely self-explanatory. In the upper set, the Create tab is where you go to create slide-show files, PDFs, PowerPoint presentations, online albums, or archives. The Send tab lets you upload to photo sites, access an FTP or share photos by email. The Editors tab lets you list external editors for easy access.
The Actions tab is for applying ACD See Actions (pre-set effects) to selected images. These effects are located in the Tools dropdown menu (shown below). You can also record your own actions and organise them into categories in the Actions Browser (shown below).


Actions in use.
In the lower set, the Filter dropdown menu provides settings for rating, labelling, tagging and sorting images into categories as well as creating catalogues. The Group menu is a variation on this theme and used for grouping images according to common features such as camera used, date taken, file type, rating, etc. The Sort tab is for sorting images according to common features and the View tab accesses the various viewing options (thumbnails, filmstrip, tiles, etc.). The Select tab is for selecting images by file type, rating, tag or group.
The Photos Tab
Clicking on the Photos tab takes you to your image catalogue (shown below) which is arranged with the oldest files and folders first by default. Mousing over a thumbnail brings up a panel containing the image plus data including the file name and location on your computer, its size in kilobytes and pixel dimensions and the date and time taken.
Right-clicking on the thumbnail brings up a dropdown menu with links to the View, Develop and Edit modes plus rotation tools. Double-clicking on the thumbnail opens it in the View mode (shown below).

In the View mode you can click+hold+drag to pan around large images, zoom in or out, view images in a slideshow, play audio files or add soundtracks, caption images, sort files according to categories, keywords and other metadata and apply pre-set edits or effects. You can also detect faces and assign names to them and view adjustments made to images in the Develop mode.
When you double-click on the thumbnail of a raw file, the software will check to see if you have previously developed it. If you have, the image will be displayed. If not, by default it will display the embedded JPEG, created by your camera when the shot was taken or, if you have selected the RAW decode radio button on the General page, it will quickly process the file and show a temporary image.

This screen grab shows a previously undeveloped raw file (identified in red in the Info Palette on the right). The software has also detected two faces in the image (circled in green).
Clicking on the Actions Browser displays a collection of preset effects that include darkroom-style adjustments, one-click black-and-white conversions and actions that recreate the look of popular 35mm film types as well as a variety of ‘artistic’ effects. You can also use the Actions browser to save your own actions for custom looks or to speed up edits for a batch of images that need the same adjustments.
The Develop Workspace
By default, the Develop mode launches with a workspace containing an enlarged version of the image you’re working on plus a ‘Tune’ toolbar down its left hand side. A filmstrip showing other files in the folder is displayed along the bottom of the pane, along with the Info Palette (which can be dragged to anywhere in the frame).

The Develop workspace.
Any adjustments made in the Develop mode will be saved in a separate file, and applied each time the image is re-opened. In the Develop mode, four palettes of tools (shown below) are provided: Tune, Detail, Geometry and Repair.

The Tune tab lets you select from the following functions: General, White Balance, Light EQ, Colour EQ, Tone Curves, Soft Focus, Effects, Colour LUTs, Split Tone, Post-Crop Vignette and RAW files: Output Colour Space. The General tab lets users choose between colour and Black & White treatments and includes global adjustments to exposure, contrast, saturation (and vibrance), clarity and dehazing. Most of the other adjustments options are self-explanatory but the Light EQ and Colour EQ functions require explanations.
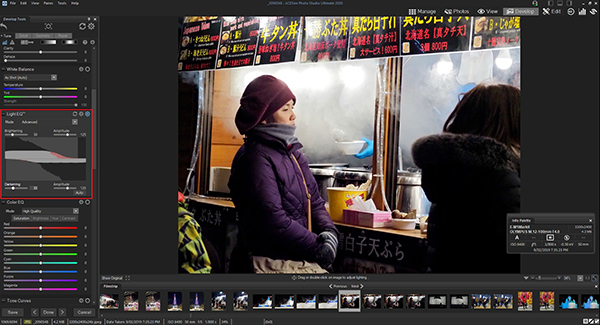
The Light EQ function (outlined in red in the screen grab above) is used to adjust tone levels in images that are too dark or too light; for example, brightening a backlit photo of a person silhouetted against a bright background. Selective adjustments are available for tweaking highlights, midtones and shadows as well as an Auto setting.

Colour EQ (shown above) provides two modes: Standard and High Quality. In the Standard mode, the user places the cursor on an area that required adjustment and drags it up and down to increase or reduce the selected parameter in that area. In the High Quality mode, individual sliders are provided for adjusting red, orange, yellow, green, cyan, blue, purple and magenta plus separate adjustments of each hue for saturation, brightness, hue, and contrast.

Colour EQ adjustments vanish when you’ve selected Black & White in favour of Light EQ adjustments (shown above). Three adjustment modes are provided: Basic, standard and Advanced. In each case, adjustments are reflected in the Tone Curves graph below the adjustment panel.
At any time while you’re working on an image in the Develop mode, you can take Develop Snapshots that save your work up to that point. Unlike presets, snapshots save directly to your image so that when you re-enter Develop mode and switch between them, you can continue editing them and apply them.
The Edit Workspace
After non-destructively adjusting the image in the Develop mode, opening the image in the Edit mode gives you access to all the conventional pixel-based editing tools plus a range of other adjustments. You can open various Panes via the dropdown menu in the top left corner and dock them to the right of the image.

The Edit workspace.
The Layers pane lets you create individual adjustment layers by clicking on the icons in the Adjustment Layers box at the bottom of the pane. Each time you add a layer it will register in this panel. You can show or hide a layer, delete or move it, rename it or merge it with the layer below. Selecting Layer in the top tool bar and then Flatten Image from the dropdown menu will merge all layers into a single image.
The Filter Menu on the left side of the Edit workspace provides tools for Repairing, Adding, adjusting Geometry (perspective, distortion, etc.), Exposure/Lighting, Colour and Detail adjustments. These can be applied to the image as a whole or to individual layers before you click on the Save button in the lower left corner of the workspace.
The Edit mode is also where you can watermark images, add borders, vignette, adjust perspective and make many of the same adjustments as those provided in the Develop mode. You can use the History pane to view the sequence of changes you have made to your image, revert back to previously-applied adjustments or undo or redo all changes made on the current tab.
Photo Studio Ultimate supports 32-bit and 64-bit Photoshop plug-ins in Edit mode but they will only work in the designated versions; i.e. you can only run 64-bit plug-ins in 64-bit versions of Photo Studio Ultimate.
For most tools, ACDSee automatically saves the Last Used settings you applied to an image when you clicked Apply or Done. You can also restore an edited image back to its develop settings. At the end of an editing session, you can choose from several options for saving your image, depending on what you want to do next.
Creative Options
HDR (High Dynamic Range) merging is one of two new features in the latest version of Photo Studio Ultimate, based upon the ability of the software to merge image files. (The other is focus stacking, described below).
If your camera has an HDR mode, it can be used to record the images with a single press of the shutter button. Photo Studio Ultimate recommends shooting raw files, rather than JPEGs but we used RAW+JPEG capture in case the software had issues with the raw files. The software is designed to work with three, five or seven frames, recorded across +/-1EV, +/-2EV or +/-3EV, respectively.

We found it best to load the images to be merged into the Image Basket (shown above), from where they will be easy to select. Selecting the images enable you to access the HDR tab in the Process dropdown menu (outlined in red).

Selected images are merged automatically and the software pops up a small window (shown above) that shows you the completed image. Three blending options are available in the dropdown menu above the image: Dramatic (the default), Detailed and Natural. Examples are shown below.

Dramatic

Detailed

Natural
Overall differences between these options were quite small and the results obtained – and, indeed, how long it took to process them and whether the software could process them – depended on the input files used. While the user manual recommends using raw files as input, we found the software froze when that was done. JPEGs worked quite quickly and more successfully.
We deliberately gave the software potentially challenging images to work with but, for most of the HDR merges we tried, more controls was provided when we converted raw files into editable formats. And the end results were, if anything, better than the HDR merges as a result, as shown below.

A comparison of converted raw files taken of the same scene as the HDR merges above. The top image was converted with ACDSee Photo Studio Ultimate 2020, while the lower one was converted in Photoshop with Adobe Camera Raw.
Focus Stacking can be initiated in the Manage or Edit modes. It’s a little more difficult than HDR mergingas the software can only work if the images are presented in order of their focal distance. In other words, the area in focus in each photo must move consistently in one direction, either from front to back or vice versa (or right to left or left to right). If you don’t do that the program will hang. Pressing the Cancel button as recommended in the user manual achieved nothing.
We waited 20 minutes to see whether four frames we were pretty sure were presented in order would stack. When nothing happened, we had to restart the computer to get out of the problem. (This glitch needs to be fixed so users can exit an action by pressing the Esc button.)

In the Manage mode (shown above), focus stacking is initiated by selecting the group of images you want to combine and clicking on Process>Focus Stack or Ctrl + Alt + S. A reminder pops up to let you know you have to select your images according to the order of their focal distance. If you press Proceed, the software will combine the images and display a Save Image As dialog box that lets you choose a location, enter a name, and choose an image format for saving the stacked image.

In the Edit mode (shown above), you must first select the images in Manage mode and then choose Process> Load Files into Stack. The images will open in the Edit mode. Select Layer>Focus Stack and press Proceed to merge the images.
If you have disabled Keep Layer Stack, all other layers will be removed and the stacked layer will be the only remaining layer in the Layers pane. If you have enabled Keep Layer Stack, the focus stack layer will appear as the top layer in the Layers pane.

Snapshooters who are keen on special effects will find plenty to sample in Photo Studio Ultimate (shown above). As well as those listed above, users can also create their own effects via the Convolution filter and save them as presets for future use.
365 Mode
The 365 mode is used to upload your images to 365.acdsee.com, an image sharing and storage service that lets you upload and browse through your online images without having to launch an Internet browser. Users are required to create an account and choose between a Home Plan and Personal Plan.
Home Plans cost US$89 per year (or $8.90 per month) and provide 50GB of cloud storage for up to five users. Personal Plans cost US$69 per year (or $6.90 per month) and provide 10GB of storage for a single user. Both plans include free upgrades for the software you use.
Conclusion
Please Login or Register to access the Conclusion.
SPECS
Hardware: Intel® or AMD processor with 64-bit support; Intel i3 or better processor recommended; DirectX 10 compatible graphics adapter
Systems compatibility: Microsoft Windows 7 (SP1) or higher (64-bit editions only)
Display support: 1024 x 768 display resolution (1920 x 1080 recommended)
Disk space requirement: 2 GB of available hard disk space
Minimum RAM: 2 GB RAM (6 GB RAM or more recommended); 512 MB Video RAM (VRAM)
Supported image formats: Read: ABR, ACDC, AFPHOTO, ANI, DCX, EMF, GIF, ICO, JPG, JP2/JPC, JPG, PBR, PCX, PCT, PNG, PSD, TGA, TIFF, WBMP, WEBP, WMF; Write: ACDC, BMP, GIF, JP2, JPG, PCX, PNG, PSD, WBMP, WEBP, TGA, TIFF
Raw formats supported: ARW, CR2, CR3, cRAW (Sony), CRW (Canon). DCR, DNG, ERF (Epson), HDR, HEIF (EXIF support only), MRW, NEF, ORF, PEF, RAF, RAW, RWL, sRAW, SRW,
Computer interface: Internet connection and registration are necessary for required software activation and access to online services
Batch processing: Yes, for editing, renaming and exporting
Export to social media: Yes via email, Flickr, SmugMug, Zenfolio and other FTP sites
Mobile device support: Requires ACDSee Mobile Sync app
Distributor: ACD Systems International Inc.
Rating
RRP: US$149.99 for Lifetime License (multi-application subscription plans and product packs also available)
- Features: 9.0
- Ease of Use: 8.3
- Versatility: 8.9
ACDSee
ACDSee is an image organizer, viewer, and image editor program for Windows, macOS and iOS, developed by ACD Systems International Inc. ACDSee was originally distributed as a 16-bit application for Windows 3.0 and later supplanted by a 32-bit version for Windows 95.[1] ACDSee Pro 6 adds native 64-bit support. The newest versions of ACDSee incorporate modern Digital Asset Management tools like Face Detection & Facial Recognition (Ultimate 2019).
ACDSee's main features are speed, lossless RAW image editing, image batch processing, editing metadata (Exif and IPTC), rating, keywords, and categories, and geotagging. Judging the image quality of a picture is fast due to next/previous image caching, fast RAW image decoding and support for one-click toggling between 100% and fit screen zoom mode anywhere inside the image. Most of ACDSee's features can be accessed via keyboard.
ACDSee displays a tree view of the file structure for navigation with thumbnail images of the selected folder, and a preview of a selected image. ACDSee started as an image organizer/viewer, but over time had image editing and RAW development (Pro version) capabilities added. The thumbnails generated by ACDSee are cached, so that they do not need to be regenerated, and stored on disk as a database.[2]
ACDSee's database can be backed up, and exported/imported as XML or binary. Each database and its associated thumbnails can also be loaded and saved as separate entities.
The photo manager is available as a consumer version, and a pro version which provides additional features,[3] and additional image editing capabilities.[4] In 2012, ACDSee Free was released, without advanced features.[5]
History[edit]
ACDSee was first released in 1994 as a 16-bit application for Windows 3.1. In 1997 32-bit ACDsee 95 was released for Windows 95. 1999 saw the release of ACDSee 3.0. Version 5.0 was released in 2002, and 7.0 in 2005.[6] Development of this line continues, with version 20.0 released in 2016.
This early version of ACDSee is sometimes known as ACDSee Classic or ACDSee 32.
ACDSee Pro was released on 9 January 2006 aimed at professional photographers. ACD Systems decided to separate its core release, ACDSee Photo Manager, into two separate products; ACDSee Photo Manager, aimed at amateur photography enthusiasts, and ACDSee Pro which would target Professionals by adding a new package of feature sets. ACDSee Pro's development team is based out of Victoria, British Columbia and was originally led by Jon McEwan, and more recently by Nels Anvik, who oversaw ACDSee Pro 2.5 through to Pro 5. The original ACDSee software was created by David Hooper, who also added a number of features to ACDSee Pro, such as Lighting correction (formerly known as Shadows and Highlights) and Develop Mode (in version 2.0). ACDSee Pro is written in C++, with the interface built using MFC.
Free version[edit]
In August 2012, ACD Systems released ACDSee Free, which retains all viewing features for the most common image formats (BMP, GIF, JPEG, PNG, TGA, TIFF, WBMP, PCX, PIC, WMF, EMF); it lacks a thumbnail browser, and support for RAW and ICO formats.[5] A reviewer at BetaNews found it "fast, configurable and easy to use".[5] The version runs on Windows XP or newer.[7] Product was discontinued in August 2013.[citation needed]
See also[edit]
References[edit]
- ^Aquino, Grace (1 November 2007). "ACDSee Pro 2 Photo Management Software". The Washington Post. Retrieved 16 March 2016.
- ^Phillips, Jon (June 2000). "Image Archivists: Fast Flipping through Thumbnails is Fun, Fun, Fun". Maximum PC. Future US, Inc.5 (6): 88. ISSN 1522-4279.
- ^Chan, Adrian (April 2008). "Alternatives &choices: ACDSee Pro 2 Photo Manager". PHOTOVIDEOi. SPH Magazines: 30. ISSN 1793-2394.
- ^"Best Fit Guide"(PDF). ACDSee. Archived(PDF) from the original on 1 June 2010.
- ^ abcWilliams, Mike (11 August 2012). "Need a quick-and-easy image viewer? Try ACDSee Free". BetaNews.com.
- ^Elias, Rupinder Matharoo, Danhui Wu, Emily. "ACD Systems - Photo Editing Management Software". ACDSee Community. Retrieved 9 February 2017.
- ^"ACDSee Free system requirements". ACDSee.com.
External links[edit]
ACDSee Free for Windows
ACDSee Free is a lightweight image viewer for Windows.
If you think that the stock Windows Photo Viewer is too slow, then you may want to give ACDSee Free a try. ACDSee Free is a simple photo viewer that doesn't feature a bunch of bells and whistles that slow it down.
Apps like Adobe Lightroom are great for managing and touching up huge image libraries but they are often slow and resource heavy. ACDSee Free gives you a great image viewer that responds quickly. Zoom in and out of photos with the '+' and '-' keys or quickly set it as your desktop background from the 'Tools' menu.
Another cool feature of ACDSee Free is its print controls. Once you're done viewing your photographs, you can quickly access print settings to make sure it fits on the specific type of paper you're using. There are tons of print options for users to tinker with to get the best possible results.
ACDSee Free's greatest strength is also its greatest weakness. Yes, ACDSee Free is lightweight and quick but Windows Photo Viewer isn't a slouch either. Since Windows Photo View is included with Windows, there really isn't a good reason to seek out an alternative photo viewer.
Overall, ACDSee Free is a good, speedy photo viewer but it could have included a few more features to differentiate itself from the stock Windows Photo Viewer.
What’s New in the acdsee free Archives?
Screen Shot

System Requirements for Acdsee free Archives
- First, download the Acdsee free Archives
-
You can download its setup from given links:

acdsee free Archives & Apps for Laptop & PC Free Download

acdsee free Archives& Crack
