
Driver pack Archives
driver pack Archives
Category: SUSE Linux Enterprise Virtual Machine Driver Pack
SUSE Blog
Akademia SUSE: Silne strony i przyszłość Linuksa
Read More
Categories:Announcements, Enterprise Linux, Events, Expert Views, Server, Server and Application Virtualization, Software-defined Infrastructure, SUSE in the Cloud, SUSE Linux Enterprise, SUSE Linux Enterprise High Availability Extension, SUSE Linux Enterprise Live Patching, SUSE Linux Enterprise Point of Service, SUSE Linux Enterprise Real Time Extension, SUSE Linux Enterprise Server, SUSE Linux Enterprise Server for Amazon EC2, SUSE Linux Enterprise Server for ARM, SUSE Linux Enterprise Server for Azure, SUSE Linux Enterprise Server for High Performance Computing, SUSE Linux Enterprise Server for SAP Applications, SUSE Linux Enterprise Server for VMware, SUSE Linux Enterprise Server for z Systems and LinuxONE, SUSE Linux Enterprise Server on IBM Power Systems, SUSE Linux Enterprise Server with Expanded Support, SUSE Linux Enterprise Server Workstation Extension, SUSE Linux Enterprise Virtual Machine Driver Pack, Technical Solutions, Virtualization

Drivers
by PcHippo · Published October 19, 2018 · Last modified May 1, 2020
Cobra Drivers Pack 2013 Free Download Full Version + ISO
Cobra Drivers Pack 2013 free download latest version for windows XP/7/8. Get offline installer setup direct download link of cobra driver pack 2013 for...

Drivers
by PcHippo · Published August 9, 2018 · Last modified April 24, 2020
DriverPack Solution 16 ISO Download
DriverPack Solution 16 ISO free download full version for windows XP/Vista/7/8.1/10. Get offline installer setup direct high speed download DriverPack Solution online 2016 version...
After completing the Windows 2003 or Windows 2008 installation and rebooting the operating system, you should review the following post installation tasks and, if necessary, perform the tasks that are applicable to your system.
Downloading Server-Specific Drivers
This section describes how to download the server-specific driver packages needed for Windows Server installations.
|
 Download the Server-Specific Drivers
 1. Go to the driver download site for your server.
2. Choose one of the following download options:
- If you are installing the server-specific drivers using media, download to a hard drive location or media that will be accessible during the installation. Extract the following sub-packages contained in :
- _x_x_x (contains Intel SATA drivers, LSI SAS/SATA RAID drivers, Sun StorageTek SAS/SATA RAID drivers, QLogic SAN drivers, and Emulex SAN drivers). You will use this file to create driver media for your installation of Windows Server 2003.
- _x_x_x (program to install all server-specific device drivers after installing Windows Server) You will use this file to install all of the server-specific drivers.
- _x_x_x (for experts only, server-specific driver archive for Windows Server, English). Download this file if you want to incorporate Sun server drivers into a Remote Installation Service (RIS) image.
- _x_x_x (for experts only, supplemental software archive). Download this file if you want to incorporate the supplemental software into a PXE installation.
- If you are installing server-specific drivers using a PXE server (advanced installation), extract the contents of the file on to the PXE server.
| Note - The _x_x_x number identifies the version of the package (for example, ). |
3. Proceed to Installing Server-Specific Device Drivers.
Installing Server-Specific Device Drivers
Sun provides a wizard to install Sun server-specific device drivers and supplemental software. The server-specific device drivers are provided to support optional devices that you added to the server when you completed the hardware installation or that you may want to add in the future.
The Sun Server Installation Package wizard may be started using one of the following methods:
- From the main menu of your server’s Tools and Drivers CD/DVD, or
- From the xxx executable file
| Note - Using a recently downloaded xxx to update the drivers ensures that you update the server-specific drivers with the latest versions available. |
|
1. Start the Sun Installation Package software using one of the following methods:
- Insert the Tools and Drivers CD/DVD into the server’s CD/DVD drive.
The CD will start automatically. At the main menu, select Install Drivers and Supplemental Software.
Or
- If you downloaded the _x_x_xfile from the Sun download site (as described in Downloading Server-Specific Drivers), ensure that it has been copied to a local drive on the server, and then run the_x_x_x application.
The Sun Server Install Pack dialog box displays.
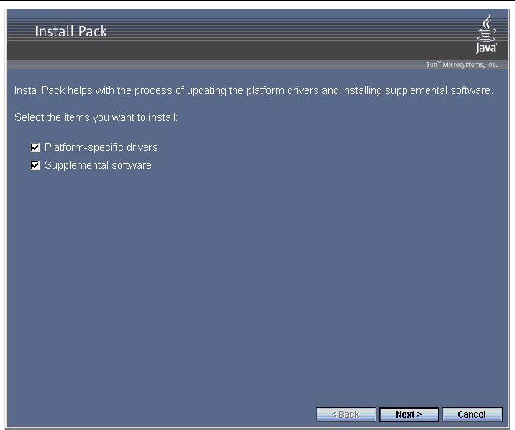
2. Click Next to accept the default settings.
Note that you should always accept the “platform-specific drivers” to ensure that the most recent versions of the drivers are installed.
The Install Pack notice dialog box displays.
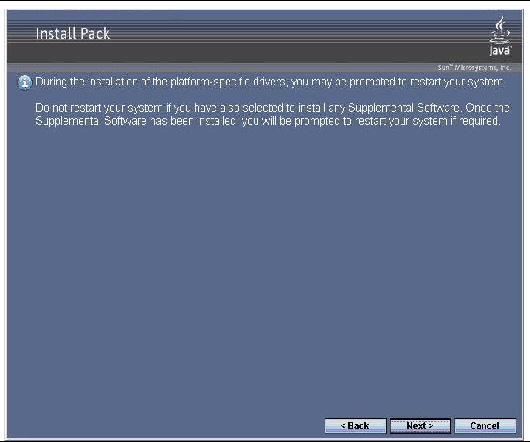
3. Review the Important Note and then click Next.
The Welcome to the Sun Server Installation Wizard displays.
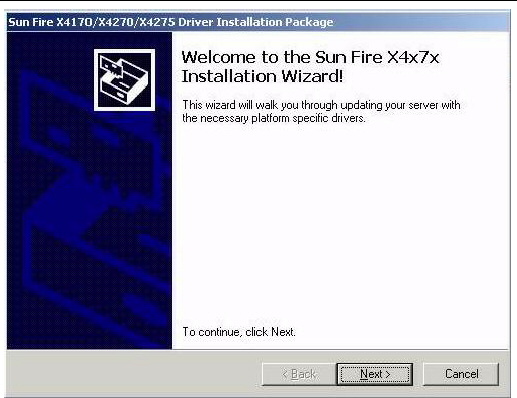
4. Click Next.
The End User License Agreement page appears.
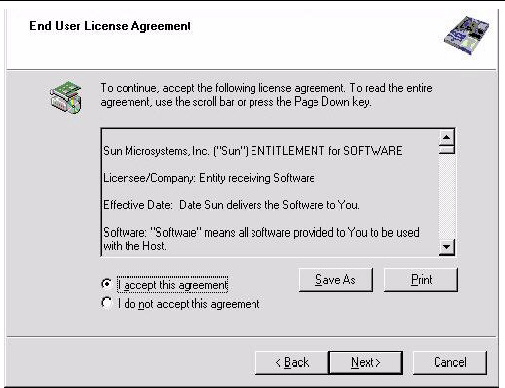
5. Select “I accept this agreement”, and then click Next.
The platform-specific drivers are installed.
In the following screen a green check mark verifies that each driver has been successfully installed.
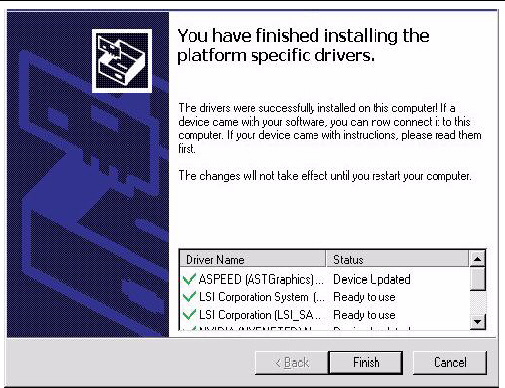
6. Click Finish.
The System Settings Change dialog box displays.
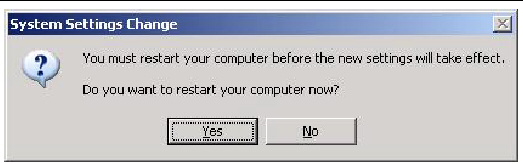
| Note - If you plan to install Supplemental Software (highly recommended), do not restart your system at this time. Once the Supplemental Software has been installed, you will be prompted to restart the system. |
7. If you accepted the default settings in Step 2, click No to proceed to Installing Supplemental Software.
If you are not installing the Supplemental Software, click Yes to restart your computer.
Installing Supplemental Software
TABLE 4-1 identifies the optional supplemental software components available for your server.
During the supplemental software installation wizard, you can choose to install all the supplemental software (listed in TABLE 4-1) on your system by choosing a Typical installation; or, you can individually select the supplemental software (listed in TABLE 4-1) to install by choosing a Custom installation. For instructions for installing the supplemental software, see Install the Supplemental Software.
Available Supplemental Software Components | Available for Windows 2003 | Available for Windows 2008 | Servers with LSI Integrated RAID Controller | Servers with Adaptec Integrated RAID Controller | Servers with Intel Integrated Disk Controller |
|---|---|---|---|---|---|
LSI MegaRAID Storage Manager Allows you to configure, monitor, and maintain RAID on the SAS internal RAID Host Bus Adapter. For information on using MSM, refer to the Sun LSI 106x RAID User’s Guide for your server available at: . | Yes | Yes | Typical | Not applicable | Not applicable |
Sun STK RAID Manager Allows you to configure, administer and monitor RAID on the Adaptec SG-XPCIESAS-R-IN integrated RAID controller. For information on the Sun STK RAID Manager, see the Sun documentation web site at: | Yes | Yes | Not applicable | Typical | Not applicable |
IPMItool command line utility This utility reads the sensor data repository (SDR) and displays sensor values, System Event Log (SEL), Field Replaceable Unit (FRU) inventory information, gets and sets LAN configuration parameters, and performs chassis power control operations via the BMC (also called the Service Processor). | Yes | Yes | Typical | Typical | Typical |
IPMI System Management Driver* (Sun Microsystems)-- Windows driver that reads the sensor data repository (SDR) and displays sensor values, System Event Log (SEL), Field Replaceable Unit (FRU) inventory information. This driver is available from the Install Pack media only. Note - This supplemental software is intended for Windows Server 2003 SP2 only. For Windows 2003 R2 SP2, use the inbox Microsoft Driver. For driver configuration instructions, see Configuring Microsoft’s IPMI System Management Driver for Windows Server 2003 R2 SP2. | Yes (Non-R2 only) |
| Typical | Typical | Typical |
Intel NIC Teaming Enables the network interfaces on a server to be grouped together into a team of physical ports called a virtual interface. | Yes | Typical | Typical | Typical | Typical |
|
| Note - If you have already installed the supplemental software, running the installation again will not necessarily reinstall the supplemental software. It may result in the components being removed. Carefully review the dialog boxes during supplemental software installation to ensure that the results are as expected. |
1. Do one of the following:
- If you did not select the when you ran the procedure Installing Server-Specific Device Drivers, refer back to that procedure and run it again, but this time accept the default settings in Step 2 (the default is to install the supplemental software), and select No in Step 7.
The Supplemental Software dialog box displays. Proceed to the next step.
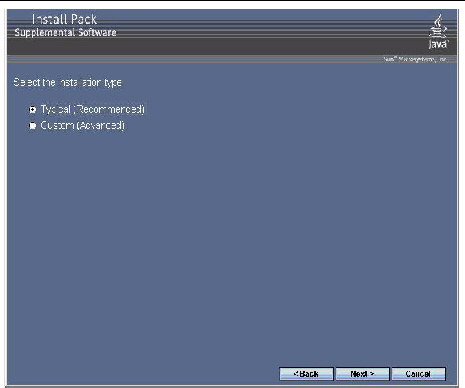
2. Click Next to accept the Typical settings, or select Custom to choose the options to install (see descriptions in TABLE 4-1).
Component installation wizards will guide you through the installation of each of the selected supplemental software components.
3. Once the supplemental software has been installed, click Finish.
4. Click Yes at the System Setting Change dialog box to restart your system.
If you ran the Sun Server Installation Package software from the Tools and Drivers CD/DVD, remove the CD from your system now.
5. If you are running Windows Server 2003 R2 SP2 and you have installed the IPMItool supplemental software, you need to configure this driver before you can run the IPMItool.
For instructions, see‘Configuring Microsoft’s IPMI System Management Driver for Windows Server 2003 R2 SP2.
Configuring Microsoft’s IPMI System Management Driver for Windows Server 2003 R2 SP2
If you are running Windows Server 2003 R2 SP2 and you have installed the IPMItool supplemental software, you need to configure this driver before you can run the IPMItool.
|
Follow these steps to configure the IPMI driver on the Windows Server 2003 R2 SP2 operating system.
1. On your Windows Server 2003 R2 SP2 system, perform the following steps to configure the Microsoft IPMI System Management driver:
a. In Control Panel, open Add/Remove Programs.
The Add/Remove Programs dialog is displayed.
b. Click Add/Remove Windows Components.
The Windows Components Wizard dialog is displayed.
c. Highlight Management and Monitoring Tools component, and then click Details.
The Management and Monitoring Tools page is displayed.
d. In the Management and Monitoring Tools page, perform one of the following:
- If the subcomponent check box is already selected, skip to Step 2.
- If the subcomponent check box is not selected, select it.
The 3rd Party Drivers warning dialog appears.
e. Read the warning and then click OK.
The Management and Monitoring Tools page is displayed.
f. Click OK.
The Windows Components Wizard dialog is displayed.
g. Click Next.
The Hardware Management component is installed.
2. Instantiate the IPMI System Management driver.
a. In the Taskbar, click Start, and then click Run.
The Run dialog box is displayed.
b. In the Open list, type:
c. Click OK.
The IPMI System Management driver is instantiated.
3. Open Device Manager and verify that the Microsoft Generic IPMI device exists under the System section.
For information about using the IPMItool, refer to your Sun Integrated Lights Out Manager 2.0 User’s Guide (820-1188). For more information on standard IPMItool commands, see:
Enable the Option for Wake On LAN
After installing the operating system, you can optionally enable the Wake On LAN (WOL) option in the BIOS Setup utility. This feature enables you to power on the server from another location over the network. For details about the requirements for enabling WOL, see “Wake On LAN - Remote Power On” in the Sun Fire X4170, X4270, and X4275 Servers Service Manual.
Configure the TPM Option
The server supports Trusted Platform Module (TPM), however, you must configure it before you can use it. For instructions on how to configure TPM, see the “Configuring Support for TPM” in the Sun Fire X4170, X4270, and X4275 Servers Service Manual.
Copyright © 2009 Sun Microsystems, Inc. All rights reserved.
What’s New in the driver pack Archives?
Screen Shot

System Requirements for Driver pack Archives
- First, download the Driver pack Archives
-
You can download its setup from given links:


