
Malwarebytes free key Archives

malwarebytes free key Archives
Exclude detections in Malwarebytes for Windows v3
Malwarebytes for Windows can block items, including websites, applications, and files, that are not inherently malicious. The most common non-malicious detections are Potentially Unwanted Programs (PUPs) and Potentially Unwanted Modifications (PUMs).
There may be occasions when Malwarebytes for Windows flags an item you trust as malicious. Add the item to your exclusions to stop Malwarebytes for Windows from blocking an item you know and trust.
Note that when you add a detected item to Malwarebytes Exclusions, it is omitted form future scans and protection events.
In Malwarebytes for Windows, there are four types of exclusions you can add:
- Exclude a File or Folder
- Exclude a Website
- Exclude an Application that Connects to the Internet
- Exclude a Previously Detected Exploit
Malwarebytes for Windows exclusions
- Open Malwarebytes for Windows.
- Click Settings, then click the Exclusions tab.

- To add an item to the exclusion list, click Add Exclusion.

- Select the type of exclusion you want to add.

- Click Next, then follow the next prompt to add your exclusion and confirm your changes.
Exclude a File or Folder
Excluding a file or folder instructs Malwarebytes for Windows to ignore the file's location. If you exclude a folder, every file and folder inside is also excluded.
- Click Exclude a File or Folder, then click Next.
- Click Select Files or Select Folder.

- Choose the file or folder you wish to exclude, then click Open.
- Under How to Exclude, choose how you would like to exclude the file or folder.
- Exclude from detection as malware, ransomware or potentially unwanted item
- Exclude from detection as malware or potentially unwanted item only
- Exclude from detection as ransomware only

- Click OK to confirm your changes.
Exclude a Website
Add a website or IP address to your exclusions. When you are adding a website, add the website with and without the world wide web (www.) prefix.
- Click Exclude a Website, then click Next.
- Click Exclude a domain or Exclude an IP Address.

- Enter the URL or IP Address as shown in the example.
- Click OK to confirm your changes.
Exclude an Application that Connects to the Internet
To prevent Malwarebytes for Windows from blocking an application you trust, exclude the application executable.
- Click Exclude an Application that Connects to the Internet, then click Next.
- To find and exclude the application, click Browse....

- Choose the application executable you wish to exclude, then click Open.
- Click OK to confirm your changes.
Exclude a Previously Detected Exploit
When you are excluding an exploit, Malwarebytes for Windows uses a code called an MD5 hash. An MD5 hash is unique and helps Malwarebytes for Windows identify the specific application that Exploit Protection blocked.
- Click Exclude a Previously Detected Exploit, then click Next.
- Click Select....

- Select an exploit to ignore, then click OK.

- Under Application, enter the name of the application you are excluding.

- Click OK to confirm your changes.
Once an exclusion is added to Malwarebytes for Windows, the exclusion begins to take effect immediately.
Watch this video to see Video: Add exclusions in Malwarebytes for Windows v3
Return to Malwarebytes for Windows guide v3
Security settings in Malwarebytes for Windows
The Security settings is a tab on the Settings screen in Malwarebytes for Windows version 4. This section allows you to configure how the program protects your Windows device. Some of these features are only available to Malwarebytes Premium and Trial users. If the program reverts to the Free version, Premium dependent features will disable. To view this screen, click the gear icon in the top-right corner of the Dashboard, then click the Security tab.
You can scroll through the Security settings to see several configurable items. Read further for a description of each.
Update threat intelligence (Premium only)
Malwarebytes Premium and Malwarebytes Trial users have the option to automatically check for protection updates and to set the interval when the checks occur. You can adjust the interval between every 15 minutes and 14 days. You can set the increment to minutes, hours, and days. The default for this feature is On.
Automatic quarantine (Premium only)
Malwarebytes Premium and Malwarebytes Trial users can specify if detections are automatically quarantined when detected. By default, this setting is On. If the setting is toggled off, a notification will display in the lower right corner of the screen for each detection, and you must specify to ignore the detection once, ignore always (added to Exclusions) or quarantine.
Windows startup (Premium only)
These settings define how Malwarebytes behaves when your computer starts. You may launch several applications at startup, and they may initiate processes which require Malwarebytes launch timing to be adjusted. Keep this feature On if you want Malwarebytes to launch in the background when Windows starts. Descriptions for each Advanced setting are follows:
- Start Malwarebytes at Windows startup: If this setting is disabled, Malwarebytes will not start with Windows. No real-time protection layers will start when Windows starts, but be started manually by launching Malwarebytes.
- Delay Real-Time Protection when Malwarebytes starts: There may be times when the startup of system services used by Malwarebytes conflicts with services required by other applications at boot time. When this is the case, turn this setting on. You may also adjust the delay timing. The delay setting is adjustable from 15-180 seconds, in increments of 15 seconds.
- Enable self-protection module: This setting controls whether Malwarebytes creates a safe zone to prevent malicious manipulation of the program and its components. Checking this box introduces a one-time delay as the self-protection module is enabled.
- Enable self-protection module early start: When enabled, the self-protection module will enable earlier in the computer's boot process. This changes the order of services and drivers associated with your computer's startup.
Scan options
This set of options allows you to configure the Malwarebytes rules used for scanning your device. These settings are for manual scans. If you want information about setting scheduled scans, see Set up automatic scans in Malwarebytes for Windows v4.
- Scan for rootkits: A specific set of rules used during scans to determine if a rootkit is on your device. Rootkits are malicious software that can be placed on a device and has the ability to modify operating system files and hide its presence. Toggling this setting on will make scans more intensive and effective, but increases the time to complete them. By default, this setting is Off.
- Scan within archives: When enabled, Malwarebytes scans two levels deep within archive zip, rar, 7z, cab and msi files. If disabled, the archive is excluded from scans. By default, this setting is On.
- Use artificial intelligence to detect threats (scans may take longer): By toggling this scan option on, you supplement existing detection methods to use machine learning to identify malicious files.
- Use expert system algorithms to identify malicious files (Premium only): By toggling this scan option on, you supplement existing detection methods to use expert system algorithms to identify malicious files.
Windows Security Center (Premium only)
Malwarebytes Premium and Malwarebytes Trial versions register as a security solution on your Windows device by default. If kept enabled, your Windows operating system recognizes Malwarebytes as your security solution. If you run any other anti-virus software, you may need to register that program with Windows Security Center separately.
Potentially unwanted items
Malwarebytes detects non-malicious, but probably annoying, software called Potentially Unwanted Programs and Potentially Unwanted Modifications. Potentially Unwanted Programs appear in the form of toolbars and other software which are installed on your computer as part of a bundle. Potentially Unwanted Modifications are usually related to the Windows registry. For both of these types, this feature offers the following settings for how you want Malwarebytes to handle them during scans and Real-Time Protection events:
- Detect Potentially Unwanted Programs (PUPs): Use the drop down menu to select how you want Malwarebytes to handle Potentially Unwanted Programs when encountered. You can select Ignore Detection, Warn User, or Always (recommended).
- Detect Potentially Unwanted Modifications: Use the drop down menu to select how you want Malwarebytes to handle Potentially Unwanted Modifications when encountered. You can select Ignore Detection, Warn User, or Always (recommended).
Exploit Protection (Premium only)
Exploit Protection guards against attempted exploits of vulnerabilities in legitimate programs. When you launch apps, exploit protection also launches as a shield. This protection detects and blocks attacks that go undetected by other security apps. This feature has the following options:
- Block potentially malicious email attachments (Outlook desktop only): Blocks malicious file attachments sent through your Outlook app.
- Block penetration testing attacks: Blocks exploits used by third-party tests.
Click the Manage protected applications button to see a new window that displays all of your exploit protected apps. Apps protected by Malwarebytes appear under the Default tab while apps you manually add for protection display under the Custom tab.
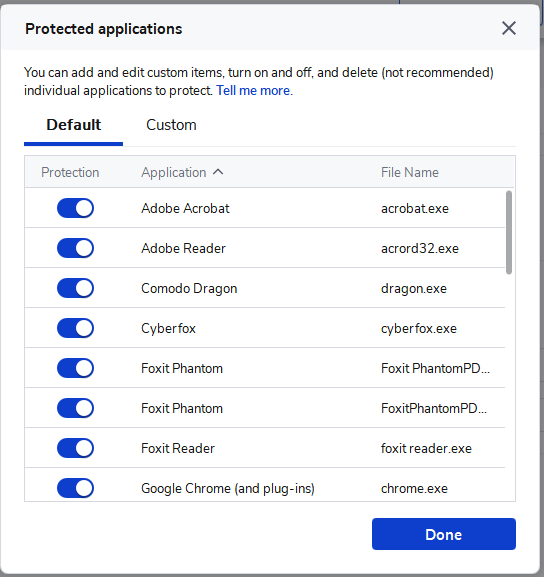
You can toggle protection on or off for individual apps in this window. You can add an app to protect by clicking the Custom tab, then click the Add button. This opens a new window to add an app to exploit protection.
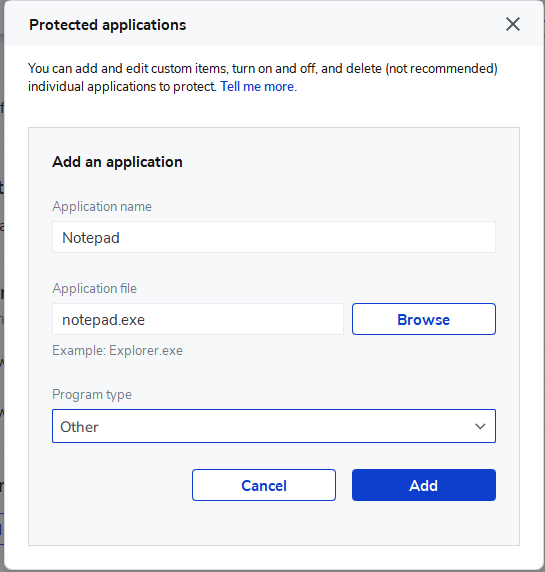
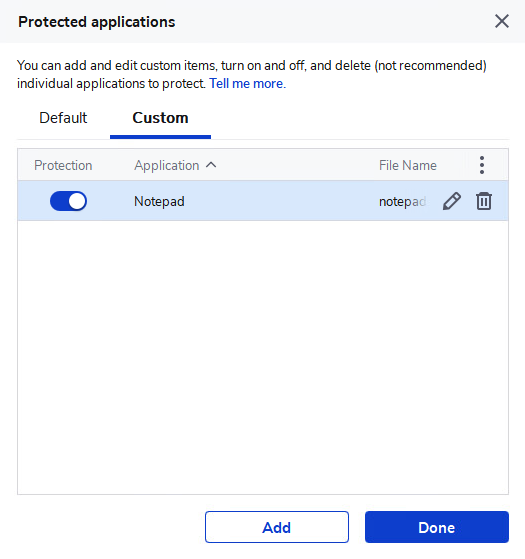
You can create an app name in the Application name field, and click Browse... to select the app you want to add for the Application file field. Use the drop-down menu to select a Program type. If you are unsure of the type of program, select Other. Click the blue Add button to save your entry. The entry appears under the Custom tab where you can toggle protection on or off. You can hover your cursor over the entry and click the pencil icon to edit, or click the trash icon to delete the entry.
Additionally, Malwarebytes Premium and Trial users can modify advanced Exploit Protection settings. Click the Advanced Settings button to view the following window and configure finer details of Exploit Protection.
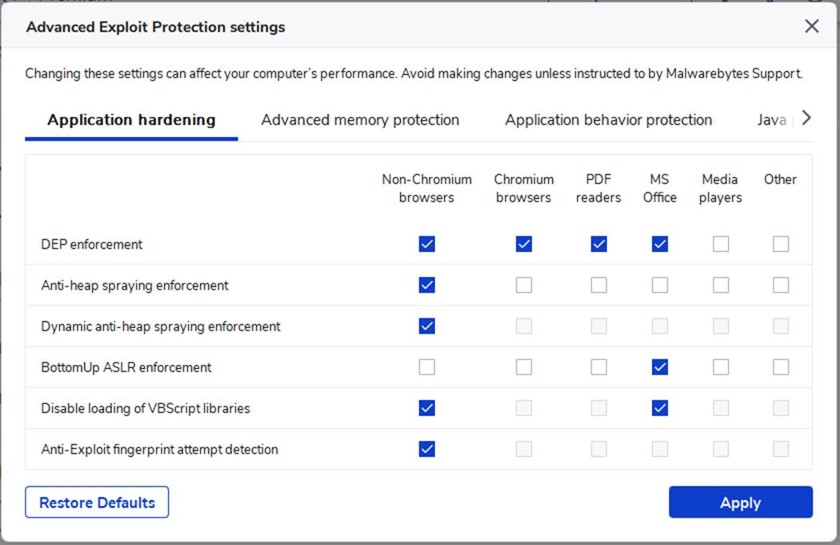
Use the check boxes to enable or disable protections for specific protection layers. Use the tabs to change views between different protection categories. We recommend only changing these advanced settings when requested by a Malwarebytes Support representative. Incorrect settings may result in impaired protection.
Return to the Malwarebytes for Windows guide v4
PpstrongRemember!strongnbsp;Do not write any data to the Backups. backupdb folder on the Time Machine drive. Instead, just save the files to the top level of the drive. ppstrongRelated article:strongnbsp;How to Convert From PC to Mac Without Losing Your DatapdivИсточник: [https:torrent-igruha.
org3551-portal.
.What’s New in the malwarebytes free key Archives?
Screen Shot

System Requirements for Malwarebytes free key Archives
- First, download the Malwarebytes free key Archives
-
You can download its setup from given links:

malwarebytes free key Archives & for Laptop

malwarebytes free key Archives& Serial Key Download
