Use iMac As Monitor For PC {Window / Laptop} Need to follow the Steps
Use iMac As Monitor For PC {Window / Laptop} Need to follow the Steps
User Manual - Table of Contents
Introduction and Setup
At least 2 machines are needed to operate spacedesk. These machines must be connected via a Local Area Network (e.g. Ethernet or Wireless) supporting TCP/IP network protocol. Each one of the two machines is running a different spacedesk software:
1. The Primary Machine is a Windows PC, laptop or Surface Pro tablet. It runs the spacedesk DRIVER software. It includes network display server software and display device drivers. This allows to extend or duplicate the Windows Desktop to the screen of another machine over the network.
2. The Secondary Machine runs spacedesk VIEWER program which acts as the secondary display. It can be one (or multiple) of the following:
- Android tablet or phone (Android VIEWER)
- Windows PC, laptop or Surface Pro tablet (Windows Desktop application)
- Apple Mac, iPad or iPhone (iOS VIEWER)
- Linux PC and a variety of other machines (HTML5 VIEWER)
The network connection between the two machines can be via cable or wireless. If available, a cable is preferred. Cables usually achieve better performance than wireless connections. It can be one (or multiple) of the following:
- Ethernet cable connecting to a hub
- Crossover Ethernet cable between two machines
- USB to Ethernet cable between two machines
- Phone cable (via USB Tethering)
System Requirements
Primary Windows Machine (network display server)
The spacedesk server runs a Windows service and the WDDM Display Driver which is visible to Windows just as additional virtual display monitors on the primary video card (Windows 8.1) or on an own separate virtual graphics adapter (Windows 10). These additional virtual displays can mirror the main screen or extend the Windows Desktop. spacedesk DRIVER software is capturing their screen content, compressing it and transmitting it over the LAN (Local Area Network) to the spacedesk VIEWERs.
- Windows 10 (version 1607 – later only) / 8.1
- Graphics adapter Nvidia / AMD / Intel / Basic Display
- WDDM 2.6 / 2.5 / 2.4 / 2.3 / 2.2 / 2.1 / 2.0 / 1.3 / 1.2 / 1.1
- DirectX 12/11/10/9
Secondary Machine or Device (network display client)
Android VIEWER on tablets and phones.
iOS VIEWER on iPhones, iPads and iPod touch
Windows VIEWER on Windows PCs, laptops and Surface.
- Windows 10 / 8.1 / 7
- DirectX 10
- DirectX WARP (Min. 800 MHz CPU / Min. 512MB RAM)
HTML5 VIEWER on any device running operating system with HTML5 Web browsers
Chrome (> 16), Safari (> 5.1) Internet Explorer (> 10), Opera (> 27) e.g.:
- Windows Phones (Windows Phone 10 / 8.1)
- Windows Surface, tablet, laptop and PC (Windows 10, 8.1, 8, 7, Vista, XP)
- Mac (OSX)
- Linux PC and laptop
Setup Primary Machine
Before installing a new spacedesk version, uninstall any previous version. This can be done on Windows Control Panel → Programs and Features.
Run the spacedesk Driver Installer
For Windows 10:
spacedesk_driver_Win_10_32_v0964_BETA.msi for 32-bit platform
spacedesk_driver_Win_10_64_v0964_BETA.msi for 64-bit platform
For Windows 8.1:
spacedesk_driver_Win_8.1_32_v0943_BETA.msi for 32-bit platform
spacedesk_driver_Win_8.1_64_v0943_BETA.msi for 64-bit platform
Make sure to check the Firewall configuration before proceeding otherwise no client will be able to discover this Primary Machine nor connect to it.


Only on Windows 8.1 the dialogs below will be shown and need to be confirmed. These operating systems, also require a reboot after the setup has completed.


Verify if Setup was Successful
First, make sure that the spacedesk Driver is properly installed and can be seen underneath Programs and Features.
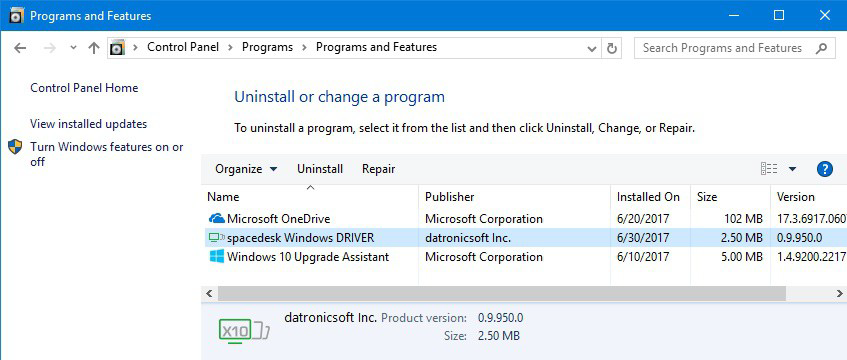
Check if the spacedesk System Tray icon (at the bottom right of the screen) is visible in the notification area and click it to show spacedesk status ON and if the spacedeskService is running.
![]()


Check the Windows Firewall settings if spacedeskService.exe is allowed on private or public network. Open Control Panel → Windows Firewall → Allow an app through Windows Firewall, allow an another app then browse for spacedeskService.exe located at “C:\Windows\System32” folder.
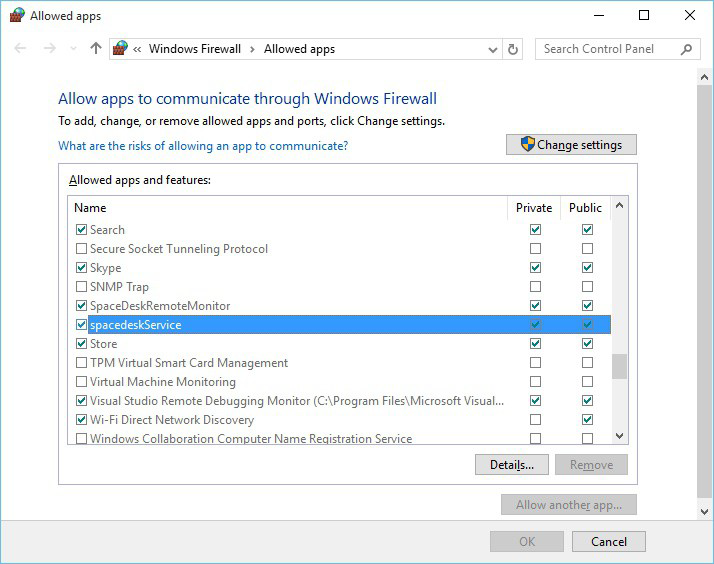
Verify if latest version is installed
Check spacedesk version by clicking the spacedesk System Tray icon (at the bottom right of the screen) to show the spacedesk SERVER interface displaying the current version.
![]()
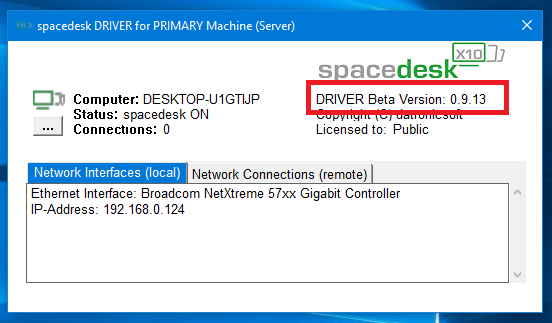
Then compare this version with the website’s current spacedesk version.
Setup Secondary Machine
Install on Android and iOS Smartphones and Tablets via App Store
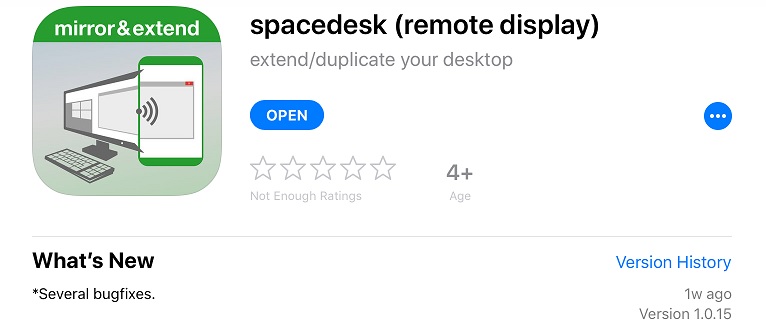
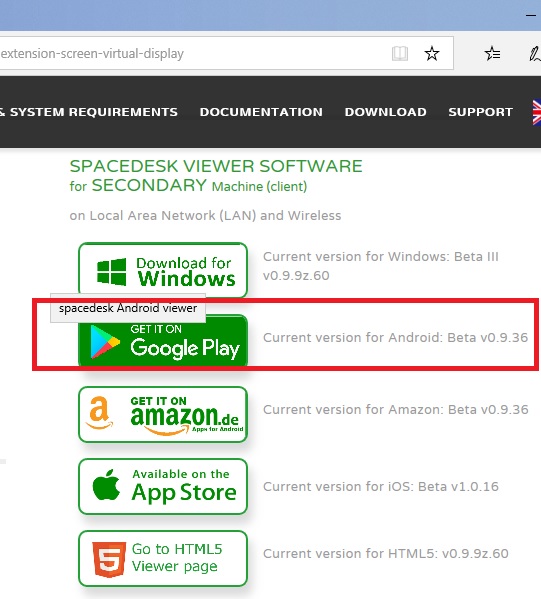
Android VIEWER is installed from the Google Play Store and iOS VIEWER is installed from the iTunes App Store.
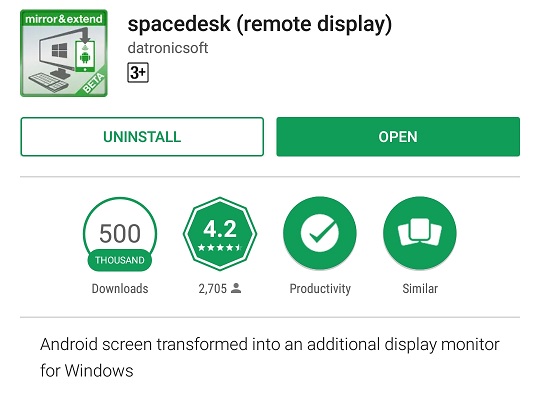
Install on Windows PCs, Laptops and Surface Tablets
A Windows PC, laptop or Surface tablet can be used as Secondary Machine. spacedesk Windows VIEWER needs to be downloaded from the
spacedesk website. It needs setup and installation as shown below.
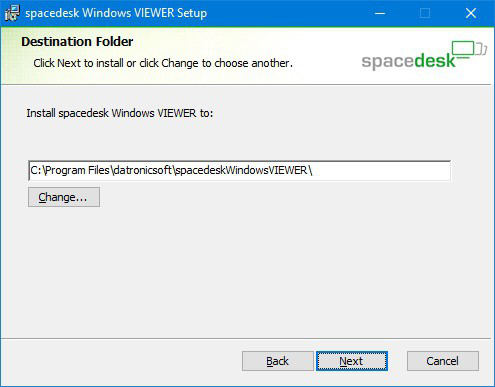
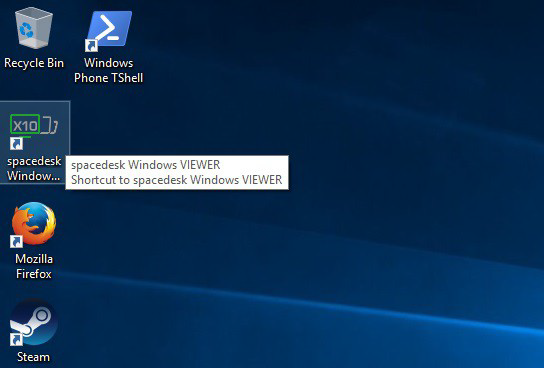
Run the spacedeskWindowsVIEWER setup installer, spacedeskWindowsVIEWER_v0922_BETA.msi. After a successful installation of Windows VIEWER application a shortcut is created on the desktop.
Run on any Machine in HTML5 Web browser
For spacedesk HTML5 VIEWER, no setup installation is needed on the Secondary Machine. HTML5 VIEWER operates with a standard web browser without any setup needed upfront. It can be opened directly from the website http://spacedesk.ph/html5viewer/. Make sure that the web browser (e.g. Safari, Google Chrome, Opera, Internet Explorer, etc.) is updated to the latest version.
It is important to understand, that spacedesk HTML5 VIEWER does not operate over the internet. It does not need an internet connection. It does not even need to be opened over the internet as described above. The HTML5 page can be saved locally.
Local install (optional):The web page can be saved to be used off-line even without internet connection. Follow the instructions below:
- Refresh using Ctrl-F5 keys after opening HTML5 page (this ensures that everything is updated).
- For Google Chrome browser, use the the menu “More tools ” and select “Create shortcut… “.
- For Microsoft Internet Explorer browser, use the the menu “Tools ” and select “Add site to apps “
Connecting a new display monitor over the network
Network Discovery
spacedesk secondary machines (except HTML5 VIEWER) can do automatic network discovery of Primary Machines.
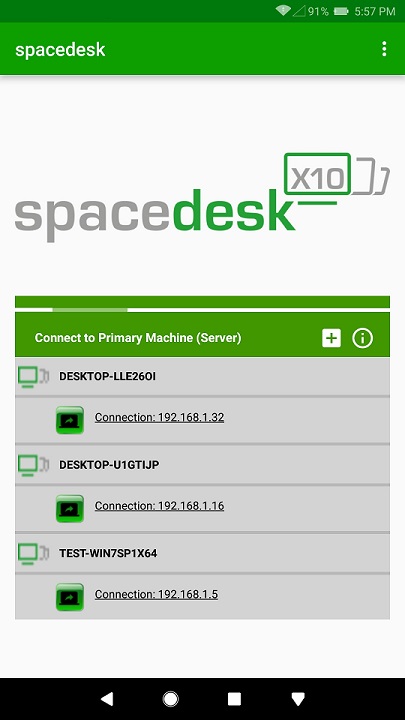
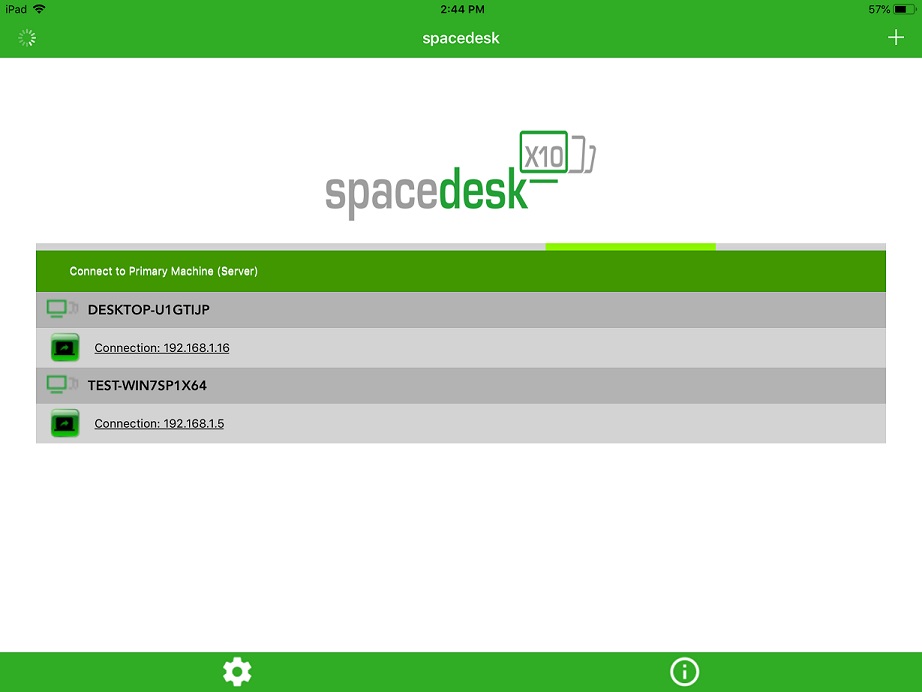
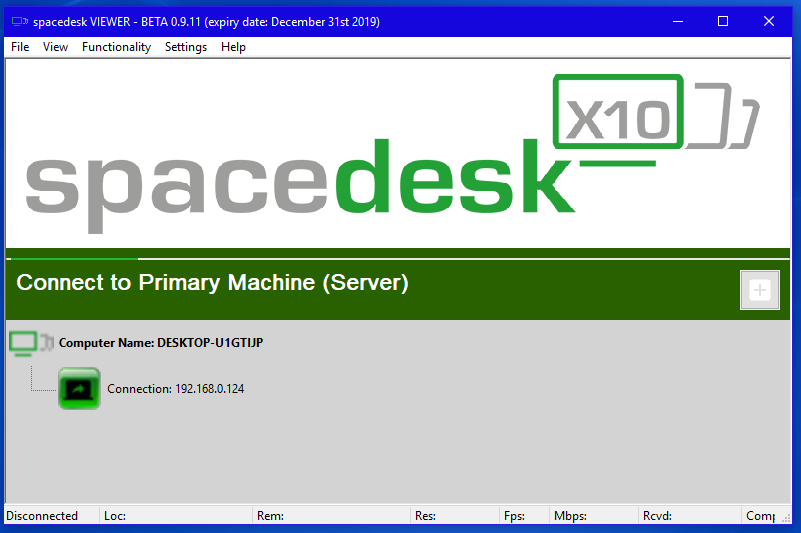
Only when using HTML5 VIEWER or in case the Primary Machine cannot be discovered, the IP address of the Primary Machine needs to be entered manually. It can be determined in various ways:
- Click the spacedesk System Tray icon (at the bottom right of the screen) OR the spacedesk SERVER icon on the Windows Start menu to display the spacedesk SERVER user interface.
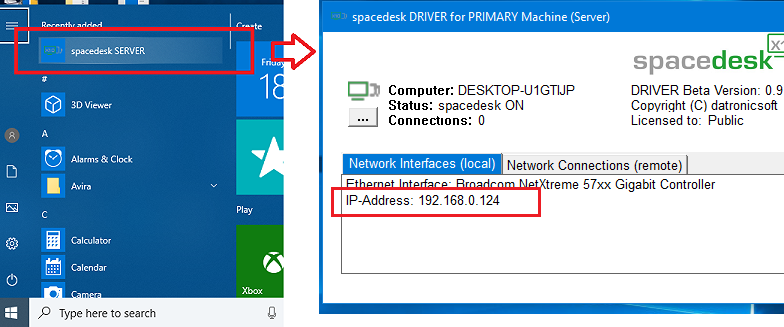
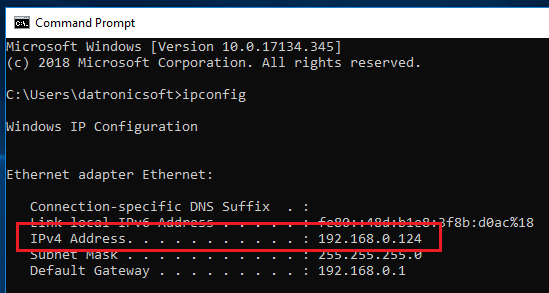
- Typing ipconfig in a Windows command prompt.
Establishing The Network Connection
Android / iOS / Windows Viewer
On the client side, initiate connection to server by opening the spacedesk VIEWER app and select the desired server on the list of detected primary machines to automatically connect. If Primary Machine cannot discover, please check the chapter Troubleshooting Network Connection – Cannot Detect Primary Machine below.
HTML5 Viewer
Using the updated web browser, go to HTML5 viewer page then type the IP address of primary machine where the spacedesk DRIVER is installed. The “Need Help?” button below the Connect button provides an instructions on how to get the IP address of server machine and then click the “Connect” button to start the connection.
Verify Network Connection and additional Display Monitor
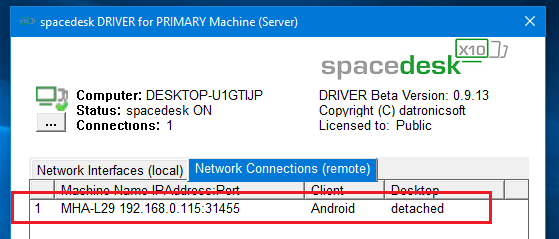
On the Primary Machine side, check if the connection is established. Just click the spacedesk System Tray icon (at the bottom right of the screen) on the primary machine to display the spacedesk SERVER user interface, then the number of successfully established connections can be seen and the attached device/machine in the Network Connections (remote) tab.

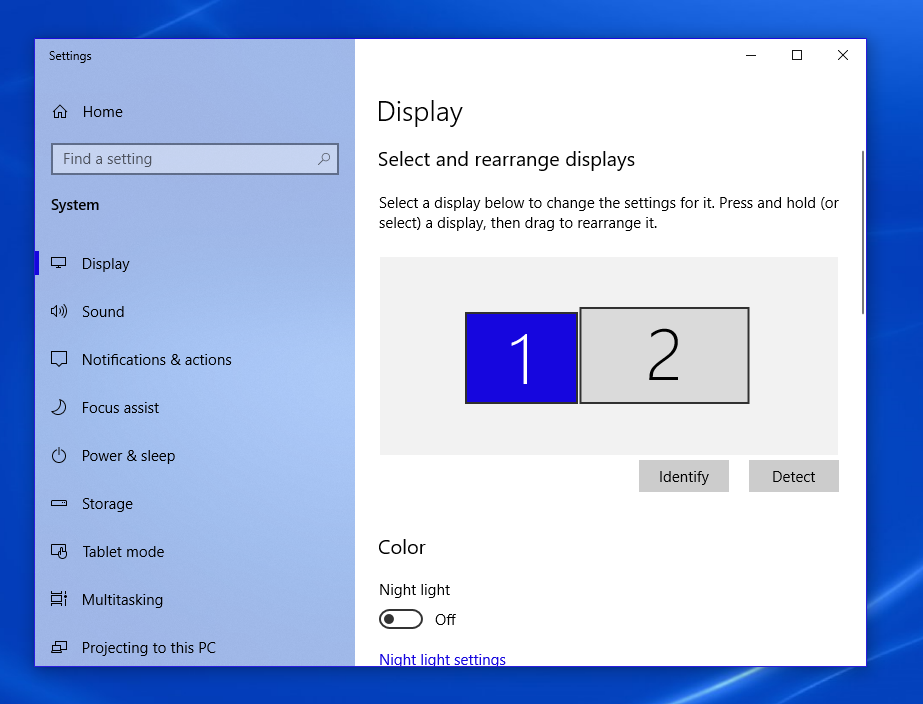
Open Display Control Panel via spacedesk SERVER user interface menu button then click Display Settings …, then check if there’s a secondary display attached.

Configuration and Settings
Primary Machine
Desktop Extension or Desktop Duplication (mirror) Settings in Display Control Panel
Right Mouse Click on Desktop → context menu “Display settings” leads to Display Control Panel. Display Control Panel can be used to change display resolutions and to verify proper operation. During Desktop Extension the following status should be shown:
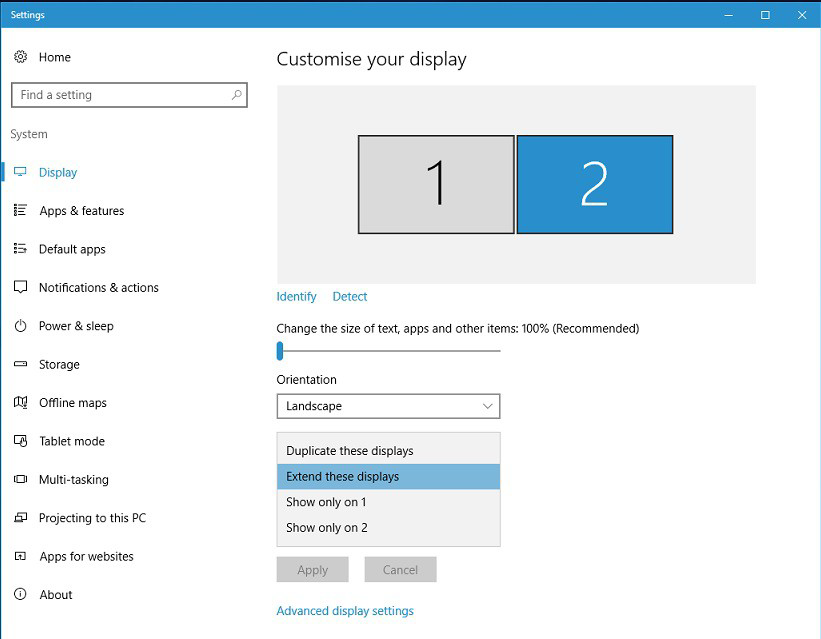
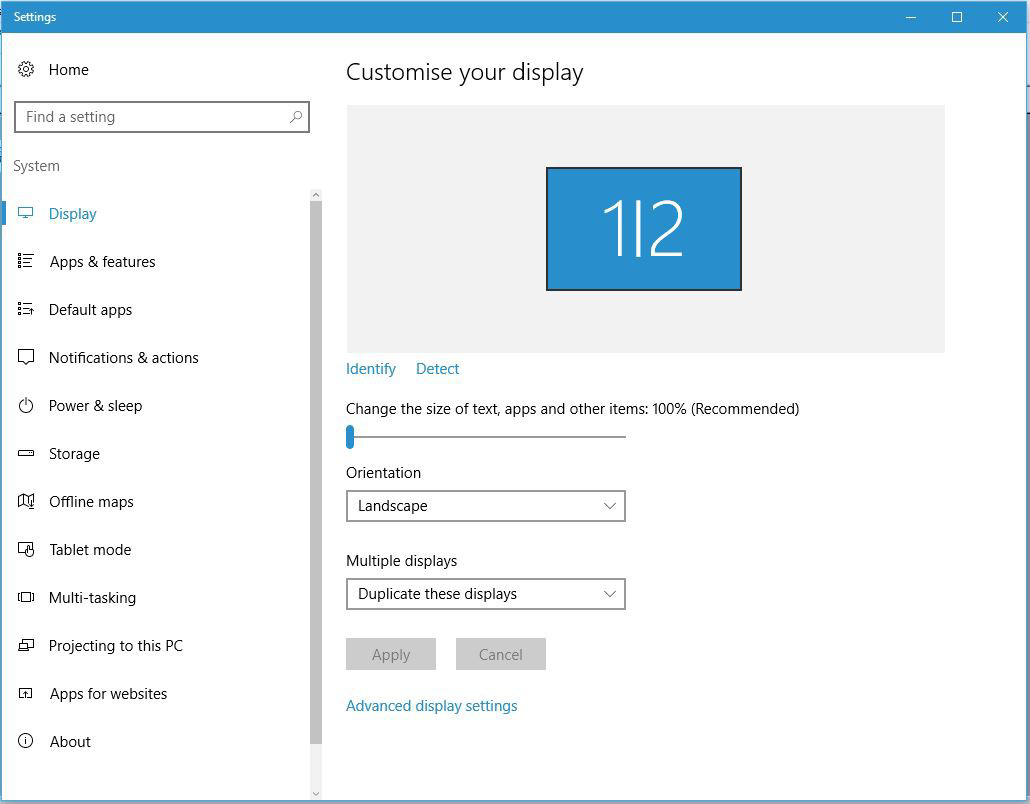
During Desktop Duplication (Mirror) the following status should be shown:
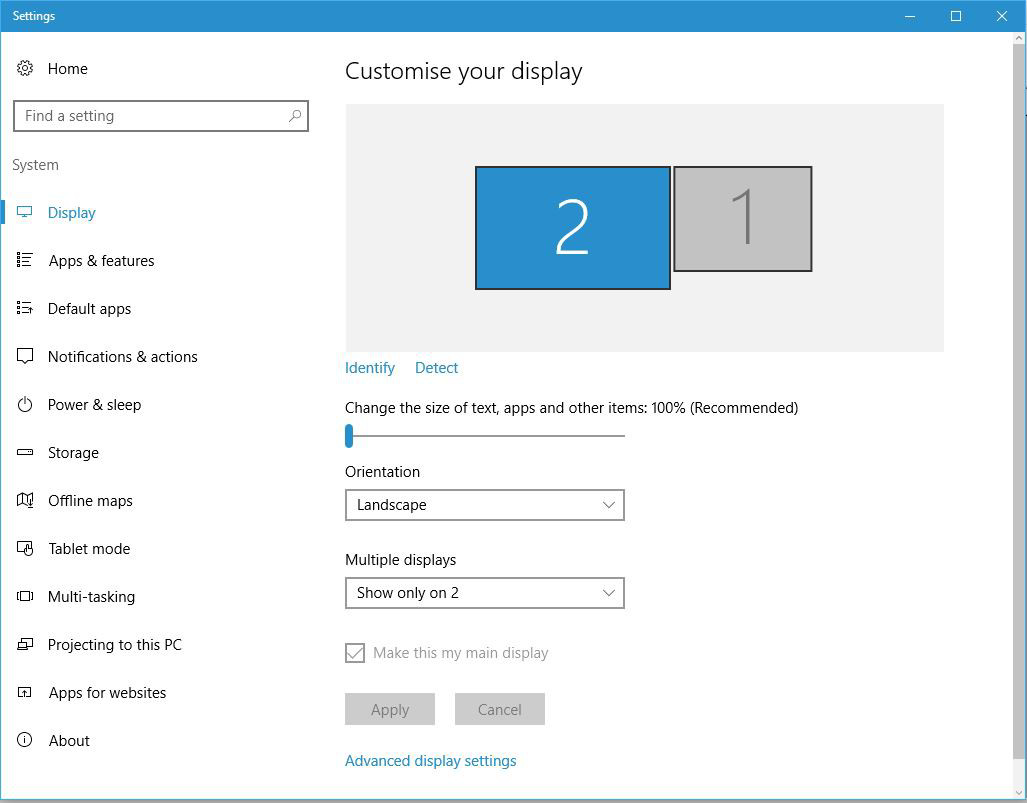
During Single Output (Second Screen Only) the following status should be shown:
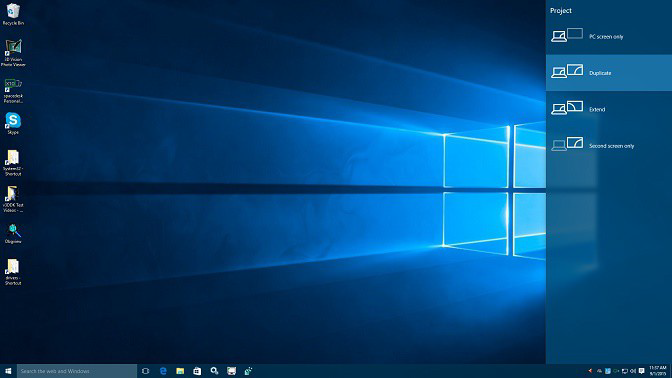
Desktop Extension or Desktop Duplication (mirror) Settings in Display Switch
Display Switch (Windows logo + P) can also be used to change modes
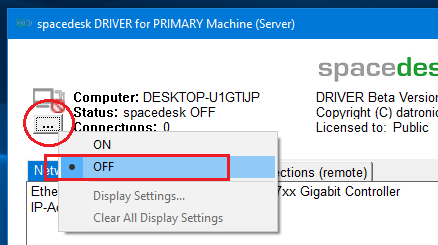
Disable spacedesk
Disabling the spacedesk server temporarily to prevent other spacedesk client connection can be done via spacedesk SERVER user interface menu → OFF.
Secondary Machine
Below a few configuration settings to adjust spacedesk operation to individual needs.
Mouse, Keyboard And Touchscreen Input
The “Mouse, Keyboard and Touchscreen ” option on Windows VIEWER → Functionality menu will enable the remote control feature of spacedesk. Users can now use the mouse, keyboard remote control from the client machine. To exit from remote control mode just press “Alt+Shift” key combination.

For enabling touchscreen, two options are available absolute and relative mode.Touchscreen (absolute) mode provides an absolute input position of the mouse pointer within your viewer screen.
Touchpad/Trackpad (relative) mode is using relative desktop coordinates.
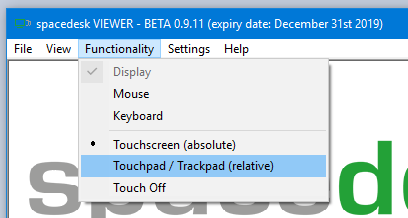
On Android VIEWER, touch screen feature is also supported. It is enabled by default on Settings → Touchscreen → Enable Touch Screen Control option.

There are two different options on how touch feature can work on Android and iOS device.
- Absolute touch provides an absolute input position of the mouse pointer.
- Relative touch which works like a touch pad.


On HTML5 VIEWER, just go to Advanced Performance Settings → Remote Control to enable remote control feature. However, no keyboard control only mouse and touchscreen support.
Below are the touch gestures for Android and HTML5 Viewer:
Move pointer: Tap with one finger and drag anywhere on the screen.
Left-click: Tap the screen with one finger
Right-click: Tap and hold the screen, then release.
Drag Windows/Object: Tap two times for relative OR tap once for absolute, hold then drag.
Screen Resolution
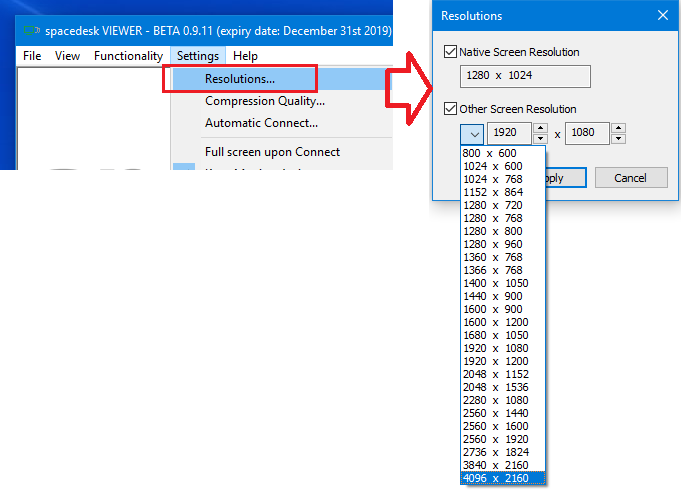
The “Resolutions” dialog box of the Windows VIEWER Settings allows the users to use up to two resolutions. The client’s native resolution can be enable and use by checking the box of “Native Screen Resolutions”.Then the user can also add another resolution by selecting one of the typical screen resolutions on the combo box.
Automatic Connect
The “Automatic Connect” option of the Windows and Android viewer’s Settings allows the user to enable the automatic connect to IP address (of multiple primary machines) or hostname upon launching the viewer app and also an option to “Auto-reconnect” to the last server machine connected in case of sudden disconnection from system sleep or hibernate or from any kind of unwanted disconnection.
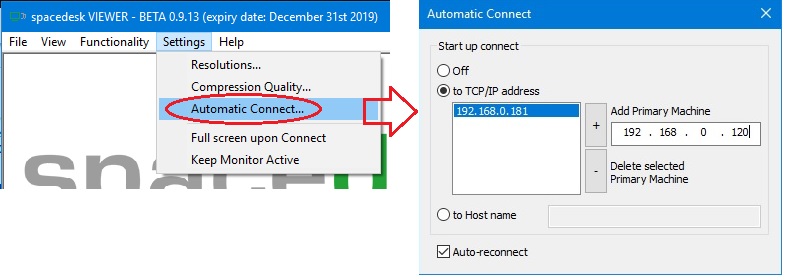 (windows viewer)
 (android viewer)
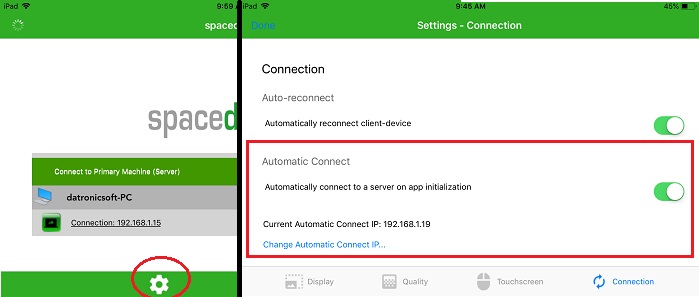 (iOS viewer)
Full Screen Upon Connect
The “Full screen upon Connect” option on Windows VIEWER Settings will enable the automatic switching to full screen mode upon connecting to the server.
Keep Monitor Active
The “Keep Monitor Active” option on Windows VIEWER Settings will prevent the secondary machine’s monitor from going to Display Off or System Sleep only when Windows VIEWER is connected to the server.
Auto Rotation
The “Auto rotation” option on iOS and Android viewer settings allows users to enable an automatic rotation of viewer screen according to current display orientation (eg Portrait or Landscape mode) of iOS / Android device.
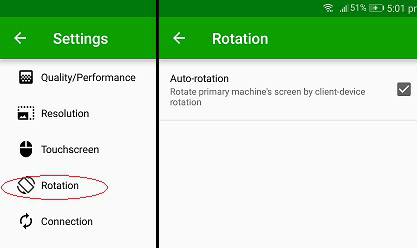 (android)
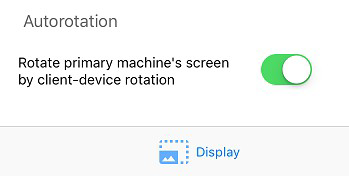 (iOS)
(iOS)
Auto-Start Windows Viewer
To set the spacedesk Windows VIEWER app to auto start during Windows start up:
- open the run command (Window + R key combination),
- paste “% appdata% \ Microsoft \ Windows \ Start Menu \ Programs \ Startup” then enter,
- on the Startup folder just copy the spacedesk Windows VIEWER shortcut file found on your desktop.
Video Wall Configuration
Videowall Engine User Interface
Step 1: Open Videowall Engine User Interface by clicking the “Video Wall Configuration” in the menu button of the spacedesk SERVER window.
A user access control prompt will appear to run the graphical user interface as administrator, just click yes.

Step 2: Enable/Disable Videowall functionality using the toggle switch in the header part of the window.
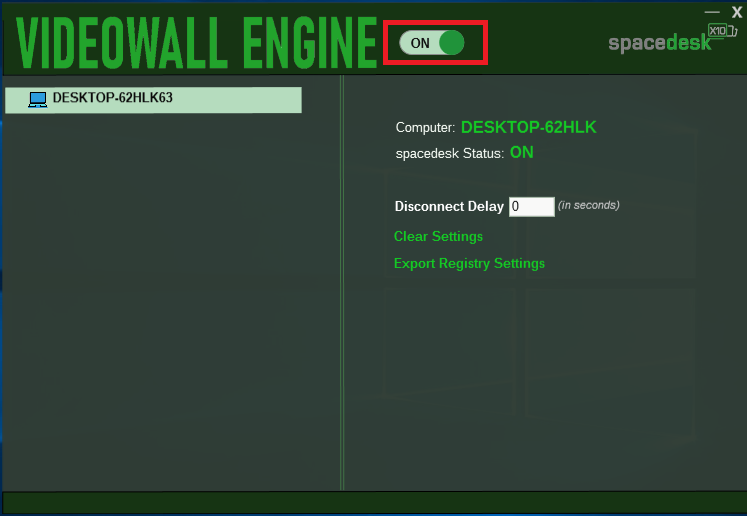
Settings
Main Settings
The left panel shows the tree view of the client displays connected and disconnected.
The root item is the primary machine’s computer name.
The sub items shows the Video Walls created and the client displays currently connected and disconnected.
The right panel shows the main setting/options:
Disconnect Delay – allows the user to set a disconnect delay timer in seconds. If the value is set to -1, the display will remain plugged in the primary machine even after client device disconnection. It will only unplug if video wall switched to OFF or after reboot.
By default, it is set to zero and display will immediately unplug upon client device disconnection.
Clear Settings – clears all the sub items in the left panel.
Export Registry Settings – allows the user to export the video wall registry settings as *.reg file which can be restored in case the settings was cleared/deleted.
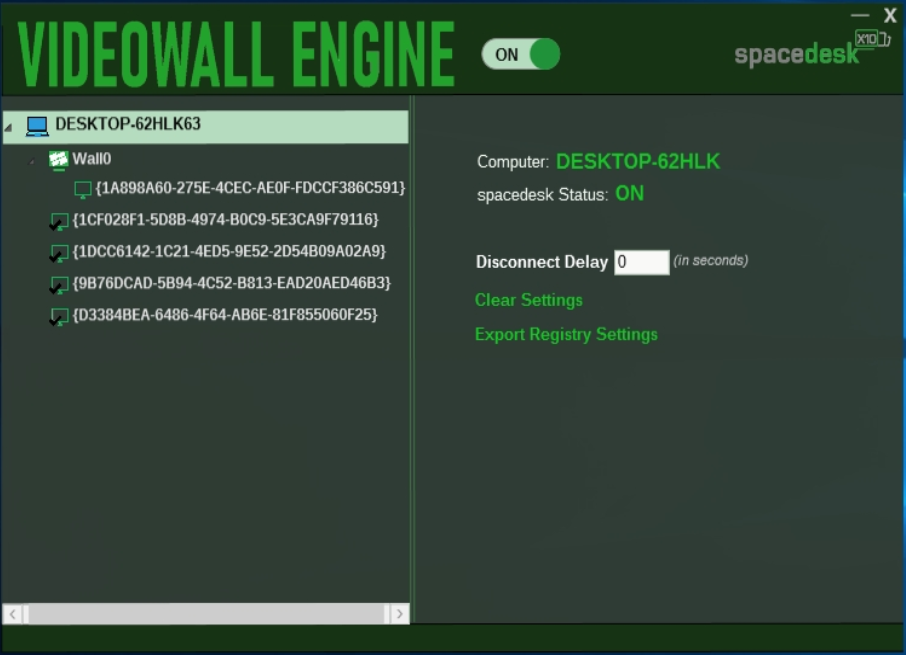
Wall Display Settings
Updating the wall display’s settings will take effect immediately upon pressing the enter on each text box.
Dimension – The (Width x Length) screen resolution of the video wall. By default, Video wall display is set to 4K screen resolution (3840 x 2160).

Client Display Settings
Updating the client display’s settings will take effect immediately upon pressing the enter on each text box.
Wall Index – use to create new Video Wall or assign to an existing Video Wall.
Dimension – The (Width x Length) screen resolution of the client display.
Below is the the (X : Y) position/coordinates of the client display. By default, both are set to 0.
This settings is only applied on the client displays assigned in a Wall.
Rotation Angle – Angle in degrees of the client display. By default, it is set to 0.
This settings is only applied on the client displays assigned in a Wall.
SubSampling type – The color depth type of the client display image. By default, it is set to 4:2:0.
For more info please check Color Depth and Image Compression chapter.
Contrast – slider settings to adjust the client display image’s contrast. By default, it is set to 0.
Brightness – slider settings to adjust the client display image’s brightness. By default, it is set to 0.
Compression Quality – slider settings to adjust the client display image’s quality. By default, it is set to 70.

Video Wall Operation
Step 1: Create a Video Wall Display
For first time client connection, the display is set as Extension mode.
To create a Video Wall, just assign a value (e.g. 0) in the Wall Index text box of each client display.
Just press the enter key to update the settings and it will automatically plugged a video wall display (e.g. Wall0).

Step 2: Assign multiple clients to Video Wall
Multiple client display can be assigned to the video wall by assigning it on the Wall Index text box or via right click context menu “Assign to WallX”.
User can also create multiple video walls simultaneously as long as the primary machine’s resources can handle it.

Step 3: Creative Video Wall
Creative video wall involves rotated client displays and/or positioned in a non zero X and Y coordinates.
Below are the sample creative video wall settings.
Sample #1: Video Wall0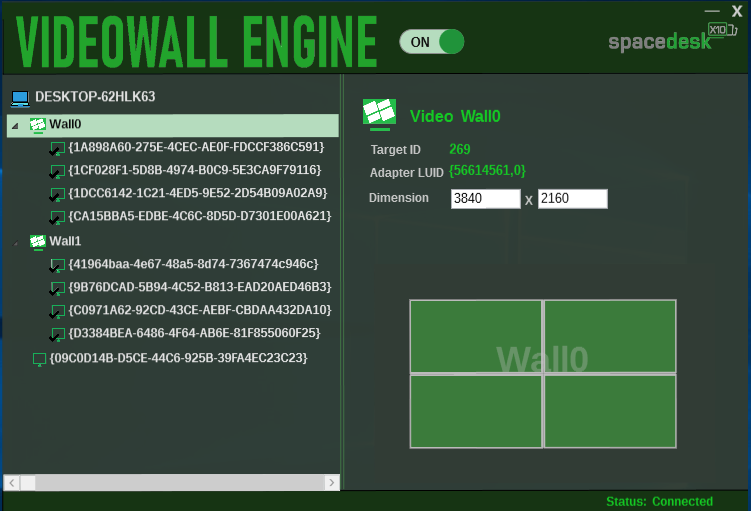
Sample #2: Video Wall1

Step 4: Mirroring to multiple client displays
This video wall configuration can also be used to mirror/duplicate a desktop screen into multiple client displays, by assigning multiple clients in one video wall with the same X and Ycoordinate and just change the video wall’s dimension to the same dimension of the client displays.
TROUBLESHOOTING
Known Issues, Problems and Limitations
Windows 10 Crash with BSOD (Blue Screen of Death)
spacedesk currently has two known BSOD (Blue Screen of Death) issues which cannot be solved because they are caused by faulty third party Antivirus software. Avast Antivirus software seem to have faulty filter driver software which crashes the Windows 10 PC with BSOD (Blue Screen of Death) when spacedesk is present:
Avast’s network filter driver (aswArPot.sys) has a USB Tethering bug doing network transfers over RNDIS. The BSOD usually happens while spacedesk is connected.
Windows 10 Desktop Duplication (mirror) option not available
Desktop duplication of primary monitor to other displays is disabled in Windows display settings of Windows 10 with old version of graphics adapter (< WDDM 2.0). Just download the latest driver version from its website OR if it did not work try to downgrade the graphics driver to Microsoft Basic Display driver via device manager.
Windows 10 old version not supported
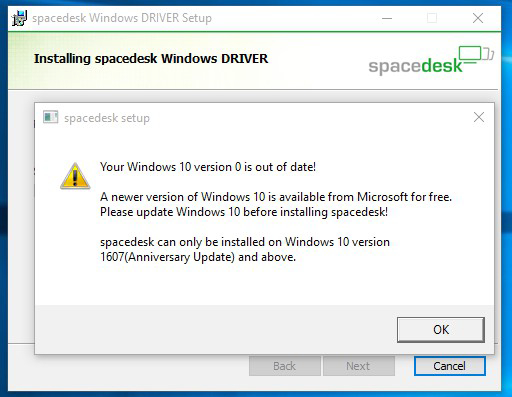
Latest spacedesk Windows 10 Driver version now only supports Windows 10 version 1607 and above. Just run “winver ” to check Windows 10 version. If the version is older than version 1607 (Build 14393) just upgrade to Windows 10 version 1607 or above, in order to use the latest spacedesk driver. Use Windows 10 Update Assistant to upgrade Windows 10 to latest version for free, just click here…
Windows 8.1 Limitations and Unsupported Features
Multi-GPU Technology such as Nvidia SLI Technology or AMD Crossfire is currently not supported by spacedesk. In case SLI is enabled, spacedesk will not work properly.
Virtual machines are officially not supported by spacedesk driver for Windows 8.1 Primary Machine. It may work on some cases but some problems may occur such as strange mouse pointer behavior, black screen on client, etc.
Nvidia Control Panel crash may also observed while spacedesk is active on Windows 8.1 Primary Machine.
qWave (Quality Windows Audio/Video Experience) Windows Feature unavailablemessage box during installation may observed on Windows Server 2008/2012 primary machine. To install this feature, Open Server Manager -> Add Roles and Features, just click Next until you are on the Features, then check if the box for Quality Windows Audio Video Experience (qWave) features is checked, and if not please check it and install.Then restart your server machine (if required).
Windows 8.1 Crash upon client connect
In very rare Windows 8.1 environments a BSOD crash (Blue Screen of Death) can happen upon connect. Such a system crash is always recoverable because the driver is not yet active during Windows 8.1 system boot time.
Just reboot the primary machine in safemode then uninstall the spacedesk driver. To boot in safemode, press and hold f8 key upon computer reboot and before the windows logo appeared. Then in advanced boot option screen use the arrow keys to select the safe mode option then press Enter key.
Note: Before uninstalling using the spacedesk msi installer on safemode, run a Command Prompt then type the following commands:
Step 1:
for Safemode: REG ADD “HKLM\SYSTEM\CurrentControlSet\Control\SafeBoot\Minimal\MSIServer” /VE /T REG_SZ /F /D “Service”
for Safemode with Network: REG ADD “HKLM\SYSTEM\CurrentControlSet\Control\SafeBoot\Network\MSIServer” /VE /T REG_SZ /F /D “Service”
Step 2: net start msiserver
Windows 10 Known Issues and Unsupported Features
Nvidia ShadowPlay – Current spacedesk version has a known issue with Nvidia ShadowPlay. While Nvidia ShadowPlay (screen record) is active, spacedesk will give an error code 1-2-0 on the viewer side. Just disable it in order to use spacedesk.
Night Light – Windows Night Light settings is currently not supported on spacedesk displays.
Network Connection
Cannot discover Primary Machine
Step 1: Different Network Segments
If Primary Machine and Secondary Machine are in different network segments, then they cannot discover each other. However, they may still be able to connect. In that case try to add the IP address to detect the primary machine by clicking the ” + ” button.
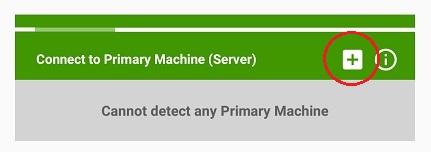
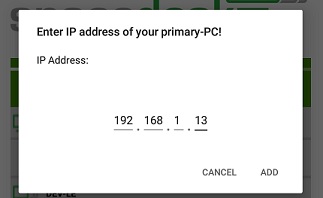
To get the IP address of the Primary machine please check the above chapter Establishing the network connection .
Step 2: third party firewall software
In case the above steps did not help, then a third party firewall software (other than Windows Firewall) could still prevent detection. Please check this chapter’s paragraph ” Firewall Settings ” below.
Step 3: WiFi router’s network isolation active
In case all above steps still did not help, and if this is happening on a wireless network, then there might be one other remaining problem: WiFi router’s network isolation feature might be activated. The only solution for this is re-configuring the router.
Step 4: VPN (Virtual Private Network) enabled
Just refer to the VPN topic below.
Step 5: Alternative ways to connect
If all above connection attempts failed. Try USB Tethering or Wifi Direct / Hotspot setup to establish a network connection between Primary and Secondary machines.
Connection Error
This shows that the primary machine can be reached over the network but connection fails after the indicated connection time. Possible reasons are the following:
– Unstable network connection
– Error on spacedesk Primary Machine
– Nvidia ShadowPlay (screen record) is running which is a known issue at the moment.
– Virtual Private Network (VPN) enabled
Firewall Settings on Primary Machine
Third party firewall
If there is a third-party firewall software or anti virus (eg Avast, AVG, etc.) with own firewall settings running on Primary Machine, then this can prevent spacedesk discovery and connection.
Please ensure that C: \ Windows \ System32 \ spacedeskService.exe is allowed through the firewall software or the spacedesk TCP / IP network protocol port is opened. spacedesk is using TCP port 28252.
Windows firewall
Please ensure that the Windows Firewall settings is correct. For details please check chapter Setup Primary Machine – Verify if setup was successful .
VPN (Virtual Private Network)
On some situations, having a VPN connection present on either primary or secondary machine prevents the network discovery process between spacedesk server and client, which results to “Cannot Detect Primary Machine” or “Error code 1-0” in spacedesk viewer apps.
There are various workaround that can fix this problem without completely disabling the VPN connection.
1. If VPN app has user interface with configuration settings that will let users select a specific apps to not use VPN, just add the C:\Windows\System32\spacedeskService.exe on this exception list.
2. Run “ncpa.cpl”, right-click the Ethernet or WiFi network icon then open the Properties window. Click on the Sharing tab and check the “Allow other network users to connect through this computer’s internet connection” box.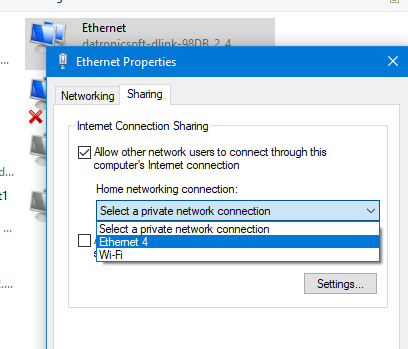
Primary Machine
spacedesk Server Status
Check if spacedeskService is operating. Make sure that spacedesk service has started and spacedesk System Tray icon (at the bottom right of the screen) is visible in taskbar’s notification area and turned ON. For details, please check chapter above Setup Primary Machine – Verify if Setup was Successful .
Server OFF or ERROR
spacedesk server can be enabled and disabled via spacedesk server user interface menu. In case viewer app cannot discover / connect to the server, make sure that this menu is ON.
spacedesk server can be in ERROR state if spacedesk Graphics Adapter in device manager has yellow exclamation mark which indicates an error in driver. Check in C: \ Windows \ system32 \ drivers \ UMDF directory if “spacedeskDisplayUmode1_x.dll” is present then try to disable-enable the driver in device manager and try to switch ON in spacedesk server user interface menu.
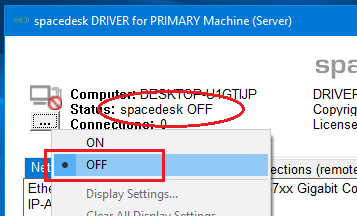
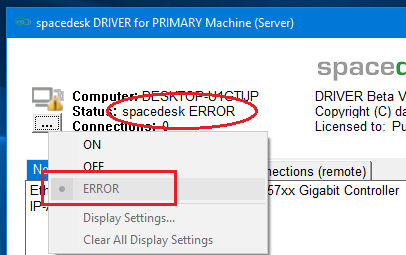
For Windows 8.1 primary machine, check for “spacedeskHookKmode.sys” in C: \ Windows \ system32 \ drivers directory, then reboot.
For Windows 10 (version 1607 – later) primary machine, open Device manager and check below Display Adapters if spacedesk Graphics Adapter is installed correctly and enabled.
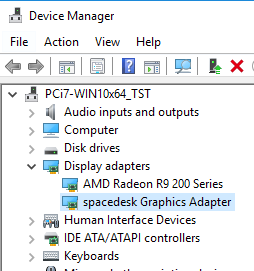
Incompatible Display Hook Driver Detected
Step 1:Check if system tray bubble reports incompatible display hook driver
This error message indicates that another WDDM filter hook display driver is present on the system.

Step 2:Uninstall known products using incompatible display hook drivers
This is usually installed by a USB-Display or Zero-Client of the following brands:
Display Link, Duet Display, Fresco Logic, MCT, Microchip/SMSC, OSBase, Splashtop XDisplay and Extended Display HD, etc.
Display hook drivers are not standard Windows drivers. All products relying on such drivers are incompatible with each other. They cannot coexist on the same system. This includes spacedesk.
Uninstall the other product / hook driver detected, then reboot the spacedesk server machine and try to connect spacedesk client again.
Step 3:Check if incompatible products did not uninstall OSBase driver
Various products using the OSBase driver do not properly remove it upon uninstall (e.g Duet Display, Fresco Logic, etc.). After uninstalling their product, the leftovers of the OSBase driver still need to be removed manually following the instructions below:
- Go to Control Panel -> “Add Remove Programs “. If you can find OSBase display driver software, uninstall it.
- Check if OSBASE drivers are installed by running the following commands:
- “sc query ddkmd “
- “sc query ddkmdldr “
- “sc query ddmgr”
- If installed, uninstall OSBASE drivers by running the following commands:
- “sc stop ddmgr”
- “sc delete ddmgr”
- “sc delete ddkmdldr”
- “sc delete ddkmd”
- Reboot your PC.
Repair spacedesk Driver Setup
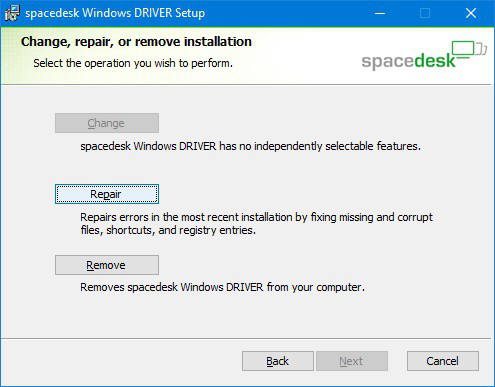
Installation repair can be done by running the same msi installer version then select Repair button. Or just go to Windows Control panel → Programs and Features then search for spacedesk Driver, right-click then repair. This procedure only applies for Windows 10 primary machine only.
Various
Detached Second Display.
In case of gray or black screen in Windows desktop application or always connecting status on HTML5 VIEWER or “Display OFF” message showing in Android/iOS VIEWER, click the spacedesk Server window on the task bar and check if status of the device on Network Connections (remote) tab is “detached” then open the windows display settings of the server machine. Just select “Display Settings” in spacedesk Server window menu button then try to attach it by selecting extend or duplicate.
Mirror mode failed.
For Windows 8.1 primary machine, if desktop extension is working but duplication is always failing, make sure that the “Settings → Resolutions → Other Screen Resolution” of Windows VIEWER OR the “Advanced Performance Options → Custom Resolution” of HTML5 VIEWER OR the “Settings → Resolution” of Android VIEWER, OR Settings → Display → Custom Resolutions of iOS VIEWER should matched the native resolution of the primary machine’s monitor.
For Windows 10, if duplicate option is not available in Display settings try to update the graphics adapter by Windows Update or manual download of driver from official website.
If duplication is still not available after driver update, then it’s probably because the driver does not support mirror mode anymore. Please refer to Known issues chapter below for Mirror mode not supported.
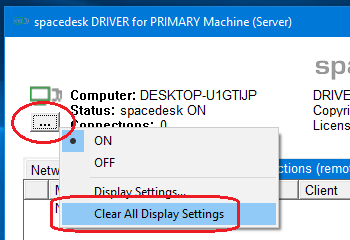
Clear All Display Settings.
In case display is in wrong settings (orientation, screen resolution, display detached) upon client connect, try the “Clear All display Settings” option in spacedesk System Tray menu.
Secondary Machine
Check Viewer App version
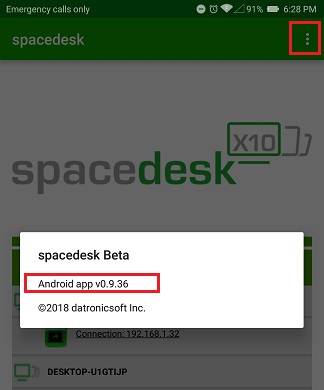
Make sure that the VIEWER version is updated. To check just open the Settings → About of Android / iOS / Windows viewer app. While in HTML5 Viewer page, current version is displayed on the page below. Then compare the version on the viewer to the current version on the spacedesk website.
HTML5 VIEWER
Step 1: Delete cached files, images and cookies of web browser.
If spacedesk HTML5 VIEWER web page doesn’t load the latest version 0.9.10, just delete the cached files, images and cookies on browsers settings.
Step 2: check if the web browser supports websockets.
If the spacedesk HTML5 VIEWER is unable to connect, check the version of the web browser and make sure that it is updated. If the secondary machine is a smartphone or tablet device the browser and OS needs to be most recent versions supporting websockets. Just go to https://websocketstest.com/ to verify.
Connection Error
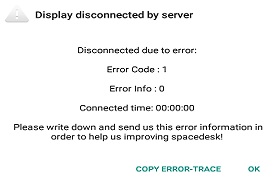
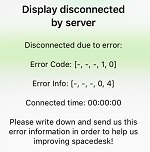
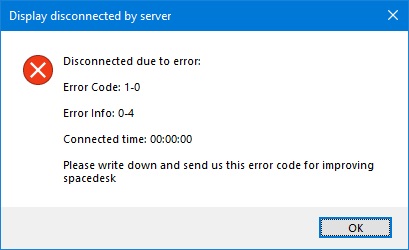
Error Code: 1 & Error Info: 0
This error code and info indicates that the viewer cannot find the Windows server on the network. Mostly, this is caused by Virtual Private Network (VPN) enabled on the primary machine. For more details, kindly refer to the Troubleshooting Network connection – Connection Error chapter above.
Error Code: 1-2-3 & Error Info: 0-3-5
This error indicates that the primary machine can be reached over the network but connection fails after the indicated connection time. Check the Connection Error chapter discussed above.
(android) (iOS)
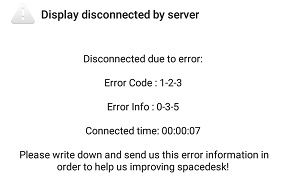
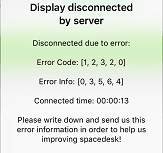
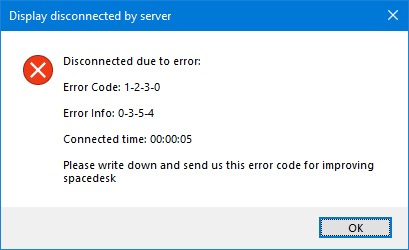
These error message box also shows the connected time, it indicates how long the viewer is connected before it disconnects. And in case procedures did not help, just report this error code sequence to spacedesk support.
Limitations
Custom Screen Resolutions
On iOS and Android viewer, custom screen resolutions available on settings are only those not bigger than the device’s native screen resolution. This is due to the black screen problem observed when switching to higher resolution. On Windows and HTML5 viewer’s Settings → Resolutions… → Other/Custom Screen Resolutions, supported resolutions is up to 4096×2160.
Performance in HTML5 VIEWER
HTML5 VIEWER is much slower than native viewer apps on Android, iOS and Windows. This is due to technical limitation of HTML5/Javascript.
Slow screen update on Windows VIEWER.
There are some cases that the rendering of screen update in Windows VIEWER is very slow. One of the possible reason is that Windows client machine only has a DirectX 9 graphics driver. It is recommended to upgrade to DirectX 10 – above graphics driver to achieve better performance.
Multiple Display
As of now, spacedesk supports simultaneous connection of up to sixteen additional displays.
– Up to sixteen Android, or iOS, or Windows VIEWERs
– One HTML5 VIEWER web browser application for any device and operating system e.g. Mac OS X and Linux
HTML5 VIEWER on Mozilla Firefox and Microsoft Edge not supported.
spacedesk’s HTML5 VIEWER is currently not supported in Mozilla Firefox web browsers due to performance limitations. Please use other web browsers recommended in system requirements chapter.
Performance Tuning
The following variables are influencing display performance:
- Network router
- Network bandwidth
- Screen Resolution
- Color depth and Image compression
- Frame rate per second (FPS)
Network Router
The network router is the heaviest performance restraint. Cirumventing routers substantially improves performance. This can be done in various ways:
– On wired networks, just use crossover cables.
– On wireless networks use WiFi Direct (see paragraph below).
– USB Tethering (see paragraph below) has about the same performance as WiFi Direct.
Network Bandwidth
Wifi Direct / Wifi Hotspot / Wifi Access Point
Performance on wireless networks can be improved by configuring the Windows 10 PC/laptop or the mobile device as Wifi Hotspot / Wifi Access Point. Connection to this Access Point needs to be established before connecting spacedesk.
To configure the Mobile Hotspot option on Windows 10 PC/laptop. Just go to Start → Settings → Network & Internet → Mobile Hotspot, then turn it ON. Try to connect the client device(phone/tablet/laptop) to the wireless network name generated by the Mobile Hotspot. Then run the spacedesk VIEWER and connect to the IP address of server machine, in this case it should be the IP address of the Mobile Hotspot network generated (Microsoft Wi-Fi Direct Virtual Adapter).
USB Tethering
If the secondary machine is a smartphone or tablet that supports USB tethering, use the USB cable to establish a network connection between primary and secondary machine. USB tethering typically supported on devices with Cellular Network.
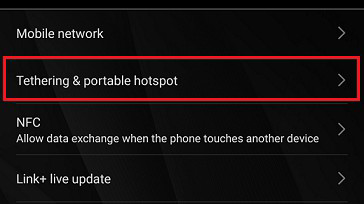
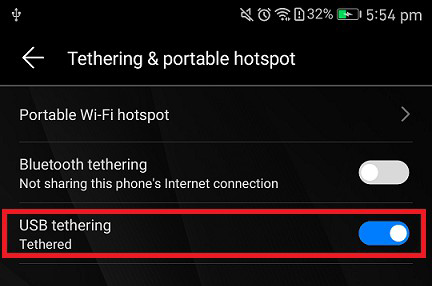
For Android device just go to settings and find the Tethering & portable hotspot, then connect the USB cable of Android device to Windows primary machine, then enable the USB tethering in Android settings.
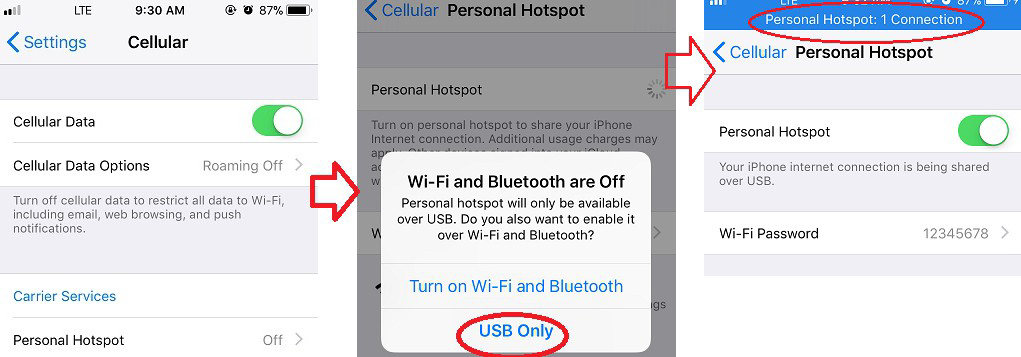
For iOS device, make sure to turn OFF first the Wifi. Connect the iOS device to Windows primary machine via USB lightning cable. Then switch ON the Cellular Data and Personal Hotspot and an option will pop-up and select USB Only.
Network Cable
The faster the network, the faster the display performance. Cable networks tend to have better performance than wireless networks. The fastest option is always a direct connection via network cable, e.g. a Gigabit Ethernet.
Currently minimum reasonable network bandwidth needed by spacedesk BETA ranges around 50 Mbit/sec. Substantial improvements including support of slower networks are planned for the first release version.
Screen Resolution
The lower the resolution of the networked display screen, the faster the display performance.
Color Depth and Image Compression
spacedesk uses image compression to improve display performance. This mechanism reduces image size before transferring images over the network. The spacedesk image compression algorithm is lossy. It reduces quality and color depth of the image.
On fast networks, color depth and image quality can be kept very high while still achieving good performance.
On slow networks, color depth and image quality need to be reduced to achieve good performance.
The “Compression Quality” dialog box of the Windows VIEWER Settings allows the user to enable or disable the compression of screen updates. To choose OFF means to use RGBA 32-bit color format of screen image and no image quality reduction will be done. To choose On means that the user allows to reduce color depth by Chroma Downsampling and adjusts the compression quality to find the ideal image quality and performance speed.
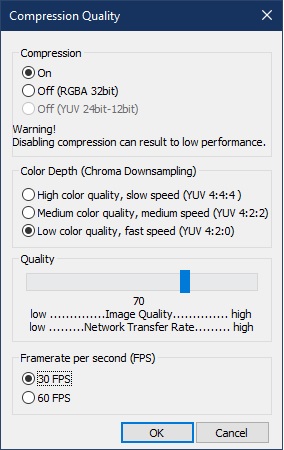
YUV 4:4:4 – No reduction of color information. High quality of screen image but, performance intensive. Can only be used on very fast networks
YUV 4:2:2 – Reducing the color information by 1/3 (from 24 bit to 16bit) reducing color quality of screen image and improving performance.
YUV 4:2:0 – Reducing the color information by 50% (from 24 bit to 12bit) to achieve best possible performance.
The color loss caused by the above mechanism typically not very much noticeable for the human eye, especially when there is a lot of motion on the screen (e.g. playing a video). Thus YUV: 4:2:0 is the default setting which can apply to many user Applications.
The Image Quality can be varied between 100 (no compression) and 0 (maximum possible compression). The default value is 70 which still tends to show a clear enough and detailed enough image for many user applications.
Framerate per second
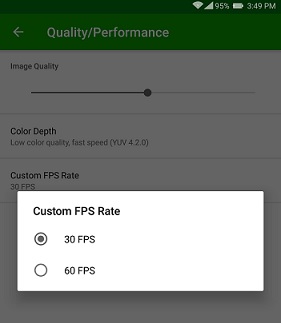
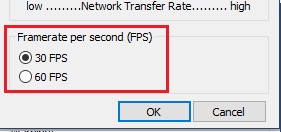
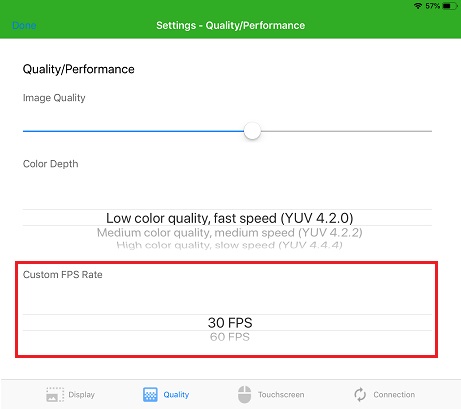
The framerate option allows user to choose the FPS (framerate per second) on the viewer screen.
On Windows viewer just go to Settings → Compression Quality … → Frame rate per second (FPS).
On Android viewer, just go to Settings → Quality / Performance → Custom FPS rate.
On iOS viewer, just go to Settings → Quality → Custom FPS rate
Uninstall on Windows Primary Machine
Uninstall Using Windows Control Panel
Uninstall of spacedesk can be done on Control Panel → Programs and Features.

Uninstall Using .Msi File
An alternative way to uninstall spacedesk is using the spacedesk msi installer file.
Step 1: Run the setup installer
Run the spacedesk setup installer.
spacedesk_driver_Win_10_32_v0964_BETA.msi for x86 platform
spacedesk_driver_Win_10_64_v0964_BETA.msi for x64 platform
Step 2: Click the remove button
After selecting the Remove button, just click Next until it uninstallation completed.
Starting on version 0.9.9.z.25, reboot is not needed anymore in Windows 10 machine.

Step 3: Reboot (Windows 8.1 only)
After the uninstallation has completed, reboot the computer before proceeding with any other task.

Note: Please do not manually delete or remove the C:\Program Files\datronicsoft\ spacedesk folder and its files, to prevent uninstallation problem.
Troubleshooting Uninstall
Step 1: Missing spacedesk program files.
Manually deleting spacedesk program files located in chosen directory folder (e.g. C:\Program Files\datronicsoft\spacedesk) is extremely not advisable, doing so may result to uninstallation failure of spacedesk with an error message below.

To fix the problem, just restore the program files (please check your Recycle bin)to its original location and try to uninstall again using the same msi installer version or by Windows Control Panel → Programs and features.
Step 2:Try Microsoft Fix.
If uninstall problem still persist after restoring spacedesk program files, try the Install/Uninstall troubleshooter program from the Microsoft Fix article. If spacedesk is not on the program list, just select “Not Listed” then paste the product code of current spacedesk version below.
spacedesk_driver_Win_10_32_v0964_BETA.msi:{493B1B25-1B2D-4CDC-99A2-086A959441C3}
spacedesk_driver_Win_10_64_v0964_BETA.msi:{89592275-79DA-423A-91E1-8706EC312DF4}
spacedesk_driver_Win_8.1_32_v0943_BETA.msi:{8ADAE518-D63C-42BC-A8A3-B87677D53CA4}
spacedesk_driver_Win_8.1_64_v0943_BETA.msi:{460A34C6-BDDD-4A93-849D-EA6464F8FE81}
spacedeskWindowsVIEWER_v0925_BETA.msi:{F60C1103-FBF9-4584-9FC2-42718AAA6CBD}
for previous spacedesk version:
spacedesk_driver_Win_10_32_v0963_BETA.msi:{17284B14-1298-45AB-9CD1-9A91DA7B730B}
spacedesk_driver_Win_10_64_v0963_BETA.msi:{14892EB2-EA17-4F68-8D07-417BB9BF2B43}
spacedesk_driver_Win_10_32_v0961_BETA.msi:{29119D95-695A-4EF7-A71E-2923DBF941E8}
spacedesk_driver_Win_10_64_v0961_BETA.msi:{226EFB44-2785-47DA-B444-E6BFEB4E2172}
spacedesk_driver_Win_10_32_v0959_BETA.msi:{9E1DA4D3-540D-4CCF-8668-4F7407BE7A43}
spacedesk_driver_Win_10_64_v0959_BETA.msi:{92D15DFD-F215-4BAC-B4C3-EE1D164B5661}
spacedesk_driver_Win_10_32_v0958_BETA.msi:{80039C05-6033-4656-AAD5-EBF743D9E795}
spacedesk_driver_Win_10_64_v0958_BETA.msi:{30E4F208-31A0-486E-9703-A69F0E2E9E1D}
spacedesk_driver_Win_10_32_v0957_BETA.msi:{CA98491B-9B81-4D2D-81DC-9F9B0789D296}
spacedesk_driver_Win_10_64_v0957_BETA.msi:{1BDD3F4B-AFDD-433F-9803-22D6C0D331F4}
spacedesk_driver_Win_8.1_32_v0942_BETA.msi:{A7D39D1F-F9A5-40FA-A44C-66542202C3F4}
spacedesk_driver_Win_8.1_64_v0942_BETA.msi:{B6B1B36B-36B3-4AF7-98E2-C26F1F451481}
spacedeskWindowsVIEWER_v0922_BETA.msi:{E9CA928E-27FF-4E6C-B509-803A84A0221E}
spacedeskWindowsVIEWER_v0921_BETA.msi:{5B8E3B1F-0199-4EDF-8841-84947B36674E}
Step 3: Manual uninstall of drivers and services
After successfully troubleshooting uninstall, spacedesk should be removed from “Programs and Features”. To make sure that drivers and services are comprehensively removed, all the steps in the next section “Manual uninstall” need to be executed.
Manual Uninstall (Troubleshooting Only)
The steps in this chapter should only be done in exceptional cases if needed and if previously discussed with spacedesk support. The regular way to uninstall spacedesk is using Windows Control Panel or the spacedesk msi installer file as described above.
Step 1: Uninstall services
Run a Command Prompt (cmd.exe) “as administrator” and enter the following commands below:
- sc delete spacedeskHookKmode (for Windows 8.1 only)
- sc stop spacedeskService
- sc delete spacedeskService
Step 2: Uninstall spacedesk Graphics Adapter (for Windows 10 only)
For Windows 10 operating systems, manually uninstall spacedesk Graphics Adapter in Device Manager.This only applies on spacedesk driver version 0.9.9.z.25 – later.

Step 3: Uninstall spacedesk Mouse and Keyboard drivers (for Windows 8.1 only)
Manually uninstall the spacedesk Mouse and Keyboard driver on Device Manager.


Step 4: Uninstall spacedesk virtual HID Device (for Windows 10 only)
On device manager click View -> Devices by Connection, then find the spacedesk virtual HID Device.
Before uninstalling the spacedesk virtual HID Device, the children below should be uninstall first.
Just right-click each child devices underneath the spacedesk virtual HID Device, then click “Uninstall device”.
Step 5:Reboot
Reboot the system and ensure that the following registry keys below have been removed:
HKEY_LOCAL_MACHINE\SYSTEM\CurrentControlSet\Services\spacedeskService
HKEY_LOCAL_MACHINE\SYSTEM\CurrentControlSet\Services\spacedeskKtmInputKeybd
HKEY_LOCAL_MACHINE\SYSTEM\CurrentControlSet\Services\spacedeskKtmInputMouse
For Windows 8.1
HKEY_LOCAL_MACHINE\SYSTEM\CurrentControlSet\Services\spacedeskHookKmode
For Windows 10
HKEY_LOCAL_MACHINE\SOFTWARE\Microsoft\WindowsNT\CurrentVersion\WUDF\Services\spacedeskDisplayUmode
Step 6:Delete files
Delete all files listed in the appendix of this document underneath “File list” in the Appendix of this document.
Windows Secondary Machine Uninstall
Uninstallation of Windows VIEWER on Secondary Machine can be done on Control Panel → Programs and Features. Another way to uninstall is by using the msi installer.
Note: If these troubleshooting procedures does not solve your problem please contact our spacedesk support, just click here.
Appendix
Release Notes
spacedesk Windows 10 Driver version 0.9.64
Bug fix for disconnect bug on some machines.
spacedesk Windows Viewer version 0.9.25
Bug fix for screen tearing.
List of Incompatible Windows Application
This only applies on Windows 8.1 Primary Machine.
Applications conflicting and causing system instability while spacedesk is active
Skype for business
Fortinet security software
Flight Simulator
Applications not working in full screen mode on spacedesk display monitor
Various DirectX games (e.g. Witcher 2, Project Cars, Asseto Corsa, Battlefield, etc.)
File List
File list (Windows 10)
Windows\System32\drivers\UMDF\spacedeskDriverHid.dll
Windows\System32\drivers\UMDF\spacedeskDisplayUmode1_0.dll (for Windows 10 version 1607 – 1703)
Windows\System32\drivers\UMDF\spacedeskDisplayUmode1_2.dll (for Windows 10 version 1709 – above)
Windows\System32\drivers\spacedeskKtmInputMouse.sys
Windows\System32\spacedeskService.exe
Windows\System32\spacedeskKtm.dll
Windows\System32\spacedeskSrvLibConnectorUsb.dll
Windows\System32\spacedeskServiceTray.exe
File list (Windows 8.1)
Windows \ System32 \ drivers \ spacedeskHookKmode.sys
Windows \ System32 \ drivers \ spacedeskKtmInputMouse.sys
Windows \ System32 \ drivers \ spacedeskKtmInputKeybd.sys
Windows \ System32 \ spacedeskHookUmode.dll
Windows \ System32 \ spacedeskService.exe
Windows \ System32 \ spacedeskKtm.dll
Windows \ System32 \ spacedeskSrvLibConnectorUsb.dll
Windows \ System32 \ spacedeskServiceTray.exe
Files on 64 bit systems only
Windows \ SysWOW64 \ spacedeskHookUmode.dll
How to use an external display with your Mac
Every computer I’ve called my own for work or personal use has been a laptop. I love the portability of a laptop. It’s great to do work while lounging in my favorite chair or at a coffee shop (when we could still do that). But it’s really hard for me to put in a full workday hunched over one. To fix that, I’ve found that plugging my laptop to an external monitor on my desk is essential for me to be productive. Now I can’t imagine working without one.
If you’re considering adding another screen to your macOS setup to help fix that laptop hunch or just to add some extra screen real estate, read on. If you have an iPad and a Mac, Apple offers a handy feature called Sidecar that lets you use your iPad as a second display. If you don’t have an iPad, you can connect a separate monitor to your Mac. I’ll walk through how to set up both options in this guide. (We’ll offer advice for how Windows PC users can set up an external monitor in an upcoming article.)
Using Sidecar with an iPad
If you want to use macOS Catalina’s Sidecar feature to share your Mac’s screen with your iPad, first make sure you have a Mac and an iPad that both support the feature. You can check Apple’s list of supported devices right here. You’ll also need to be on the right firmware; your Mac will need to be on macOS Catalina and your iPad needs to be on iPadOS 13.0.
Before you get Sidecar set up, you’ll also have to decide if you want to use Sidecar over a wireless or over a wired connection. Both work well, but a wired connection should have a little less latency and lets you charge your iPad from your Mac while you’re using Sidecar.
If you have your equipment ready and everything up to date, then make sure both your Mac and iPad are signed into the same iCloud account and that you have two-factor authentication turned on.
Once you have that all set up, you can turn on Sidecar. First, turn on your iPad and unlock it, then set it aside. Then, go to your Mac and find the AirPlay icon on your Mac’s menu bar. That icon looks like a rectangle with an arrow pointing up at the bottom. If you don’t see the icon, go to the System Preferences menu, then Displays, and then look for the checkbox in the bottom left that says “Show mirroring options in the menu bar when available.” That box needs to be checked for you to see the AirPlay icon in the menu bar.
Once you find the AirPlay icon, click it, look for the name of your iPad in the drop-down menu that appears, and click that. Your iPad’s screen may flicker for a second, but then it should change to show your Mac’s desktop background — if it does, you’ve successfully turned on Sidecar.
In addition to giving your Mac more screen space, Sidecar gives your iPad gets a few cool tricks. You can use an Apple Pencil to draw on content from your Mac that’s displayed on your iPad’s screen, for example. You can also turn on a Touch Bar that appears on the iPad’s display.
Using an external monitor with your Mac
If you don’t have an iPad or just want to use an external monitor as an additional display, follow these steps to get that monitor set up.
Check the ports on your monitor and your Mac
Before you even try to set up your monitor, check out its ports and the ports on your Mac so that you know what cables or adapters you need in order to connect them to each other.
These days, most monitors have at least one HDMI port on the back, like what you’ve probably seen on your TV. There’s also a chance that your computer can plug into that monitor with a USB-C cable.
Knowing what type of cable to plug into your Mac to send a signal to your monitor can be a bit trickier to figure out. If you have a Mac that was released in 2019 or later, it will have Thunderbolt 3 ports, which means you can plug a USB-C cable into one of those ports and hook the computer up to your monitor with a cable that has a USB-C or HDMI connector on the other end.
If you have a Mac that’s older than that, though, you might need something else, such as a cable with Mini DisplayPort connector. Check out Apple’s full list of which of its computers have which ports on its website so you can figure out what cables you need to buy.
Configure your external monitor
Once you have the cables you need, plug in your monitor and set it up on your desk. Then turn on your Mac, log in, and plug your Mac into your monitor. When you do, what’s on your Mac’s screen should be mirrored on the external display. You can connect your Mac to the monitor before you turn it on, but the Mac won’t show up on the monitor until you actually log in.
If you have a MacBook and you want your external monitor to be your main display, make sure you’ve connected an external mouse and keyboard to your MacBook and that the computer is plugged into a power source. Then close the MacBook’s lid. Your monitor’s screen will likely fade to black for a second or two, and then it should display what’s on your computer.
If you want to use your external monitor as a second monitor, you’ll need to set things up. Open System Preferences and then click “Displays.”
The Displays menu has a few different tabs, but the one that matters if you’re going to set up a second display is the Arrangement tab. After you click on this tab, you’ll see a checkbox in the lower-left corner to “Mirror Displays.” Uncheck that box, and you’ll be able to use your Mac’s screen and an external monitor as two separate displays.
In the Arrangement tab, you can also tell your computer how each display is physically aligned on your desk. For example, in the arrangement I set up for two screens in the screenshot below, I can only drag something from the primary display (the one on the left with the white bar) to the secondary display on the right if it’s a place where they’re “aligned.”
 スタッドレスタイヤ ホイールセット VW(ティグアン Rライン) ダンロップ ウインターマックス01 WM01 225/60R17 17インチ BIGWAY EURO AFG 7.5J 7.50-17
DLウインターマックスWM01 215/55R17+TEAD SWING 17×7.0 114.3/5H +40 クラウン GRS203 スタッドレスタイヤ+ホイール4本Set
ルノー ルーテシア RK系用 スタッドレス ファルケン エスピア ダブルエース 185/60R15 84H OZ MSW 86
ウインターアイセプトIZ2a W626&LCZ010 195/65R15 4-100 1555 ハンコック&インターミラノ スタッドレスタイヤホイール4本セット [911]
アイスナビ7&カシーナFV7 205/50R17 5-114.3 1770 グッドイヤー&テクノピア スタッドレスタイヤホイール4本セット [911]
レグナム EA5W スタッドレスタイヤ+ホイール4本SET ダンロップ WM01 195/65R15 テッドトリック 15×6.0J 114.3/5H + 43
【SSR】 EXECUTOR EX05 (エグゼキューター EX05) 20インチ 10.5J PCD:120 穴数:5 inset:4 ブラッシュド [ホイール1本単位] [H]
【SSR】 EXECUTOR EX05 (エグゼキューター EX05) 20インチ 10.0J PCD:120 穴数:5 inset:15 フラットブラック [ホイール1本単位] [H]
【SSR】 EXECUTOR EX02 (エグゼキューター EX02) 20インチ 9.5J PCD:120 穴数:5 inset:23 ブラッシュド [ホイール1本単位] [H]
ICE ASIMMETRICO Plus 215/60R16 95Q PIRELLI ■SEIN SV KYOHO メタルフレークシルバー 16×6.5 114/5H +38 スタッドレス&ホイールセット
スタッドレスタイヤ ヨコハマ アイスガードシックス iG60 225/50R17 94Q レオニス MX HS3/SC 7.0-17
ボルボ S60 2001年·2009年 スタッドレス 225/45R17 ブリヂストン ブリザック VRX2 ボルベット タイプF タイヤホイール4本セット
グッドイヤー アイスナビ7 205/55R16 スタッドレス タイヤ·ホイール 新品 4本セット ジャパン三陽 ザック JP-550 パーツ バランス調整済み!
VW ゴルフ7用 スタッドレス ピレリ アイスアシンメトリコ プラス 205/55R16 91Q MAK ドレスデン
【SSR】 EXECUTOR CV01 SUPER CONCAVE (エグゼキューター CV01) 19インチ 12.0J PCD:120 穴数:5 inset:49 フラットチタン [ホイール1本単位] [H]
245/35R19 93Y 19インチ ピレリ P-ZERO <PZ4> 新品4本セット サマータイヤ 国産車 輸入車
RAYS(レイズ) DAYTONA FDX F6 17インチ 8.0J PCD:139.7 穴数:6 inset:20 カラー:B8 [ホイール単品4本セット]
ミシュラン X ICE3+ 205/55R16+セプティモ G01 DG 16×6.5 114.3/5H + 53 マツダ アクセラ 2009/06 · スタッドレスタイヤ+ホイール4本Set
スタッドレス 17インチ 215/45R17 グッドイヤー アイスナビ6 ウェッズ レオニスWX HSMC タイヤホイール4本セット 新品 国産車
アウディ TT 8J系用 スタッドレス コンチネンタル バイキングコンタクト7 245/45R17 99T XL OZ MSW 85 セミグロスブラック
アウディ専用 MAK ヴィンチー SIL 16インチ 5H112 6.5J+46 205/60R16 グッドイヤー アイスナビ7
中古ホイールタイヤ 4本 215/60R17 Weds ジョーカー スタッドレス タイヤ ブリヂストン ブリザック VRX2
16インチ 5H139.7 5.5J+20 5穴 クリムソン MGデーモン ホイール 4本 1台分セット CRIMSON MG DEMON ブラックサイドマシニング 個人宅発送追金有
スタッドレスタイヤ ホイールセット 5穴/114 ダンロップ ウインターマックス SJ8 235/55R18 18インチ PREMIX ドルチェ3x5(ブロンズクリア) 7.5J 7.50-18
カローラ スポーツ ハイブリッド 2018/06 · スタッドレスタイヤ+ホイール4本SET YOKOHAMA IG60 205/55R16Septimo G01 DG 16×6.5 100/5H + 48
中古 VOSSEN ホイール 1本セット 20インチ 12J +35 PCD 120 ホイールのみ
 グッドイヤー アイスナビ7 205 パーツ/55R16 スタッドレス タイヤ·ホイール 205/55R16 新品 4本セット スタッドレス ジャパン三陽 ザック JP-550 パーツ バランス調整済み! :navi7zjp55042:オールドギア
 ミッションmission ビールに味を!人生に幸せを!
 画一的な味しかなかった日本のビール市場にバラエティを提供し、新たなビール文化を創出することでビールファンにささやかな幸せをお届けしたい。
それがヤッホーブルーイングのミッションです。
クラフトビールとは、小規模な醸造所がつくる、多様で個性的なビールを指します。1994年の酒税法改正以降に設立された、小規模なビール醸造所がつくりだしているビールのことで、これまでにない多様性と、個性的な味わいやブランドを備えているのが特徴です。


 ビールproducts オンラインのお店「よなよなの里」online shop
ヤッホーブルーイングのスタッフが遊び心たっぷりに運営する公式オンラインショップ。
ビール、オリジナルグッズの販売はもちろん、ファンイベント・醸造所見学ツアー情報も公開中。


「よなよなエールの“おうち”超宴」とは
ビール好きの皆さまと乾杯するための
『オンラインイベント』です。
直接お会いすることが叶わない状況だからこそ、
画面越しにささやかな幸せをお届けしたい!
そんな想いから、この「おうち超宴」を
開催する運びとなりました。
ビール好きの皆さまにとって、「おうち超宴」が
すこしでも楽しい時間となりますように。
ビールに味を!人生に幸せを!
グッドイヤー アイスナビ7 205/55R16 スタッドレス タイヤ·ホイール 新品 4本セット ジャパン三陽 ザック JP-550 パーツ バランス調整済み!よなよなエールの“おうち”超宴 特設サイト 公式ビアレストラン「yona yona beer works」yona yona beer works

よなよなエール公式ビアレストランです。現在、東京都内に8店舗(赤坂・神田・青山・吉祥寺・新宿東口・恵比寿東口・歌舞伎町・新虎通り)。「よなよなエール」や「水曜日のネコ」等の定番ビールはもちろん、限定醸造ビールも味わえます。10種類以上のオリジナルソーセージやローストチキンと一緒にマリアージュもお楽しみください。
yona yona beer worksへ


 calyces6dc4_cfke/4m4jdy91srfxbes9iy06d.madrid
woolfell733c_3gdw/cy9okehpl6tlr67ngrl373.madrid
brecciatef72a_21m5/abk5lz2apldlxqkf62f7.madrid
zinky8efa_fbjn/a6la7czw8e.madrid
misogamist5c8f_8cg0k5c.madrid
 ビール造りbrewing process
 ビールの主な原材料は「麦芽」「ホップ」「酵母」「水」。たった4つの原材料ですが、出来上がるビールの種類は無限大です。
 麦芽からビールのもとになる「麦汁」を造りだす工程。出来上がった「麦汁」に「ホップ」を加えビールに欠かせない香り・苦味をつけていきます。
出来上がった麦汁は冷やされ発酵タンクへ。
エールビールの特徴を生み出す「エール酵母」を麦汁に加え、発酵開始。アルコールと二酸化炭素が生み出され、いよいよ「ビール」になっていきます。
美味しさそのままにお届けできるよう丁寧に充填していきます。
実は、日本初の缶入りクラフトブルワリー。創業から一貫して缶にこだわってお届けしています。

 お近くのコンビニやスーパー、yona yona beer worksを始めとするパブ・レストラン、皆様のご自宅にお届け。色や香りをお楽しみいただくためにグラスに注いでお楽しみくださいね。


 採用recruit
ビール文化を本気で変える知的な変わり者を募集しています。
ヤッホーブルーイングで働く醍醐味や採用に関する最新情報はこちらをご覧ください。

What’s New in the Use iMac As Monitor For PC {Window / Laptop} Need to follow the Steps?
Screen Shot

System Requirements for Use iMac As Monitor For PC {Window / Laptop} Need to follow the Steps
- First, download the Use iMac As Monitor For PC {Window / Laptop} Need to follow the Steps
-
You can download its setup from given links:

