
Visual Studio 2017 Visual Studio 2017 Patch Key Archives

Visual Studio 2017 Visual Studio 2017 Patch Key Archives
June 2017 (version 1.14)
Update 1.14.1: The update addresses these issues.
- The refactoring to convert a JavaScript ES5-style function class to an ES6 class is disabled.
Update 1.14.2: This update addresses these issues.
Downloads: Windows | Mac | Linux 64-bit: .tar.gz.deb.rpm | Linux 32-bit: .tar.gz.deb.rpm
Welcome to the June 2017 release of Visual Studio Code. There are a number of significant updates in this version that we hope you will like, some of the key highlights include:
If you'd like to read these release notes online, you can go to Updates on code.visualstudio.com.
The release notes are arranged in the following sections related to VS Code focus areas. Here are some further updates:
- Workbench - Restore loose files, quickly switch running windows (instances).
- Languages - TypeScript 2.4, more relevant suggestions in JavaScript files.
- Debugging - Simplifications for Node.js debug configurations.
- Tasks - Auto-detect and customize npm scripts and TypeScript compiler to run in VS Code.
- Extension Authoring - SVG rendering constraints, custom views visibility, new Debug API.
Insiders: Want to see new features as soon as possible? You can download the nightly Insiders build and try the latest updates as soon as they are available.
Workbench
Lighter update experience
We're working on toning down the update experience. The consensus was that the popup message to update VS Code was disruptive and we are experimenting with other UI affordances. This month, you'll notice a little indicator in the bottom-left corner of the workbench when an update is available:
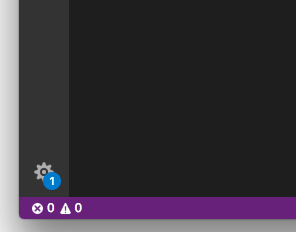
Clicking on this indicator will let you apply the update as well as access other global actions (Command Palette, Settings).
Don't worry about losing sight of this notification. macOS users will have the update automatically applied as soon as they restart VS Code, and Windows and Linux users will get the old pop-up message if they don't accept the notification after a few days.
Command Palette improvements
We improved the Command Palette drop-down (⇧⌘P (Windows, Linux Ctrl+Shift+P)) to make it more useful.
One popular request was to always restore the last typed input when reopening the Command Palette. Enable this behavior with the new setting .
We also added a most recently used (MRU) list of commands that is persisted between restarts. The most recent commands executed will always show to the top. A new setting allows you to control the number of entries to show (set it to 0 to disable this feature). With the MRU enabled, you do not need to enable because the history will always have the last executed command selected by default when you open the Command Palette.
A new command Clear Commands History was added to quickly dismiss all the entries from the commands history.
Finally, keyboard shortcuts in the drop-down are presented in the same visual form as in the Keyboard Shortcuts editor.
Restore empty workspaces
In VS Code, you can work with workspaces that have folders opened as well as empty workspaces. An empty workspace is not opened to a specific folder but can show files from disk. Up to now, we would never restore the UI state of empty workspaces and you would lose your carefully selected layout of opened files (even on window reload).
With this release, we will restore the UI state for empty workspaces in the same way we do for workspaces with opened folders.
![]()
A new setting configures this behavior. The possible values are:
- - Never restore any workspaces
- - Restore the last active workspace (default)
- - Only restore opened folders
- - Restore all workspaces.
With the new setting , we deprecated the previous setting and ask you to switch to the new setting. We will still support the old setting for a couple of releases.
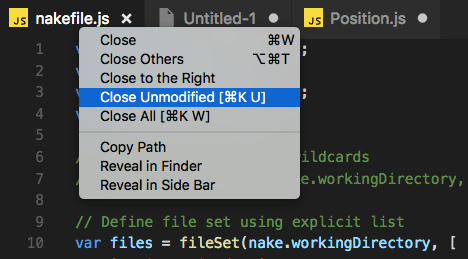
Close unmodified files
A new command was introduced to close unmodified editors of the currently active editor group. This makes it easy to quickly dismiss tabs of editors that are not dirty (no unsaved changes). The action can be triggered not only via a keybinding (⌘K U (Windows, Linux Ctrl+K U)) but also from the context menus of the tabs (headers) as well as the OPEN EDITORS view in the Explorer.
Thanks to Soney Mathew (@soneymathew) for providing the pull request for this feature!
Switch window improvements
In a previous release, we added a quick picker for switching between the opened windows (via the command). In this release, we did some tweaks to make the experience better.

You will now see icons for the currently active file or folder in the window, provided that you have enabled one of the File Icon themes.
In addition, a new command was added to quickly switch between opened windows. Press and hold the modifier key to cycle through the list of windows and release all keys to open it.
As an example, to use this feature with the keyboard shortcut, configure the following rule in the keybindings editor:
Press and leave the key pressed. As long as you now press the key, you can navigate through the list of windows. Release all keys to focus it.
New keybindings context per quick picker
Related to the improvements around the window picker, it is now easier and better to configure a picker with quick-pick functionality. Each time a picker opens, a specific keybinding context becomes active that you can use to assign keybindings to. For example, the window picker enables a context key when opened. Not only does it make quick navigate in pickers more powerful, it also fixes some annoying bugs. You can now bring up any quick picker, even if the quick picker is already showing (for example, opening the Quick Open file picker while the Command Palette is already open).
The following example demonstrates how to configure quick navigate keybindings to switch between the most recently opened folders:
As an example, to use this feature with the keyboard shortcut, configure the following rule in the keybindings editor:
Press and leave the key pressed. As long as you now press the key, you can navigate through the list of recently opened folders and files. Release all keys to open it.
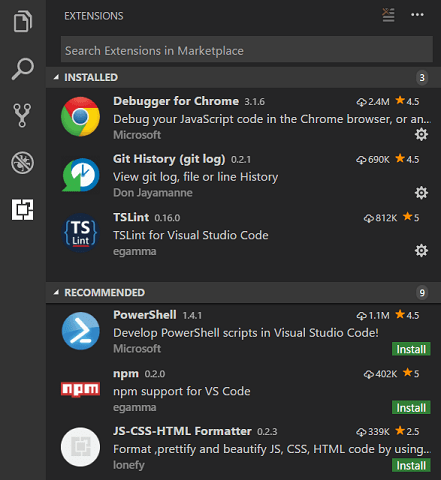
Extensions Installed / Recommended sections
To make recommended extensions more visible, Extensions view now shows INSTALLED and RECOMMENDED extensions in two sections.
Lists and quick pick leverage aria properties
Lists such as the suggestion widget, exception list and the Quick Open drop-down now set and . These lists are virtualized and so without these aria properties, screen readers could not correctly determine the number of entries.
Integrated Terminal
Selection re-implemented
The way selection works in the Integrated Terminal has been completely re-implemented by moving away from regular web selection to a model where it's managed and rendered by the terminal itself. This fixes a lot of issues and here are the major call outs:
- You can now select and copy text from more than one page of the terminal.
- There is a new Select All command.
- Copying wrapped lines will no longer add line breaks where they wrap.
- Double click word selection is improved, it will now select URLs and paths, rather than just fragments
- Selection in with mouse mode on should now work correctly
Find in the terminal
The Integrated Terminal now has basic find functionality which can be triggered with .

If you want to go to the shell instead of launching the Find widget on Linux and Windows, you will need to remove the keybinding like so:
Rename terminal sessions
Integrated Terminal sessions can now be renamed using the command. The new name will be displayed in the terminal selection drop-down.
Git
Pull from specific remote
Thanks to @BugraC, @matthewshirley, @Krzysztof-Cieslak, it's now possible to pull changes from a specific branch in a remote repository with the Pull from... command.
Manage your .gitignore file
@BugraC also provided a change so that you can now add files to your right from the context menu of the Source Control view or via the global Git: Add File to .gitignore command.
Tasks
To make tasks more convenient to use, we added a Tasks menu to the top-level menu bar:
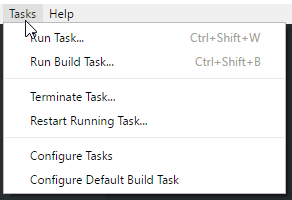
The Tasks menu offers a new action Configure Default Build Task which when used with the version of a file, just opens the file. The full power of the Tasks menu comes when using it with the version of the , which is now the default if no file is present.
Many cool features come with the new task format:
- The command now shows most recently used tasks first, then custom defined tasks, and last, auto-detected tasks.
- Tasks are executed in the Integrated Terminal. This improves output encoding, brings full support for ANSI control sequences (for example, colors), and supports providing input to a task.
- Task auto-detection for TypeScript, Gulp, Jake, Grunt and npm:
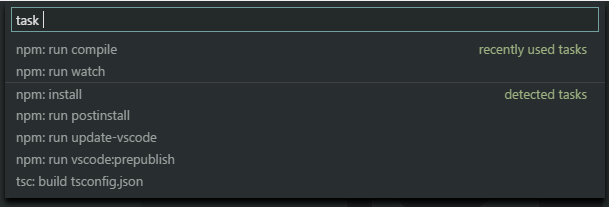
We are working with extension providers to add dotnet, Maven and others in the future.
As you can see from the image above, auto-detected tasks are prefixed with the type of task ('npm:', 'gulp:', 'grunt:', 'tsc:', or 'jake:'). If you are referencing an auto-detected task in another file, for example as a in , you will need to update that task reference with the prefix. Assuming you have the following and the "build" task comes from a gulp file,
you now need to change this to:
- Guided problem matcher selection when executing a task without one:

Guided default build task selection. Simple run from the global menu bar.
And of course you can still define your own custom tasks in the file with full control over how they are executed in the terminal. For example, the tasks below executes a test script in the terminal and uses a new terminal for every test run:
Consult the tasks documentation for a detailed list of new features and how to use them as well as instructions on how to best convert a version file to a .
Since we are now auto detecting all Gulp, Grunt, Jake and npm tasks available in a workspace you need to qualify the task name with the task runner when referencing it from a launch.json file. Assuming you have the following launch.json
and the task comes from a gulp file you now need to change this to:
If you are unsure how the task name looks like execute Run Task... from the global Tasks menu and use the label presented in the list of tasks.
We also released the tasks API. If you want to provide task detection for your programming language, you should have a look at the API and at one of the VS Code task detection extensions like npm scripts autodetect.
Debugging
Recipe for Angular debugging
Setting up Node.js debugging can be challenging for some non-standard or complex scenarios. In May, we started to collect recipes for these scenarios in a recipe repository.
This release adds a new recipe by Tony Sneed (@tonysneed) for Chrome Debugging with Angular CLI.
Debug hover has scroll bar for long values
Thanks to a community pull request, a debug hover now displays long string values using a scroll bar.
Node Debugging
Windows executables are found even if no extension is specified
On Windows, it was previously necessary to include the correct file extension in the path, leading to complicated cross platform configurations:
With this release, it is no longer necessary to include the file extension which makes the path portable across all platforms:
Simplified setup for "Restart debug session"
VS Code Node.js debugging always supported restarting a debugging session automatically. This is useful if you use a file watching tool like nodemon to restart Node.js on file changes. Setting the launch configuration attribute to true makes the node debugger automatically try to re-attach to the Node.js runtime after Node.js has terminated. See the Node.js Debugging documentation for details.
In this release, we have simplified this feature by eliminating the need to set the debug flags and the port attribute explicitly. Depending on the protocol ("legacy" or "inspector"), VS Code will pass the correct , , , argument and a random port to the program specified as the and this port will be used for subsequent restarted sessions.
With this feature, the debug configuration for globally installed nodemon simplifies to:
"Attach by process ID" support for all Node.js versions
VS Code Node.js debugging always supported debugging a Node.js process even if it was not launched in debug mode. For this, the debug configuration of type "attach" has to specify a attribute. With this release, we support this feature for all versions of Node.js (and not only for versions < 8.0 as before).
Node.js v8.0 related changes
Different versions of Node.js support different debugging protocols. The VS Code Node.js debugger tries to determine automatically which protocol to use. If this is not possible, it defaults to the "legacy" protocol which is supported by all Node.js versions < 8.0. For details, see the Node.js Debugging documentation. Since the adoption of Node.js v8.x is steadily increasing, we are in the process of changing the default protocol for specific scenarios from "legacy" to "inspector".
In this release, Node.js debugging will assume the "inspector" protocol whenever the attribute of a launch configuration is set. If you see your debug configurations failing, this change could be the reason. To fix this, you can either upgrade Node.js to version 8.x or you can explicitly force the use of the "legacy" protocol by adding to your launch configuration.
Languages
TypeScript 2.4
VS Code now ships with TypeScript 2.4.1. This release includes a number of new language features, bug fixes, and editor improvements. Some highlights include:
Dynamic Import Expressions
Support for the new ECMAScript expression for lazily loading modules:
Parent method suggestions in subclasses
IntelliSense now displays interface and parent methods class methods in subclasses:
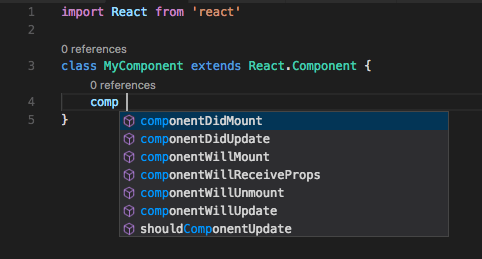
This is helpful for overriding parent methods or implementing interfaces.
More relevant suggestions in JavaScript files
In VS Code 1.13, suggestions in JavaScript files include suggestions for types:
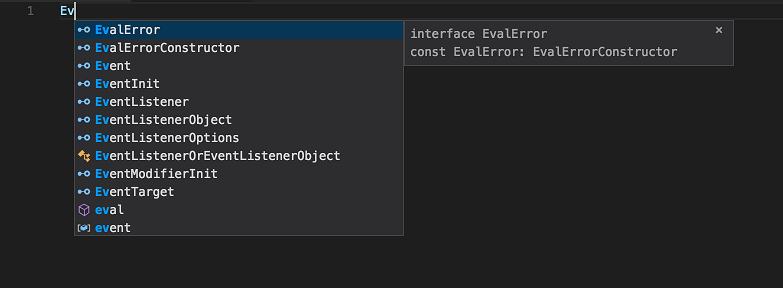
This meant that many suggestions that are generally not useful in JavaScript were shown, such as or .
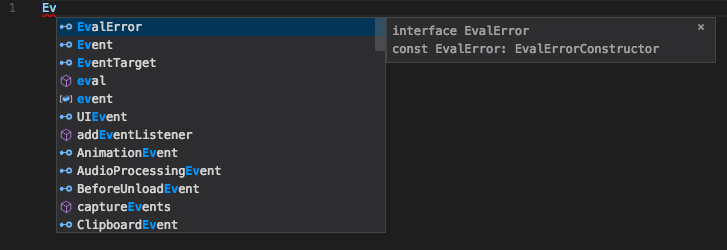
VS Code 1.14 better filters JavaScript suggestions to only include those you typically care about while working in plain old JavaScript:
Simpler building TypeScript using Tasks
You can now build TypeScript projects using ⇧⌘B (Windows, Linux Ctrl+Shift+B) without having to configure a file, all you need is a file:
TypeScript will pick up all projects in your workspace for building.
Formatting option for spaces after TypeScript type assertions
The new setting allows you to control the placement of spaces after a type assertion in TypeScript.
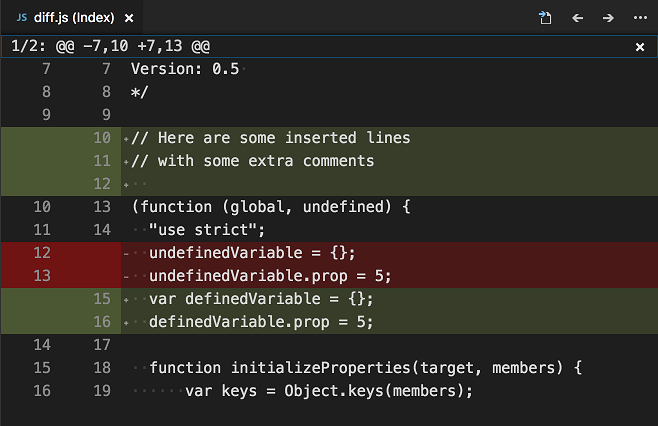
Refactoring support for JavaScript and TypeScript
Note: Due to performance issues in some scenarios, this refactoring is disabled in 1.14.1.
VS Code 1.14 includes initial support for refactoring JavaScript and TypeScript code. The first supported refactoring converts a JavaScript ES5-style function class to an ES6 class:
We plan to add additional refactorings in the future.
Control handling of line breaks in the Markdown preview
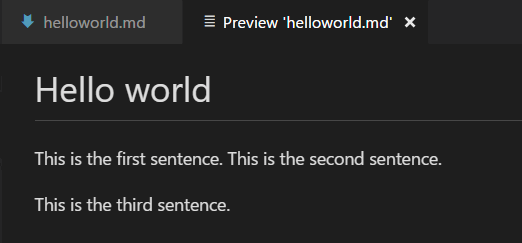
The new setting controls the rendering of line breaks in Markdown preview. By default, single line breaks in Markdown paragraphs are ignored. For example in the Markdown below:
The Markdown preview would show:
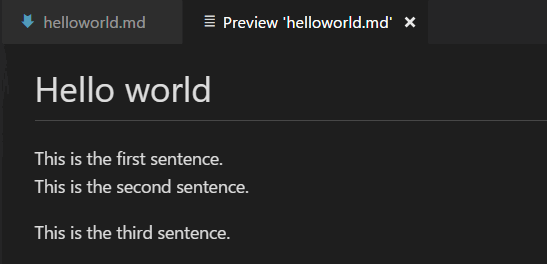
When is set, all new lines in paragraphs are converted into tags in the output HTML:
Editor
Emmet abbreviation improvements
In the previous release, we introduced a new model for Emmet features which you can enable by setting to . Below are the improvements to this new model in the current release:
Multi cursor support in Emmet
Try out the multi cursor support for many of the Emmet commands after setting to and don't forget to log issues if you find anything not working as expected.
Emmet customizations in the new Emmet model
The new Emmet model supports the following Emmet settings:
Add Emmet: Expand Abbreviation and Emmet: Wrap with Abbreviation support to the language of your choice by providing a mapping to an existing Emmet supported language. The new language goes on the left and the Emmet supported language on the right. Use language ids for both sides of the mapping. For example:
If there is any language where you do not want to see Emmet expansions, add it in this setting which takes an array of language id strings.
See Emmet Customization of output profile to learn how you can customize the output of your HTML abbreviations. For example:
Customize variables used by Emmet snippets. For example:
Controls the Emmet suggestions that show up in the suggestion/completion list.
- - Never show Emmet abbreviations in the suggestion list for any language.
- - Emmet abbreviations in the suggestion list for languages that are markup and stylesheet based ('html','pug','slim','haml','xml','xsl','css','scss','sass','less','stylus') (default).
- - Emmet abbreviations in the suggestion list in languages that are markup and stylesheet based as well as , and any other language that has been mapped in the new setting .
Note: In the mode, the new Emmet implementation is not context aware. For example, if you are editing a JavaScript React file, you will get Emmet suggestions not only when writing markup but also while writing JavaScript.
Enable language extensions to provide Emmet suggestions
To get around the issue of having Emmet suggestions show up in the non-markup and non-stylesheet sections of your source code, we have pulled out the Emmet completion provider to a module of its own. This enables language extensions to use the npm module vscode-emmet-helper and provide Emmet suggestions in the right context as they are more aware of the language structure than the Emmet extension.
Auto indent on type, move lines and paste
With this release, you can have auto indentation adjustment while typing, moving lines and pasting content in TypeScript, JavaScript, HTML, CSS, JSON or languages that have indentation rules. To enable this feature, set to . The indentation rules are still under development so let us know if you run into any issues.
Indentation rules
We made some earlier improvements to the indentation rules in the 1.9 release. With this release, language extension authors can declare the indentation rules in a file instead of registering them in the extension activation phase.
TypeScript, JavaScript, CSS, HTML and JSON have built-in indentation rules. We don't ship indentation rules for other languages yet but if you use an extension which defines rules for another language, you will see the feature working.
Typing
For C-like languages, we already handle brackets nicely. We indent the next line when the user types an open bracket and adjust the indentation when the user types a matching close bracket. However we don't have support for languages that use keywords to wrap blocks. With the new auto indent feature, it is now possible by creating indentation rules for that language.
Moving lines
When you move source code out of a nested block or move code from one block to another, the editor will adjust the indentation level automatically.
Paste
Pasting is similar to moving lines, VS Code will adjust the indentation for you based on the lines before the pasted area.
Minimap
The new setting can be configured to to always render the minimap (outline view) slider. There is now also a subtle indicator of the horizontal scroll position within the slider. The slider geometry computations received a lot of improvements too (see the Notable Changes section):
Diff editor review pane
We've added a review pane to the Diff editor, an experience especially designed for users of screen readers. Our diff editor is implemented as a composition of two editors, and each side is exposed as a regular code editor to screen readers. It is not clear (if possible) how we could automatically announce entering a diff region or the actual diff to a screen reader from the context of a code editor.
We therefore added and which will navigate through diffs and present them in a unified patch format. Lines can be navigated with arrow keys and pressing will jump back in the diff editor and the selected line.
Extension Authoring
Constraints for rendering SVG images
Due to security concerns, we don't want to render user provided SVG images within VS Code. We added constraints for extensions to make it safer for users when they browse the extension Marketplace within VS Code:
- The icon provided in may not be an SVG.
- The badges provided in the may not be SVGs unless they are from approved badge providers.
- Image URLs in and need to resolve to URLs.
- Images in and may not be SVGs unless they are from approved badge providers.
- Images in and may not use data URIs.
To help you adopt these constraints, VS Code shows linting errors in your extension's , , and files if they are not yet compliant. Also, the publishing tool performs compliance checks and prevents you from uploading a new version of your extensions if there are problems.
Custom views
You can now control the visibility of a custom view by providing the context value while defining it in contribution section in .
Example:
New Debug API
In this release, we've started to provide a Debug API for extensions.
The initial API covers the life-cycle of debug sessions:
- for starting a debug session based on an in-memory launch configuration.
- An event which indicates that a debug session has terminated.
Note: Currently this API is proposed, so in order to use it you must opt into it by adding a to and you'll have to copy the into your extension project. Also be aware that you cannot publish an extension to the Marketplace that uses the attribute.
New Task API
If you want to provide task detection for your programming language, you can now use the official task API. Have a look at the API and at one of the VS Code task detection extensions like npm scripts autodetect.
Debug Adapter Protocol
New capability
In the May release, we improved stepping performance by fetching parts of the call stack and the corresponding variables lazily. Later we learned that not all debug extensions were prepared to return the stack in chunks which could result in a duplicated top stack frame. We weren't able to fix this problem in a robust way, so we decided that debug adapters should opt-in to the delayed loading of stack frames explicitly and a new capability was introduced in the debug protocol. So if the lazy loading of stack frames was working fine in your debug extension and if you know that your debug adapter already supports both the and the attribute of the request, you should return for the capability. This ensures that you'll continue to see the improved stepping performance delivered in the June release.
New optional attribute for type
With this new option, the can be parameterized to include all stack frames, including those the debug adapter might otherwise hide.
Engineering
Windows 64 bit Insiders
Visual Studio Code 64-bit builds are now available on Windows for the Insiders build. They come in the usual Installer format as well as a ZIP archive. Make sure to uninstall the 32-bit version before you install the 64-bit one.
You should expect 64-bit builds of our Stable version next month.
Issue management automation
The Probot we deployed to assist in our issue management now uses a machine learning algorithm to guess the feature area of new issues. When the algorithm estimates a sufficiently high probability of being correct, the bot adds the area label and (in some cases) directly assigns the issue to a developer on the team:
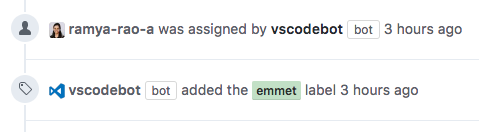
For a few days after a new release, the bot labels new issues filed for that release with the label. This helps us quickly spot regressions introduced in the release. We remove the label after a few days:

We are looking for feedback from the community and plan to add more automation.
Monaco Editor
We published a new version of the Monaco Editor, bringing it up to date with VS Code and making numerous accessibility improvements.
Preview: Multi Root Workspaces
We have been busy this milestone on the development of "Multi-Root Workspaces" in VS Code (refer to our previous release notes for the design decisions we made last sprint). The outcome of this work is what we call a "Minimum Viable Product" (MVP) to enable testing on multiple root folder workspaces. The features outlined below are currently only available from our Insiders build and not Stable. More work is needed before we can make this feature available for all users. To try it out, grab our Insiders build from https://code.visualstudio.com/insiders.
File Explorer
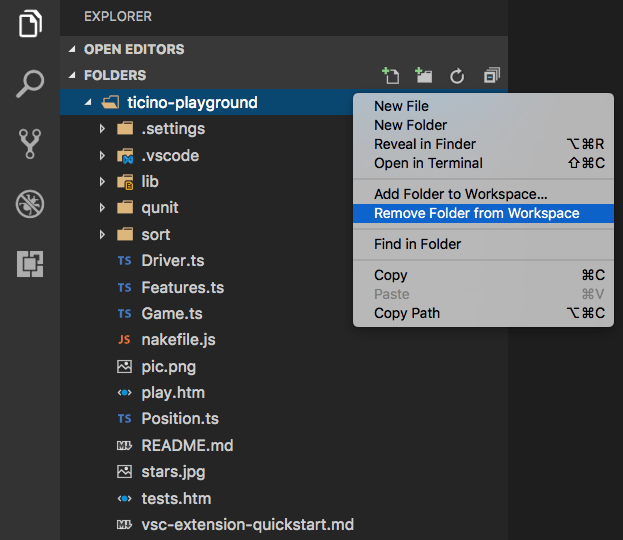
The File Explorer can now show multiple root folders in one tree. You can easily add root folders from the File menu or context menu:
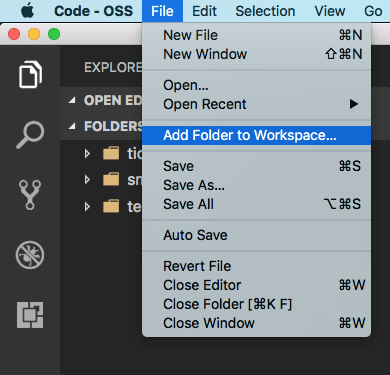
Once a root folder is added, the Explorer will show the new folder as root in the files tree. You can right click on any of the root folders to add more root folders or to remove it.
The File Explorer should work and behave as before. You can move files between root folders and use any of the typical file operation actions provided in the context menu and the Explorer view. Settings like are supported for each root folder if configured and across all folders if configured as global user setting.
Search
Full text search and the Quick Open file picker take the additional root folders into account. When searching, results from all of the root folders will show up in the search results view:
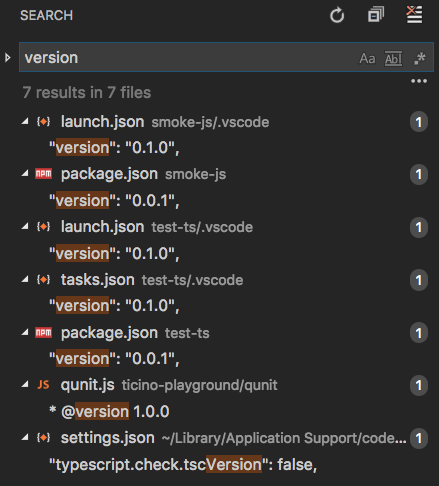
To distinguish results with the same file name across root folders, the name of the root folder is used as a prefix to the relative path in the results list. Settings like are supported for each root folder if configured and across all folders if configured as global user setting.

Settings
With multiple root folders in one workspace, it is possible to have a folder in each root folder defining the settings that should apply for that folder. We classified settings into Workspace and Folder scoped to determine which setting can be applied at Workspace and Folder level.
A subset of settings is supported at a Folder level in this environment, specifically:
Other settings are currently not supported on a per-folder basis and we will add more to the above list in the future.
Refer to the issue to get more information about how settings are applied in a multi-root workspace.
Proposed multi-root API
Having multiple folders open in the editor requires a more powerful API. From when only a single root was supported, there is the API and for compatibility that will remain. We have a new and more powerful API in the pipeline. The current proposed API is shown below and enables you to inspect all workspace folders and sends an event when those change. It also gives you access to the new configuration model.
Note: The API is still proposed and you will need to enable it per extension. In the file of your extension, add the following line:
Also, copy the file from our repository to your project. Including this file in your project enables type-checking and IntelliSense.
As the API is in the proposed state, it is still being refined and breaking changes are likely to happen. For that reason, we don't support publishing extensions that use proposed APIs. However we do want extension writers, the clients of the extension API, to help us define how the final API should look and what it should support. Don't be shy with feedback!
Upcoming features
There is still a lot of work ahead of us to make the multi-root experience great.
These areas will get special attention in the next milestone:
- Source Control UI for multiple root folders
- Task and Debug support
- Rich languages support across root folders
New Commands
| Key | Command | Command id |
|---|---|---|
| ⌘K U (Windows, Linux Ctrl+K U) | Close unmodified editors of the currently active editor group | |
| Quickly switch between opened windows (instances) | ||
| Quickly switch between recently opened folders and files | ||
| Integrated Terminal Find | ||
| ⌘A (Windows, Linux ) | Integrated Terminal Select All | |
| Integrated Terminal Rename | ||
| F7 | Diff Editor Next Change | |
| ⇧F7 (Windows, Linux Shift+F7) | Diff Editor Previous Change |
Notable Changes
- Now using instead of to hint editor browser layers. The "hidden" editor option is replaced by . See monaco-editor#426.
- Replaced a bad usage of in a loop, which makes large pastes significantly faster. See monaco-editor#351.
- Reimplemented the scrollbar's slider geometry computations, to take into account artificial slider size inflation at an earlier stage, which results in correct mouse control in large files. See 6710.
- Reimplemented the minimap's slider geometry in a similar spirit: 21346, 29326, 28944.
- Found (with help from @fj128) and implemented a workaround for thin lines rendering when the CSS <-> screen pixel ratio is not an integer: 9634, 28542.
These are the closed bugs and these are the closed feature requests for the 1.14 update.
Contributions to Extensions

- Git Lens: We added a stash explorer (Pull requests: #94, #102) to Git Lens, which allows you to see the content change of local stashes in VS Code Diff Editor.
Thank You
Last but certainly not least, a big Thank You! to the following folks that helped to make VS Code even better:
Contributions to :
Setting Up Visual Studio for Unreal Engine
Unreal Engine is designed to integrate smoothly with Visual Studio, allowing you to quickly and easily make code changes in your projects to immediately see results upon compilation. Setting up Visual Studio to work with Unreal Engine can help improve efficiency and the overall user experience for developers using Unreal Engine.
In this document, we'll also cover the basics for setting up your Unreal Engine-to-Visual Studio workflow.
Before Setting-up your Unreal Engine-to-Visual Studio Workflow
In Visual Studio 2017 (VS2017), support for C++ is now part of optional workloads that aren't installed by default. For detailed instructions on adding C++ tools to your existing Visual Studio installation, see Install C++ support in Visual Studio on the Microsoft support page. If you have not yet installed Visual Studio or the Unreal Engine, see the Options for a New Visual Studio Installation section on this page.
The following table lists which versions of Visual Studio are integrated with the binary version of Unreal Engine.
Unreal Engine Version | Visual Studio Version |
|---|---|
4.22 or Later | VS 2017 |
4.15 or Later | VS 2017 |
4.10 to 4.14 | VS 2015 |
4.2 to 4.9 | VS 2013 |
As of version 4.22, Unreal Engine does not support VS 2015. Unreal Engine still uses VS 2017 by default, but also supports VS 2019.
As of version 4.20, Unreal Engine uses VS 2017 by default. However, VS2015 is still supported. If you have VS 2015 installed but not VS 2017, Unreal Engine 4.20 will still work. However, if you have both VS 2015 and VS 2017 installed, Unreal Engine 4.20 will use the VS 2017 IDE and compiler by default, as well as generating VS 2017 project files.
To configure Unreal Engine 4.20 to generate a VS 2015 solution and project files, you can do either of the following:
Select the version of Visual Studio you wish to use as your preferred source code IDE in the editor (from the editor preferences window)
Modify the relevant section of the BuildConfiguration.xml file
Open source versions of Unreal Engine (available through GitHub and Perforce) are integrated with VS2013. Also, earlier versions of Unreal Engine integrated with older versions of Visual Studio aren't covered in this document.
Run the Unreal Engine Pre-Requisite Installer
When you install Unreal Engine from the Epic Launcher, or if you clone it from GitHub, the Unreal Engine pre-requisite installer runs automatically. However if you install or sync Unreal Engine from Perforce, you will need to manually run the pre-requisite installer. You need to do that before running any Unreal Engine tools you have built locally.
Options for a New Visual Studio Installation
If you're installing Visual Studio for the first time, you'll want to make sure that you have the following options enabled.
C++ Tools
To add C++ tools to your Visual Studio installation, make sure you select Game development with C++ under Workloads.
Include the UE4 Installer
To include the UE4 installer when installing Visual Studio, locate the Summary sidebar on the right, expand Game Development with C++, and under Optional make sure the box for Unreal Engine installer is checked.
Recommended Settings
The following are recommended settings for developers using Visual Studio with Unreal Engine 4.
Increase the Width of Solution Configurations Dropdown Menu
Right-click on the toolbar and select Customize at the bottom of the menu that appears.
Click on the Commands tab.
Select the Toolbar radio button.
In the dropdown next to Toolbar, choose Standard.
In the Preview list, select the Solution Configurations control.
Click Modify Selection on the right.
Set the Width to 200. Then click OK.
Click Close. Your toolbar should update immediately.
Add the Solution Platforms Dropdown
Locate the right-most button on the Standard toolbar (if you hover the mouse over it, it's labeled Standard Toolbar Options).
Click the dropdown button, click Add or Remove Buttons, and then click on Solution Platforms to add the menu to the toolbar.
Turn Off the Error List Window
Typically, the Error List window pops up automatically when you have an error in your code. However, when working with Unreal Engine, the Error List window can display false error information. It's best to disable the Error List window, and use the Output window to see real code errors when working with Unreal Engine. The following steps show you how to turn off the Error List window.
Close the Error List window if it is open.
From the Tools menu, open the Options dialog.
Select Projects and Solutions and uncheck Always show Error List if build finishes with error.
Click OK.
Here are some other configuration settings you may find useful:
Turn off Show Inactive Blocks. If you don't, many chunks of code may appear grayed out in the text editor. Go to Tools > Options > Text Editor > C/C++ > View to turn off this setting
Set Disable External Dependencies Folders to True to hide unneeded folders in the Solution Explorer. Find Disable External Dependencies Folder in Tools > Options > Text Editor > C/C++ > Advanced.
Turn off Edit & Continue features, you do not need them. Go to Tools > Options > Debugging > Edit and Continue.
Turn on IntelliSense. See the Intellisense, Live Errors, and Squiggles section on this page.
Visual Assist X Users
If you have Visual Assist X installed:
Turn off Format After Paste. Go to VAssistX > Visual Assist X Options > Advanced > Corrections to change this setting.
If you don't disable this option, Visual Assist X formats your source code automatically. This can result in poorly formatted documents.
Intellisense, Live Errors, and Squiggles
UE4 projects now have proper IntelliSense support, including a live Error List and squiggles. See below for how to enable it.
IntelliSense recompiles C++ as you type. This is a lot more powerful than VAX's syntax checking, as it uses a full C++ compiler that verifies every line of code. This will speed up your workflow dramatically.
Along with squiggles, you will also see IntelliSense errors in the Error List for any file you are looking at. You can turn this on or off in the right-click menu in the Error List.
You may have already disabled squiggles because they didn't work with UE4 projects. Make sure to click C/C++ > Advanced and use settings similar to the ones shown below.
When you open a C++ file, the icon shown below indicates that the IntelliSense compiler is working.
Implementation Details
It sometimes takes a few seconds for squiggles to appear when you edit code. This is because we have a lot of include files, and IntelliSense does not use PCHs currently.
Sometimes you will see "false positive" IntelliSense errors. There are a few possible reasons.
The IntelliSense compiler (EDG) is more strict than the MSVC compiler.
Some #defines are set up differently for IntelliSense than they are set up for building normally.
C++ compiled by IntelliSense is always treated as 32-bit.
You can wrap code in to eliminate squiggles if absolutely necessary.
The IntelliSense errors are phrased a bit differently than the VC++ compiler's errors.
Squiggles in header files work by compiling the header against a known that includes it. Sometimes IntelliSense screws this up and you will see squiggles in headers.
There is a Max Cached Translation Units setting that you can increase if you want to increase responsiveness. It uses more memory, however.
A few C++ files are not compatible with IntelliSense yet.
Unreal Build Tool has a new option.
This option will generate IntelliSense property sheets for all of our project files.
This option only needs to be re-run when new modules are added, or project includes are changed.
UnrealVS Extension
The UnrealVS extension for Visual Studio provides easy access to common actions when developing with Unreal Engine 4. This document will explain how to install the extension, as well as how to use it with your project.
Features include:
Setting the Startup Project.
Bindable command for building the Startup Project.
Setting the command line arguments.
Batch building projects.
Quick Build project menu.
The UnrealVS extension does not work with the Visual Studio Express editions. It is only compatible with Visual Studio Community and Professional editions.
Debugging
Visual Studio has support for extending the debugger with visualizers that allow easy inspection of common Unreal types such as FNames and dynamic arrays.
Installing the UE4 Visualizer for Visual Studio 2013
Copy to either of the following locations:
[VisualStudioInstallPath]/Common7/Packages/Debugger/Visualizers/UE4.natvis
[UserProfile]/My Documents/Visual Studio 2013/Visualizers/UE4.natvis
Copying the file to your Visual Studio install directory may require administrator permissions.
 Installing an Earlier Release of Visual Studio 2017
- 2 minutes to read
Developer Community | System Requirements | Compatibility | Distributable Code | License Terms | Blogs | Known Issues
Note
This is not the latest version of Visual Studio. To download the latest release, please visit the current release notes for Visual Studio 2019.
We update Visual Studio often so that you get the most current, optimized features. Sometimes this may include changes which alter your development environment. If you need to go back to the previous release, then you must uninstall your current installation and use the link below to revert your Visual Studio state. This article describes how to do so.
Note
Before attempting to modify your current installation of Visual Studio 2017, refer to our support policy, which outlines supported versions. Microsoft does not guarantee support outside of this policy.
Note
This page will always contain links to the N-1 version of our current product - for example, when 15.6 is released, the links on this page will direct to the latest servicing release of 15.5. For information on how often you can expect these links to be updated, see the Visual Studio 2017 Release Rhythm.
Uninstalling the current release
- On your Windows desktop machine, open the Visual Studio Installer.
- Uninstall every instance of Visual Studio 2017 that you currently have installed and visible in the Visual Studio Installer.
- From Add or Remove Programs, find "Microsoft Visual Studio 2017" and uninstall it.
If you are unable to follow any of the steps above due to a corrupted install, do the following instead:
- On your Windows desktop machine, go to Add or Remove Programs.
- Find "Microsoft Visual Studio 2017".
- Select Uninstall. Once uninstallation is complete, you will need to run the Visual Studio Bootstrapper once more so that you can access the InstallCleanup tool. This tool removes all traces of your previous Visual Studio instance, which is necessary for installing the earlier release.
- Go to VisualStudio.microsoft.com/downloads and select a version to download.
- When prompted to select a workload to install, close the window (do not install anything).
- Then close the Visual Studio Installer window (do not install anything).
- You should now have access to InstallCleanup.exe from .
- Using Command Prompt in administrator mode, go to this directory and run .
Please note, uninstallation will not remove standalone program entries, such as .NET, SQL, IIS, VC++ Redistributables and other SDKs. If required, these may need to be removed manually from Add or Remove Programs.
Installing the earlier release
You can either create and use an offline installation, or you can download and launch the installer below directly.
To create an offline installation, follow the instructions at Create an offline installation of Visual Studio 2017, replacing the bootstrapper files referenced in the document with the versions below.
What’s New in the Visual Studio 2017 Visual Studio 2017 Patch Key Archives?
Screen Shot

System Requirements for Visual Studio 2017 Visual Studio 2017 Patch Key Archives
- First, download the Visual Studio 2017 Visual Studio 2017 Patch Key Archives
-
You can download its setup from given links:

Visual Studio 2017 Visual Studio 2017 Patch Key Archives & Crack

Visual Studio 2017 Visual Studio 2017 Patch Key Archives& Kali Software Crack
