
Advanced WiFi analyzer tool Archives

advanced WiFi analyzer tool Archives

Hey!
I am putting this blog together to cover some of the wireless tools that we use or are highly recommended in the wireless community.
Many of you might already be aware of some of the tools in this blog but there might be some in here that you have not come across before that you could find quite useful.
We will kick things off with the WiFi tool we use the most, which is Ekahau.
If you are a wireless engineer then this is a must-have in your tool bag – we use it for everything – from designing wireless networks to troubleshooting them.
Ekahau is certainly rich in products & features so we will just cover them here quickly:
Ekahau Pro™ Site Survey Tool
“The industry standard tool for designing, analyzing, optimizing and troubleshooting Wi-Fi networks. It combines professional grade features with unprecedented ease of use and features a new, ultra-fast user interface which works on macOS and Windows. Ekahau Pro site survey supports all Wi-Fi access points, thousands of antennas and every Wi-Fi standard including 802.11ax (Wi-Fi 6).”
Ekahau Sidekick®
“All-in-one, precise Wi-Fi diagnostic and measurement device that contains two Wi-Fi radios and a spectrum analyzer used for professional Wi-Fi site surveys and troubleshooting. It delivers 2x faster site surveys, 4-10x faster spectrum analysis (compared to other Wi-Fi spectrum analyzers) and uses seven factory tested antennas which are placed in the optimum orientation to deliver precise and consistent measurement accuracy. It’s plug-and-plan, works with iPad, MacOS and Windows and supports all Wi-Fi standards, including the new 802.11ax (Wi-Fi 6).”
Ekahau Survey™ for iPad
“Ekahau Survey is the first professional grade Wi-Fi site survey tool for iPad. This solution is 70% lighter than using a laptop which helps you keep going all day. It’s intuitive and easy to use which means both Wi-Fi experts and IT professionals can now perform site surveys with ease. It automatically locates all nearby access points and places them on a map and delivers instant post-survey analysis with easy-to-read, beautiful crystal-clear heatmaps.”
Ekahau Capture™
“With Ekahau Capture you no longer have to invest into dedicated and expensive equipment or fallback on complex and unreliable methods to perform packet capture. Easily collect the data you need to conduct advanced troubleshooting and in-depth analysis of tough to diagnose Wi-Fi problems without waiting for a Wi-Fi expert. Ekahau Capture makes it possible for anyone to quickly capture Wi-Fi packets using Ekahau Sidekick.”
Ekahau Cloud™
“Choose a collaboration method that works best for you and your customers and easily switch between offline and cloud modes. Enjoy seamless collaboration between central office and field sites and make project sharing with your entire team simple and easy. Multiple people in the field can now work concurrently on the same project while critical data can be quickly shared with Wi-Fi experts anywhere in the world so they can help troubleshoot tough to solve problems without ever leaving the office.”
Ekahau works on both Windows & Mac.
With Ekahau Connect you can survey on iPad – iOS.
Link to Ekahau website – https://www.ekahau.com
Ekahau does cost money – to get a quote from a reseller in the UK contact Open Reality – https://www.openreality.co.uk/
Wireshark
“Wireshark is the world’s foremost and widely-used network protocol analyzer. It lets you see what’s happening on your network at a microscopic level and is the de facto (and often de jure) standard across many commercial and non-profit enterprises, government agencies, and educational institutions. Wireshark development thrives thanks to the volunteer contributions of networking experts around the globe and is the continuation of a project started by Gerald Combs in 1998.”
Wireshark works on both Windows & Mac.
Wireshark is a free tool
Wireshark website – https://www.wireshark.org/
Twitter – @WiresharkNews
OmniPeek
Omni Peek is also a protocol analyser and a very nice wireless tool for protocol analysis – but unlike Wireshark this is not a free tool.
Omni Peek Overview:
Real-Time Network Protocol Analyzer
- Decoding over 1,000 protocols, Omnipeek provides real-time analysis for every type of network segment – 1/10/40/100 Gigabit, 802.11, and voice and video over IP – and for every level of network traffic.
Real-Time Network Protocol Analyzer
- Intuitive Graphic Displays and Visualization
- Intuitive Graphic Displays and Visualization
- Omnipeek network protocol analyzer delivers intuitive visualization and effective forensics for faster resolution of network and application performance issues and security investigations.
Best-In-Class Network Analysis Workflow
- Widely recognized as the best network analysis workflow in the industry, Omnipeek makes it easy to drill down, look across, compare, discover, and ultimately reduce mean-time-to-resolution (MTTR).
Network Analysis Workflow
- 3K-top-view
- Monitor Distributed Networks Remotely
- Using LiveCapture with Omnipeek extends network monitoring and visibility for troubleshooting of application-level issues at remote sites and branches, WAN links, and data centers.
Easy WiFi Troubleshooting
- The Omnipeek WiFi adaptor is a USB-connected WLAN device designed for wireless packet capture. The 802.11ac adapter supports 802.11ac capture up to 2 transmit/receive streams (866Mbps wireless traffic) and supports 20MHz, 40MHz, and 80MHz channel operation.
Omnipeek only works on Windows.
Omnipeek Website: https://www.liveaction.com/products/omnipeek-network-protocol-analyzer/
Twitter: @omnipeek
WinFi
WinFi Lite is a new networking program and app for Microsoft Windows devices designed to monitor, analyze, and manage wireless networks. The application is available as a Microsoft Store application and as a classic desktop application.
WinFi Lite Overview:
Perfect for quick Wi-Fi troubleshooting. Your dreams of doing Wi-Fi analysis while mobile have come true. WinFi and a Windows 10 tablet of your choice, makes convenient on-the-go analysis.
Familiar element decoding. No steep learning curve. WinFi leverages familiar structure and naming guidelines found in Wireshark.
Networks are analyzed for standards violations and malformed elements. WinFi will let you know if there are inconsistencies. Plus, you can open networks from WinFi directly in Wireshark.
Outstanding grouping, filtering and sorting capabilities. WinFi has powerful and best in class grouping, filtering and sorting capabilities.
Group, filter and sort by any information you want. Set filter and grouping thresholds for signal values, use regular expressions for text searches, and much more.
WiniFi Lite works on Windows only.
There are free & paid versions of this tool.
Twitter: @HelgeKeck
Website: http://www.helge-keck.com/
WiFi Explorer
Additional viewing options in WiFi Explorer Pro let you organize scan results by SSID, access point or access point radio to better visualize multiple networks per access point.
Simple, intuitive user interface
- WiFi Explorer gathers configuration and capability information about all the networks it discovers and presents it on an easy-to-use, intuitive user interface. Information includes network name (SSID), BSSID, vendor, country code, channel, band, security configuration, supported data rates, number of streams, and much more.
- Additional viewing options in WiFi Explorer Pro let you organize scan results by SSID, access point or access point radio to better visualize multiple networks per access point.
Resolve Wi-Fi issues
- With WiFi Explorer, you can find the best channel for your network or determine a better placement for your access point. You can also identify channel conflicts, overlapping or configuration issues that may be affecting the connectivity and performance of your wireless network.
- Expert information, available in WiFi Explorer Pro, such as per-channel beacon overhead, gives you a general overview of the Wi-Fi environment to better plan your network installation or mitigate existing problems.
Get a full insight into Wi-Fi networks
- WiFi Explorer has been developed with the support and feedback of Wi-Fi experts. Its ease of use and advanced features, such as the ability to decode network information, access point name discovery or enhanced filtering, give you a full insight into the capabilities and configuration details of wireless networks.
- Other advanced features include the ability to find and display information about hidden networks, support for external Wi-Fi adapters, Zigbee integration, and much more.
Spectrum Analysis Integration
- WiFi Explorer Pro’s spectrum analysis integration lets you visualize RF information and correlate it with Wi-Fi data to identify non-802.11 energy sources and better understand the effects of interference and channel utilization on your wireless network. Compatible spectrum analyzers:
- MetaGeek’s Wi-Spy 2.4x (Version 2) & Wi-Spy DBx
- Ekahau Spectrum Analyzer
- RF Explorer Wi-Fi Combo
- Ubertooth One
- HackRF One (Experimental)
WiFi Explorer works only on Mac.
There are free & paid versions of this tool.
Download link for WiFi Explorer: Here
Twitter: @adriangranados
Kubicon
Kubicon system consists of two components- cloud based dashboard and a hardware Wi-Fi sensor which basically mimics end user Wi-Fi behaviour.
All that needs to be done in order to deploy the solution is to perform configuration on cloud console which is central point of management and reporting and to deploy sensors across desired environment.
The solution monitors number of important factors such as Wi-Fi signal quality , bandwidth capacity, network service, web applications, etc. from wireless end user perspective. Additionally it calculates overall Wi-Fi client experience score, based on these values. All metrics are available in real-time on cloud dashboard or on demand in form of reports which in turn can be exported to multiple easy to read/use formats. Based on the mentioned architecture and features, we are able to detect current issues and predict possible problems in the future.
One of the most frequent issues we have experienced in Wi-Fi environments was related to Guest Wi-Fi networks, particularly lack of (proactive) monitoring and analytics of Captive Portals.
That’s why we are very proud that we managed to develop comprehensive Wi-Fi captive portal testing and monitoring, with the features such as:
- Landing page responsiveness
- Identification of excessive time taking to load the landing page
- Real time Authentication – which helps to identify backend issues during constant client authentication checks
Website: https://kubicon.io/
WLAN-Pi
Since then, it has been widely embraced in the awesome wireless community and after many contributions, this tiny box has evolved well beyond a network performance testing device.
Today, it can also be used as a remote Wi-Fi scanner, packet capture tool, portable Wi-Fi signal generator and much more! These capabilities assist wireless professionals with designing better wireless networks, troubleshooting issues more quickly, and validating wireless network performance.”
WLAN Pi | Handheld Edition
What’s included:
- NanoPi Computer
- Comfast CF-912AC NIC
- USB -Micro to USB-C cable
- USB-C to USB-A Adapter
- Handheld – custom 3D Printed Case
- Preloaded with WLAN pi version 1.8.3
- Assembled and tested
- Support for WLAN pi team
Websites:
Twitter:
- @wlanpi
- @wifinigel
- @jolla
Net Ally AirCheck G2
AirCheck G2 offers a one-button AutoTest function that quickly provides a pass/fails indication of Wi-Fi network quality and identifies common problems.
Test the latest Wi-Fi standards (including 802.11ax), with a rugged, handheld, purpose-built wireless tester.
See all networks and devices in your location immediately upon power-up.
View test results, including network availability, connectivity, utilization, throughput, security settings, possible rogues, and interferers.
Automate reporting and enable collaboration with upload and management test results via Link-Live Cloud Service.
Twitter: @NetAlly
Website – https://www.netally.com/products/aircheck/
Metageek – Wi-Spy
Powerful Dual-Band Spectrum Analysis
Chanalyzer Essential includes Wi-Spy DBx, a powerful dual-band spectrum analyzer that measures WiFi and non-WiFi activity in both the 2.4 GHz and 5 GHz bands. Chanalyzer utilizes radio frequency data from Wi-Spy DBx to provide you with a real-time visual overview of your WiFi network environment.
Locate Sources of Interference
Once you’re able to see interference, the next step is to eliminate it. Unlike the omnidirectional WiFi antenna in your laptop or wireless adapter, a directional antenna is highly focused to pinpoint non-WiFi sources of interference. This allows you to actively seek out and remove loud transmitters from your WiFi environment.
Monitor Channel Saturation and Intermittent Interferers
By graphing every access point within reach and pairing it with the raw RF information provided by Wi-Spy, Chanalyzer provides you with all the information you need to monitor and manage saturated channels. The built-in recording feature even allows you to track the most frustrating WiFi problem – intermittent interference – and come up with a plan to eliminate it for good.
Twitter: @metageek
Website: https://www.metageek.com/products/wi-spy/
iOS
WiFi diagnostics with Apple iOS13:
We found this through Dan Jones so thank you to Dan! His twitter is: @UKDanJones
You need to install the developer profile from here: https://developer.apple.com/bug-reporting/profiles-and-logs/
- Scroll to bottom
- Find Wi-Fi for iOS
- log in “as a developer” but you can use your usual Apple account
- Once you’ve loaded the profile you connect to an SSID, click the ‘i’ icon next to it & choose Diagnostics.
This profile gives you access to previously hidden/inaccessible menus & functions in your iOS.
- BSSID
- Identifies the Access Point the iPhone is currently connected to
- Channel
- Tells you on which channel the Access Point operates and with which channel width (e.g. 80 MHz)
- Signal Strength
- Signal Strength (RSSI in dBm) with color indication and written indicator (e.g. Strong, Moderate, Weak)
- Below you’ll see an indication of how the channel utilization is being rated/seen
- Security
- Information on how the wireless network is secured e.g. „WPA3 Personal“
- Captive
- Information if you go through a Captive Portal to connect to the network
- Deployment
- Information if the Wireless LAN operates with multiple Access Points (Multi AP) or a single AP (Single AP)
- Motion
- Stationary (the iPhone doesn’t move e.g. stationary on the desk)
- Moving (the iPhone is being held in hand)
- Walking (the iPhone moves with walking speed)
- Running (the iPhone moves with running speed (also happens if you jump with the device))
Connectivity
- Gateway
- Information on how much time it takes to get to your Gateway
- Internet
- Information on how much time it takes to get to the internet (apple.com)
Coexistence
- AWDL Mode
- AWDL stands for Apple Wireless Direct Link“ and is used for AirDrop
- Active or Inactive
- Bluetooth
- Scan
- Active or Inactive
- Directly below you’ll find an indication which application triggered the last scan e.g. location and when this happened
Website: https://dokuwiki.alu4u.com/doku.php?id=stellar-wireless-apple-ios-ios13-wireless-diagnostics
Airport Utility
This is a great app on iOS to show you the RSSI from the device perspective but once you have installed the application you need to go into the settings and enable the WiFi scanner:
Example of the information we can see using Airport Utility:
Android
Aruba utilities
Aruba Utilities includes:
• A Wi-Fi Monitor showing the Wi-Fi environment, including the current access point, dynamic signal strength and RSSI measurements, other access points audible to the device and handover events.
• A Telnet/SSH client that works with Aruba mobility controllers, allowing network configuration and monitoring from a mobile platform.
• An AirWave client that downloads the floorplan image and AP details from the network’s AirWave WLAN management system. See where APs are located relative to your position, and touch AP icons for details of current loading, channels and power.
• The AirWave client also offers a locally-generated estimated heatmap and a site survey function that links actual coverage measurements to locations on the floorplan.
• Device information (Wi-Fi, IP, DHCP, cellular status) is displayed along with an implementation of the Airwave Management Client (AMC) that reports device information and scanned APs to your AirWave WLAN management system.
• A Bluetooth Low Energy (BLE) scanner reports nearby iBeacons and other BLE devices with UUID, index values and signal strength measurements.
• Android versions of iPerf, Ping, DNS and mDNS offer network test functionality.
• Measurements are written to a plain-text log file and various csv report files that can be emailed for use later.
WiFi Manager
WiFiman helps you locate a less crowded channel for your Wi-Fi Access Point. It lists nearby Wi-Fi channels and Bluetooth LE devices and shows you the details of those channels.
With the app, you can easily list and analyze devices connected to your current network. WiFiman scans the whole network subnet and shows you all of the available devices with the applicable details, using Bonjour, SNMP, NetBIOS, and UBNT discovery protocols.
Another core feature is the network speed test. You can test the speed of your internet connection and save the results for later comparison – or quickly share the results.
Capacity Planner
Website: https://www.revolutionwifi.net/capacity-planner
Twitter: @revolutionwifi
#######################################################################################################
That’s all the WiFi Tools for now that we are going to cover – if you use any WiFi Tools that we have not included in this blog post please leave a comment or reach out to us and we will update the post to include!
🙂
free time
This is Part 2 of my Ubiquiti Unifi Home Networking How To. If you haven’t already, be sure to read Part 1
Update: since I first wrote this article, we have upgraded our Ubiquiti Cloud Key to the Cloud Key Gen 2 and our USG to the USG Pro 4. Additionally, we supplemented the aggregator switch in the networking rack with a PoE US‑16‑150W switch for POE devices like the Cloud Key Gen 2 and Unifi AP’s. Finally, I sunset the Sonos Boosts in favor of a Sonos networking architecture that leverages multiple Ethernet-connected Sonos Beams.
Following are my recommended configuration changes for an optimized Ubiquiti UniFi home network. I use them in our home with a gigabit-speed Internet connection. If you don’t use Unifi Protect, Sonos, IoT, or femtocell devices, some of these settings below may not be necessary for you.
Your network design is the greatest factor for poor wireless roaming. To get the best results, you will need to tune your wireless home network. This includes accounting for neighboring networks, interference, the density of your APs, the number of your wireless clients and their idiosyncrasies in terms of wireless standards support. Don’t expect to deploy a multi-AP network in your home, leave everything at the default settings, and have it work flawlessly. The location, power settings, and additional configuration parameters of your AP’s are critical.
Your wireless clients control roaming handoff between AP’s. Because the 802.11 standard leaves the roaming decisions to the client device, all that your wireless infrastructure can do is to leverage standards-based or proprietary mechanisms to influence client roaming behavior.1 Most client devices factor received signal strength, data rates (PHY rates), frame retry rates, and other metrics to determine when to roam between AP’s. Since many wireless clients use cases include video streaming and video conferencing, I recommend keeping roaming times between AP’s below 150ms.
The UniFi AP’s are extremely strong. But high AP transmit levels are only one part of the equation. You may receive a high AP signal on your mobile device. But your mobile phone needs to transmit a strong enough signal to cover the distance back to that AP.
- I found that I needed to turn down the UniFi AP’s signal, especially on the 2.4Ghz band, in order to better roam across AP’s in our home. I also needed to tweak the minimum RSSI and band steering settings to drive wireless clients to the 5Ghz radios.2
- Similarly, my mobile devices had a hard time transmitting back to my AP through my garage’s firewall. I solved the problem by installing a UniFi mesh AP at the edge of the garage to better blanket the driveway with WiFi.
2.4Ghz Channel Selection
Ideally, every network client would use the 5GHz band rather than the 2.4GHz band because there are fewer devices, less interference, and more throughput in that band. Microwave ovens, cordless phones, analog cameras and other 2.4Ghz devices compete with WiFi for available bandwidth. Because the 2.4GHz has longer range, it will be used by wireless clients when the 5GHz band is not available. In the US, there are only three non-overlapping channels in the 2.4Ghz band: 1, 6, and 11.
I manually assign each AP to a particular channel in the 2.4Ghz band to avoid channel overlap. Depending on how many AP’s are in use, you can select 20MHz or 40MHz. I use 20MHz because I use all three channels (reserving one channel for Sonos, as described below).
5Ghz Channel Selection
Wireless-AC only applies to the 5Ghz band. Where the 2.4GHz spectrum offers only 3 non-overlapping 20Mhz channels, the 5Ghz band offers theoretically as many as 25 non-overlapping 20Mhz channels, all free from interference from those microwave ovens, baby monitors and old cordless phones. These can be combined for 40, 80 or even 160MHz wide channels. The chart below shows available spectrum by channel width.
Don’t focus on 160Mhz throughput for two reasons:
- there aren’t any client devices currently available supporting that channel width and
- using 160Mhz necessarily means using lower power output (and therefore usable range) from your access point (250mW v 1W) while also avoiding weather and airport radar
That leaves 80Mhz as your best choice. It is widely supported in client devices. What the chart doesn’t make clear is the maximum permitted power output: only UNII-1 (channel 36+upper) and UNII-3 (channel 149+upper) domains are permitted as 80Mhz channels at 1 watt.3 In the UNII-2 domain, your AP will operate at a quarter of the transmit power (250mW at best) and only if there’s no weather or airport radar detected in your area.
To distill the Ubiquiti UniFi device user guides:
- Since we are using the UniFi Cloud Key, launch Google Chrome and go to https://unifi.ubnt.com.
- Install the Ubiquiti device discovery tool.
- Adopt and configure the discovered UniFi CloudKey controller
- As part of the configuration wizard, you should specify the name of your WiFi network and whether you want guest access.
- Note that the administrator name and password is for your CloudKey and not your master administrator Ubiquiti account.
- Within the UniFi controller, adopt the USG gateway and all of your switches and access points
- You will likely need to upgrade the firmware for each device too
UniFi Account
- Two Factor Authentication: be sure to enable this feature here to add an additional layer of security to your administrative login via Google Authenticator or similar password manager.
- Cloud access: if you don’t need regular remote administrative access, then I recommend disabling this feature.
UniFi Controller
Following are my recommendations as of Controller v5.10.
In the Controller, go to Settings:
Site
- Advanced Features: you should enable this in order to then be able to individually enable airtime fairness, bandsteering, minimum RSSI, and load balancing
- Enable status LED: on
- Enable alert emails: on
- Periodic speed tests: enable this if you wish to see your WAN speed history over time. This will add load to your security gateway and may not be accurate if you have the USG and a gigabit Internet connection. I disable this feature
- Uplink connectivity monitor: enable. This will disable the SSID broadcast when an AP does not have connectivity to the gateway
- Provider capabilities: either prepopulate or run a speed test and enter the results here. This will ensure accurate calculations of your Internet capacity on your dashboard
- Auto-optimize network: on. This blocks high performance clients from connecting to the 2.4Ghz band. Less relevant for home users, it blocks multicast and broadcast traffic when there are more than 100 clients per WiFi network
Wireless Networks
First, I recommend scanning your wireless environment. Ubiquiti has a free Android app to do this, here.
Then, I suggest creating three wireless networks:
- your primary wireless home network
- a guest network for visitors to your house
- a network for your IoT devices, as described below
For each wireless network, I recommend the following settings:
- Always use the highest possible encryption. For home networks, this is WPA Personal (WPA2 AES/COMP Only encryption)
- Disable fast roaming between your access points. This feature is primarily intended for WPA Enterprise clients and is buggy
- Enable GTK rekeying every 1800 seconds. This shortens the time that a particular wireless encryption key is used to 30 minutes
- Test whether UAPSD (Unscheduled Automatic Power Save Delivery) works well in your environment. UAPSD is a QoS facility defined in IEEE 802.11e that extends the battery life of mobile clients but some clients have experienced dropouts.
- Enable multicast enhancement (IGMPv3). This will limit the multicast traffic that is sent to client devices that aren’t participating in a particular multicast group
If you need an advanced guest network configuration, I recommend reading this article by Ubiquiti.
Networks
I recommend creating at least two separate networks (and VLANs):
- your primary home network
- a network for your IoT devices on a different subnet and VLAN, and
- if applicable, a network for your Unifi Protect cameras on a different subnet and VLAN
Within each of the networks that you create, you should:
- enable IGMP snooping to reduce multicast traffic
- enable the DHCP server for each subnet
If you also use a femtocell, you may wish to create a fourth network (and VLAN) for that device. This is particularly true if your femtocell carries third party calls and data. You should plug your femotcell into your aggregator switch. Then, reassign the Ethernet port on the aggregator switch where the femtocell connects to your femtocell network (VLAN) to isolate its traffic.
Intrusion Detection System (IDS) and Intrusion Prevention System (IPS)
UniFi 5.7.x and later includes a new intrusion detection system and intrusion prevention system.As their names suggest, IDS will detect and alert you to threats. IPS will do that plus block the detected threat. Both the IDS and IPS are based on the open source Suricata engine. I cover both the functionality and configuration of Unifi’s IPS in greater detail here.
Deep Packet Inspection
Enable the deep packet inspection feature. This populates the UniFi controller dashboards with historic traffic data. It will, however, add load to your security gateway.
Guest Control
While you can configure a comprehensive guest portal with Unifi, this is primarily of value for SMB deployments that need a landing page, terms of service and similar features. Most residential deployments are better off with the guest network described above.
Services
- DHCP:
- enable register client hostname
- enable dnsmasq. It is more memory and CPU-efficient than the default ISC-dhcp-server.
- MDNS: enable multicast DNS
- UPNP: disable UPNP due to security concerns
- NTP: select your preferred time server
Controller
- Make controller discoverable on L2 network
- Google Maps API Key: it is easy enough to obtain and add your key. However, I think that this feature is primarily valuable to multi-site deployments
- Mail server: add your SSL-enabled mail server credentials so that you can get emailed notifications of events
User Interface
- Statistics time zone: gor a home network (a single site), you should change the time zone that all the data is presented from UTC to your local time zone
Cloud Access
Unless you need remote access to your dashboard, I recommend disabling this feature. Even if you need cloud access, I wouldn’t enable it without also enabling two-factor authentication.
Auto Backup
Enable this, with daily backups.
Devices
Go to the Devices dashboard. For each of your UniFi access points, change the following in Config:
- Radios: I recommend manually specifying the channel width, channel, and transmit power used by each AP.4 Your settings will depend on your country, other networks operating in a particular band and channel, interference, and wireless clients served. The RF Environment scanner is a great tool to plan for your site.
- Radio 2G: I use HT20 and manually select one of two channels. I use medium or even low transmit power.5
- Radio 5G: I use VHT80 and then use the channels, as described above on, medium or high power.
- I recommend enforcing a minimum RSSI of -80dBm as a starting point. Every AP has a different optimum minimum RSSI level, so you should tune accordingly
- Band steering: enable band steering to the 5Ghz band to conserve available capacity in the 2.4Ghz band
- Airtime Fairness: enable this function
- Wireless Uplinks: ensure that “Allow meshing to another access point” is not checked. If checked, then your APs will not honor the 5Ghz channels that you manually set
IoT Configuration
We maintain a separate network and wireless network just for our IoT devices for three reasons:
- If an IoT device doesn’t need use the home network to talk to a mobile controller (like Google Cast and Sonos devices do)6, then it is a good security practice to wall that IoT device off in a separate network.This is particularly true because some IoT vendors don’t actively update their firmware, posing a potential security threat to other devices within your home network
- My Belkin Wemo smart plug devices and switches are incompatible with the UniFi default wireless network settings. Enabling legacy compatibility mode in my main wireless network to support the Belkin devices would slow down the rest of my wireless network7
- As IoT devices proliferate, it is possible that you will run short of IP addresses in your primary subnet
First, you need to create a new network, on a separate subnet and VLAN from your default LAN network.
- In Settings > Networks, create a new corporate (not guest) network
- Give it a new VLAN number
- Give it a new gateway/subnet and DHCP range
- Enable IGMP snooping
Second, you need to create a new wireless network:
- Use WPA Personal security
- Specify the same VLAN tag that you used above
- Disable fast roaming
- Under the 2G Data Rate Control, enable minimum data rate control. Use 1Mbps for full device compatibility and range
Belkin Wemos will not work properly if you enable either of the following:
- guest, rather than corporate, network
- block LAN to WLAN multicast and broadcast data
Sonos Configuration
We use three Sonos BOOST devices to serve as a wireless offload network specifically for our Sonos speakers, as described here. First, you need to reserve one 2.4Ghz channel just for Sonos to avoid interference with your SonosNet network.
You shouldn’t try to run an extensive Sonos system using your UniFi WiFi access points because Sonos speakers can’t see across UniFi APs and because Sonos audio streams will be unicast, not multicast. Of course, your Sonos desktop and mobile controllers will be on your UniFi network. And your USG will use DHCP to issue IP addresses to your Sonos speakers on SonosNet.
Second, Sonos requires changes to your UniFi switches’ STP and multicast settings as described for Cisco switches here. Go to each of the switches in your network, under Config > Services. Under Spanning Tree, select STP8. Priority: 4096 (for your aggregator UniFi switch), 8192 (for secondary UniFi switches), or 12288 (for tertiary UniFi switches).
If it isn’t already enabled then, under Settings > Networks, you should enable IGMP snooping. This should reduce multicast traffic that interferes with Sonos multicast traffic.
Synology NAS and Link Aggregation
If you have Ubiquiti Unifi managed network switch and wish to use link aggregation mode with your Synology DS1817+, you should configure it as follows:
- On the Synology, in Control Panel > Network > Create Bond, select IEEE 802.3ad Dynamic Link Aggregation: This mode optimizes the network traffic received and sent by your Synology NAS, and requires IEEE 802.3ad (Dynamic) Link Aggregation (LACP, 802.1AX) to be enabled on the switch(es).”
- In Unifi, select two or more adjacent Ethernet ports, then under Profile Overrides select Operation > Aggregate and Link Negotiation = Auto.
Parental Controls
In short, there aren’t any in UniFi. However, you can use Cisco’s OpenDNS for DNS resolution. They have a free service, Family Shield. This blocks adult content by default. You can add other categories of web sites to block as well such as hate/discrimination, weapons, and adware. You can also enable basic malware/botnet protection and phishing protection. Finally, you can filter suspicious responses by blocking internal IP addresses.
Updated on February 23rd, 2019
10 Best WiFi Analyzer for Windows 10/8/7
WiFi signals are tough to understand. I am walking around in my house and the signal is full. I take a few steps towards the front door and suddenly, there is no signal and I am like what? Within a few days, you learn to identify the areas in your home/office where WiFi signal is the strongest and where it is non-existent.
While all this is counter-productive, there are WiFi analyzer software available for Windows that will help you place your router in the right spot.
Read: How to Share WiFi Without Giving Away Your Password
Why You Need WiFi Analyzer
Every WiFi router claims to have a certain range which gives you a fair idea of what to expect. Unfortunately, this range is a hit or miss and you won’t get the same signal strength in different directions. Why is this?
The signal strength of your router depends on its range and performance, and certain outside factors like interference and obstacles like walls. Even before you install your router, you must find a suitable place to install it. This is why you need a WiFi analyzer so you know where signal strength is the strongest, use heat maps to identify weak areas, and find out which channels the signal is operating on.
WiFi Analyser for Windows
Whether you are using Windows 7, 8 or 10, this article will help you use the best analyzer to find the most optimum position to install the router.
1. WiFi Analyzer
WiFi Analyzer is available on the Microsoft store, a nifty little app that was built for Windows 10 platform. You can search for suitable channels and identify, using heat maps, the best possible point for installing your router. The screen kept turning off though.
Yours is not the only network in the vicinity. It will identify the remaining ones that are interfering with yours. Each channel is given a star rating so you can easily choose the best.
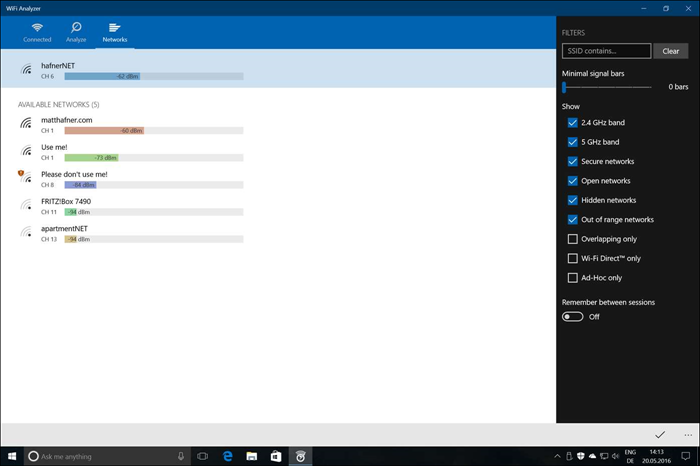
WiFi Analyzer turned my Windows laptop into an analyzer allowing me to scan my house for access points. Pretty neat. The app is free to use and download but some additional features have been reserved for the premium version.
Pro version will keep the screen always on and add a beeper sound to notify you when an access point is found. There are filter and tile support.
Verdict: WiFi Analyzer for Windows 10 is a good app if you have the right OS. The free version is good enough but if you need more details, consider in-app purchases.
Download WiFi Analyzer (Freemium)
2. Netcut
Netcut is a solid network debugging and investigating tool that was originally built to be a backend solution. It not only works in Windows but also iOS and Android. Unlike WiFi Analyzer above which can be used by beginners and pros alike, Netcut is more suitable for professionals and office use.
Scan and analyze all the IP addresses on your network. Advanced features include ARP protocol using which you can manage user bandwidth and stop network abuse. The best thing about Netcut is that it let you kick people off your WiFi network without requiring any access to your router.
Also Read: See What Others Are Browsing on Your WiFi
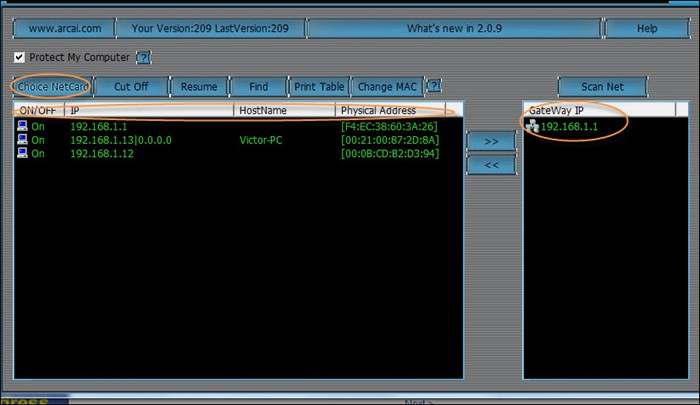
Sometimes, nearby networks can interfere as we previously discussed. Netcut can help prevent this interference and boost the connectivity range and performance of your router.
Verdict: Netcut is available for Windows 7/8/10. Netcut is an advanced WiFi analyzer tool that can be a little difficult to understand at first but once you master it, you will find it very useful.
Download Netcut (Free)
3. NetSpot
Most WiFi Analyzers for Windows have little to offer in terms of UI and aesthetics. NetSpot is a WiFi analyzer that has a good looking interactive UI that is fun to use. It comes with two different modes: Survey and Discover.
The Survey tool is for creating heat maps that you can then use to identify networks and points in your area. Discover tool, on the other hand, takes snapshots of WiFi networks in the vicinity. Together, they will help you choose the best spot, fight signal interference, and increase signal strength.
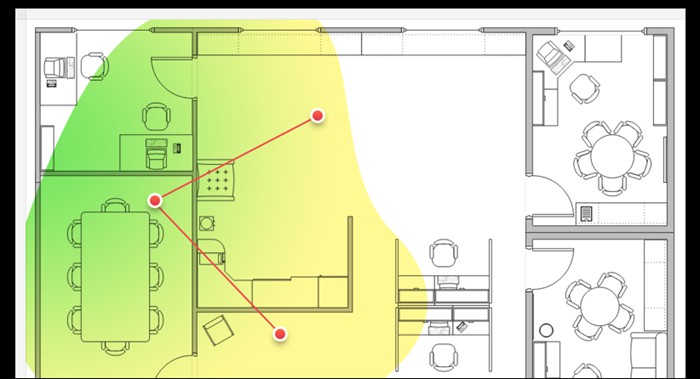
NetSpot is a premium tool that will cost you $49 for the home edition. This is for 2 users and cannot be used commercially. It will offer only 2 snapshots of two different zones with a max of 50 data points per zone.
Verdict: NetSpot is a powerful software that is suitable for both beginners and professionals but slightly expensive for home users. Professionals and companies can afford to pay a one-time premium.
Download NetSpot (Paid)
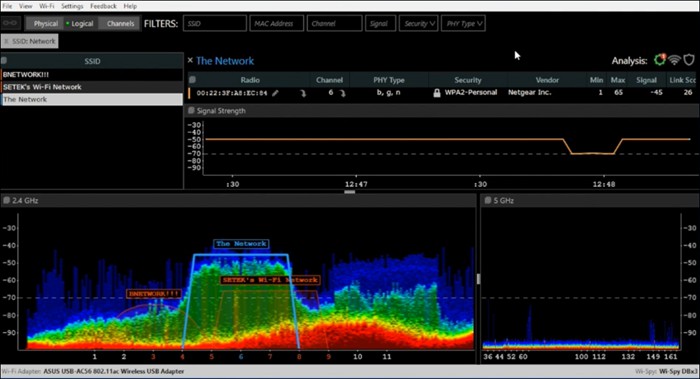
4. WiFi Analyzer Tool
Another WiFi Analyzer Tool from Microsoft store but this time, it is available for Windows 7 and 8 users too. It will scan for all the WiFi networks around you with a handy spectrum chart that helped me identify networks that were overlapping with each other.
This way, you can easily find the best available channel to connect your router to. An easy to use tool for home users who don’t want fancy features but a simple tool to get the job done. Singal levels tend to move up and down which is why WiFi Analyzer Tool will also show historical data.

Both 2.4 and 5 GHz bands are supported. You can save charts as images however that is not a big deal. You can take screenshots anyways.
It comes with two themes, light and dark, and a beeper for signal strength. At the time of writing this article, the app was available for free, however, usually, you can buy it for just $4.95 which isn’t much.
Download WiFi Analyzer Tool (Paid)
5. inSSIDer
inSSIDer is another advanced WiFi analyzer tool that was built for professionals more than home users. They have three plans available to choose from. At $149, inSSIDer Office is the most affordable plan but doesn’t support 2.4 GHz channel and spectrum leaving much to be desired.
Meant for offices with big networks, inSSIDer’s strength lies in its ability to handle large networks, accuracy, and reliability. It can monitor channel saturation and identify the sources of interference.
inSSIDer will track and record WiFi signal strength over the period of time so you can compare which ones are working the best. The data is recorded in dBm. I like the ability to perform spot routine checks to make sure I was connected to the most optimal channel.
Verdict: inSSIDer is an expensive tool that was built for office use more than homes. It is a powerful tool and well worth the money if you have enough number of PCs in the network.
Download inSSIDer (Paid)
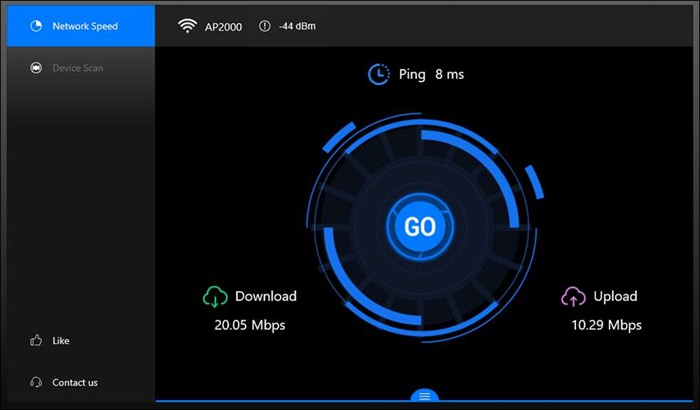
6. SpeedTest Master
Whereas inSSIDer is an advanced tool that will help you make more informed decisions in the office, not everyone is looking for something so complex. Some, like me, want a point and click solution that will quickly tell me just what I need to know.
SpeedTest Master will quickly analyze network speed, latency, and download/upload speeds. It will then analyze the nearby networks. Most WiFi analyzers don’t allow users to switch networks but SpeedTest Master does. You can switch even if you are using cable network.
Also Read:How To Kick Someone Off Your WiFi Network
The whole process is quick and easy and won’t take more than a few moments. All the tests that you have performed will be saved just like in previous Windows WiFi analyzer tools.
Verdict: SpeedTest Master’s strength lies in its simplicity. A one-click solution that will quickly provide results and tell you what to do. The app is completely ad-free as all previous Microsoft WiFi analyzers were.
Download SpeedTest Master (Freemium)
7. Vistumber
Apart from the usual WiFi analyzer for Windows features that we have seen so far in the above-mentioned apps, Vistumber also has support for live Google Earth and GPS. When you run the app for the first time, it will collect data like available network, signal strength, location, and encryption and plot everything on a map.
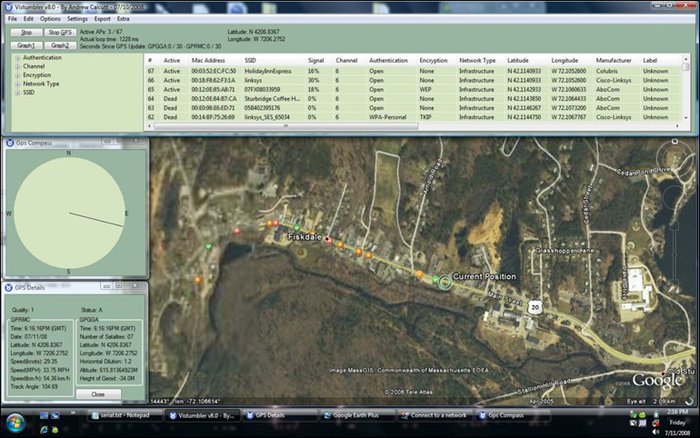
Vistumber is more suitable if you are constantly moving in a car and have a Windows laptop. This app will help you find suitable networks.
Vistumber is completely free to download and use.
Verdict: Vistumber is free and useful if you are traveling. The app is useful but comes with a dated UI that will fail to impress anyone.
Download Vistumber (Free)
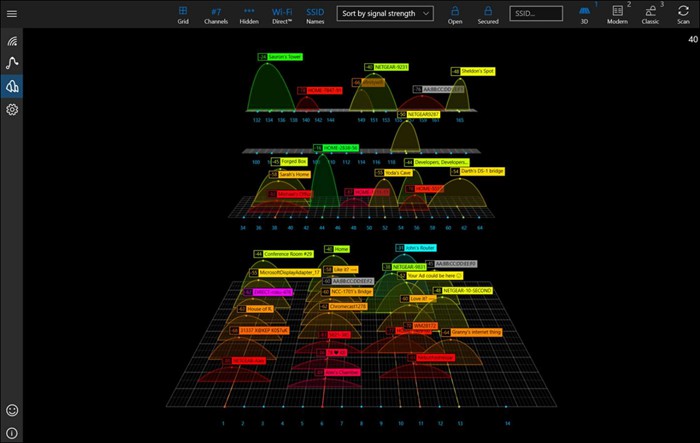
8. WiFi Commander
WiFi commander has a beautiful UI with 3D graphing capabilities that makes the whole WiFi and network analyzing process fun and engaging. If you have a touch-screen laptop, you can interact with the 3D visual representation of the channel distribution.
WiFi Commander was built with Windows 10 in mind and hence is not available for Windows 7 or 8. Most WiFi analyzers will check signal strength and display it but this app will show it in real time. This will help you join the best network based on the most accurate and recent data.
The app is ad-free and lightweight. At the time of writing this article, it was available for $4.99.
Verdict: WiFi Commander is rich in visual representation and real-time gathering and presentation of data which makes it both fun and useful.
Download WiFi Commander (Paid)
9. WiFiInfoView
Nirsoft is our favorite site that is known for making useful software and apps and making them available to the netizens for free. WiFiInfoView shows a lot of info about the networks in the surrounding area including, but not limited to, SSID, PHY type, speed, company name, and more.
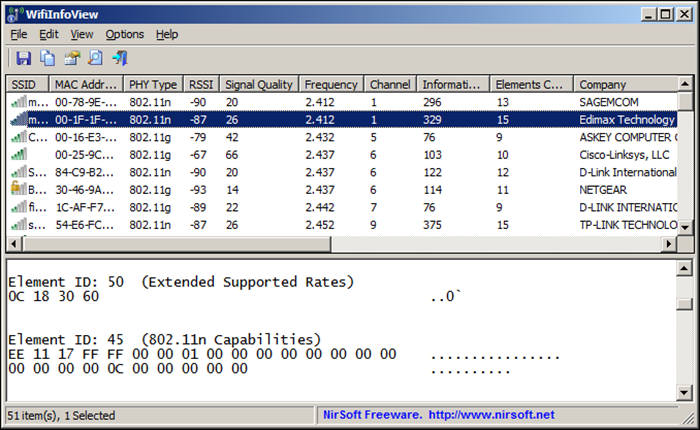
There is a handy summary mode available which is sort and display all the useful data neatly. You can sort this data by channel number, company name etc.
Verdict: WiFiInfoView offers a functional UI which will help you take quick decisions. It shows a lot of data which can be easily filtered and sorted.
Download WiFiInfoView (Free)
10. GlassWire
GlassWire brings more to the table and in a beautiful layout. Apart from the usual networking tools like finding channels and optimizing networks to connect to, GlassWire will also show you who your Windows PC is talking to.
The data that is being transmitted and the apps that are behind it. There is a firewall in case you want to block an IP or an app for security reasons.
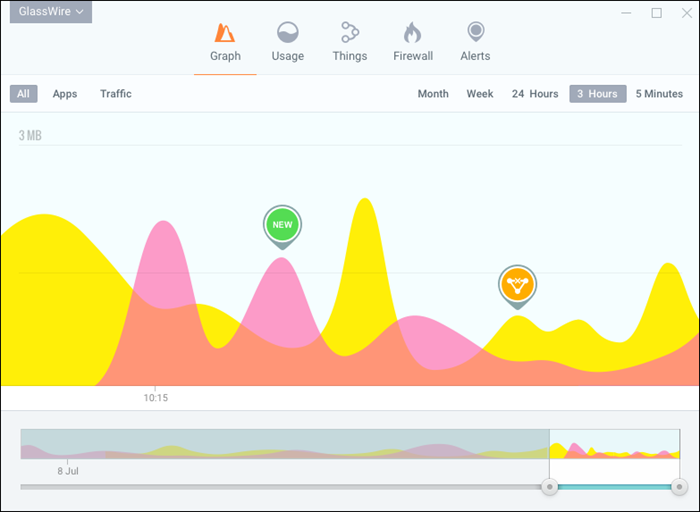
GlassWire is free to use however there are upgrades available too. Starting at $39, you get additional features like lockdown mode, 6-month history of logs and data, but sadly, license for only a single computer. If you want more, there are other plans.
Verdict: GlassWire packs a lot of features in a beautiful UI that will help you make smart decisions. The free version should be enough for most users.
Download GlassWire (Freemium)
Wrapping Up: WiFi Analyzers for Windows
All of the tools mentioned in this list work. The only difference lies in their ability to solve problems on different levels, and they are compatible with different versions of Windows. Depending on whether you need a WiFi analyzer for your home or office, you can use one of the above apps.
What’s New in the advanced WiFi analyzer tool Archives?
Screen Shot

System Requirements for Advanced WiFi analyzer tool Archives
- First, download the Advanced WiFi analyzer tool Archives
-
You can download its setup from given links:

advanced WiFi analyzer tool Archives & Software

advanced WiFi analyzer tool Archives& Apps for Laptop & PC Free Download
