
Mac Apps Archives
Mac Apps Archives
Archive utility Mac apps: the best way to compress files
What does the word archiver mean?
The archiver is a program for the simultaneous packaging of one or any other number of files in order to conveniently copy, send, and store them. Thanks to the compression methods, archivers allow reducing the size of files that are added to them. Another useful feature of many archivers is the ability to set a password for the created archive, after which the user will not be able to open any of the files contained in the archive and, moreover, will not be able to extract these files from it. Below you will find the main reasons to compress files on Mac computers.
Overview of popular archive formats
ZIP
The name of the most popular archive format in the world began its long life with PKWare. Today it is already difficult to imagine life without this archive format. The format supports splitting archives into parts, password protection, adding comments. The main plus of ZIP is its ubiquity and support even by those programs that have an indirect relation to archives.
GZ
GZ (GZIP, GNU ZIP) uses the same file compression algorithm as regular ZIP. This format is widespread in the world of UNIX systems, it does not support anything except, in fact, compression. In terms of compression quality, GZIP also cannot compete with more modern formats, but it does not really need it as in the UNIX world, this format is as common as ZIP in everything else.
TAR
If GZIP cannot pack several files into one archive, this does not mean that users of UNIX systems do not need to create archives from several files. TAR format comes to rescue here, which does not support data compression, but allows you to combine several different files inside.
RAR
This format was developed by Eugene Roshal. The compression quality of this format is superior to ZIP, and for some types of data it is very noticeable. The main advantage of RAR is a highly effective compression, provided both by the efficiency of the algorithm and the ability to compress the files in the archive as a single data stream. Another plus is its good resistance to various damages, especially if during archiving special information was added to restore it.
7Z
7Z is positioned as an archive format with high compression efficiency. It really compresses well, but at the same time requires a lot of memory. The same thing when unpacking, which is also not a good thing. It’s worth mentioning that, in terms of compression quality, 7Z can sometimes even surpass RAR, but it does not happen very often.
5 reasons to compress files on Mac
Cataloging. While archiving, the entire file structure with folders, subfolders, files in them, is compressed into one file. When unpacking the archive, you will get exactly the same structure. Imagine that you need to transfer over the network all the contents of a disk, let’s say D (E, G, F the letter doesn’t matter). And there are hundreds or thousands of folders on it...
It will take a lot of time to transfer them considering the fact that online data storages usually cannot upload more than one or several files at a time. With Mac archiver utilities everything is simple - you create an archive of a disk D and transfer all the data in a single file (archive). After unpacking you will have an exact copy of your disk D on the remote computer.
Compression. Almost any files on a computer can be compressed using special algorithms, reducing their size. Sometimes it is possible to reduce the size of the archive compared to the original data several times. Of course, you cannot use the data until you unpack it, but if you store rarely used information on your hard drive, then archiving it is the best way to save disk space. Below in this article, you will find an answer on “How to compress files on Mac with ease?”
Data safety. Archive software provides the ability to add to the archive recovery information, which will help restore the archive if it is damaged (for example, on a bad hard drive or external media). It is obvious that this will increase the archive size. However, taking into account the compression of the files, you will not notice much difference compared to the size of the original data. Besides that, if you need to hide files from someone’s eyes, then archiving files with a subsequent password is an excellent solution. Most archiver programs have this feature and you can easily set a password that protects the necessary data. Be serious about choosing a password in this case, it should not be too simple and obvious, but it is important to remember it because there will be no recovery path with secret questions. This method is also not ideal, more and more programs appear on the network that can pick up passwords and crack archives.
Space-saving. If your hard drive is not large enough and there is always not enough space, try storing files that you do not want to delete or simply feel pity to delete in archives. For example, working documents, which you have on your computer just in case, as files placed in the archive are not deleted from their usual place on the computer. So if you want to save space, compress files on Mac and feel free to delete files after archiving them, as it can be unpacked at any time.
It is important to remember that not all files are compressed with significant savings, for example, the size of photos is reduced from every 100 MB by only a few MB and at the same time, Microsoft Word documents or files in the Adobe Photoshop graphics editor are compressed significantly: from fifty MB to three MB. Music and video files are also compressed slightly, but if their number is impressive, then you can add it to the archive.
File transfer. When transferring files on the Internet, for example, by e-mail or on Skype, we cannot attach the entire folder to the message, but only individual photos or documents. Therefore, it is extremely convenient to make one file out of many elements for transmission, in this case, the archiver comes to the rescue. For example, you can send the entire folder "Holiday photos" at once, creating from them a single file - an archive. What is also worth mentioning is that its transmission will be faster than usual, because the size has become smaller.
Is built-in Mac archive utility enough to work with archives?
As you already know, file archiving has long been a common practice, but if we are talking about Mac devices, their users are faced with the difficulties of working with the archived data. Because the built-in Mac archive utility supports formats such as GZIP and ZIP only, and you will not be able to create an archive or open an archive of any other popular format. In addition, don’t think that you can change compression ratios, because you simply cannot. Taking all these factors into account Mac users have to think about installing additional archive software to be able to work with different archive formats and way more.
The standard Mac archive utility is hidden in the system folder. However, there are a couple of backup settings that you might need to change. The fastest way to get direct access to a built-in Mac archiver is to select in the Finder upper menu Transition → Go to folder .... In the window for entering the path, enter /System/Library/CoreServices/Applications and click Go. In the list of applications, you can find the Archive Utility element. If you double-click it, the program will launch. Then, in the top menu bar, click Archiving Utility → Settings ....
In the window that appears, you can make some changes both to unzip the compressed files and to create them yourself. You can change the location of both the created archives and the extracted information using the options “Save expanded files” and “Save archive ”. You can also set the program’s actions after archiving and unzipping in the “After archiving” and “After expanding” drop-down lists. After making the changes, the settings window just needs to be closed.
The Mac Security Blog
Apple + How To
Understanding Compressed Files and Apple’s Archive Utility
Posted on April 18th, 2018 by Kirk McElhearn


Compressed files and archives are very common. You certainly see these files often—they bear the .zip extension, and contain one or more files that have been shrunk to save space. Archives also allow you to store a number of files in a single file, making them easier to move around or send to others. (For instance, if you sent a hundred text files to someone by email without compressing them, it would be very annoying to receive that many attachments.)
Apple’s macOS uses Archive Utility, a small app hidden away in an obscure folder and used to create and decompress .zip files. The Archive Utility app has some options that may make working with archives easier. In this article, you’ll learn about compressed files and Archive Utility, and we’ll show you some options you can adjust that will make working with compressed files easier.
Where is the Archive Utility?
Archive Utility is a small app hidden in a system folder. To access Archive Utility on your Mac, go to /System/Library/CoreServices/Applications. Here you’ll find Archive Utility along with some other apps that you may occasionally use, such as About this Mac, Network Utility and Screen Sharing. All of these apps are generally launched in other ways, but not by double-clicking. About this Mac launches when you click the Apple menu and choose About this Mac. You can launch Screen Sharing by choosing Go > Connect to Server in the Finder.
How to use Archive Utility
In most cases, you’ll use Archive Utility without launching it directly. If you want to compress a file, a folder, or a group of items, select it/them, then right click and choose Compress [item name]. Archive Utility launches, compresses the item(s), and then it quits.

The same is the case if you receive a .zip archive and want to expand it; just double-click the archive. Archive Utility opens, decompresses the archive, and then it quits.
However, if you need to create a lot of archives, you might want to launch the app, so you can drag files and folders onto its Dock icon and not have to bother with the contextual menu.
Archive Utility Preferences
If you launch Archive Utility, then choose Archive Utility > Preferences, you see a small window with a number of options.
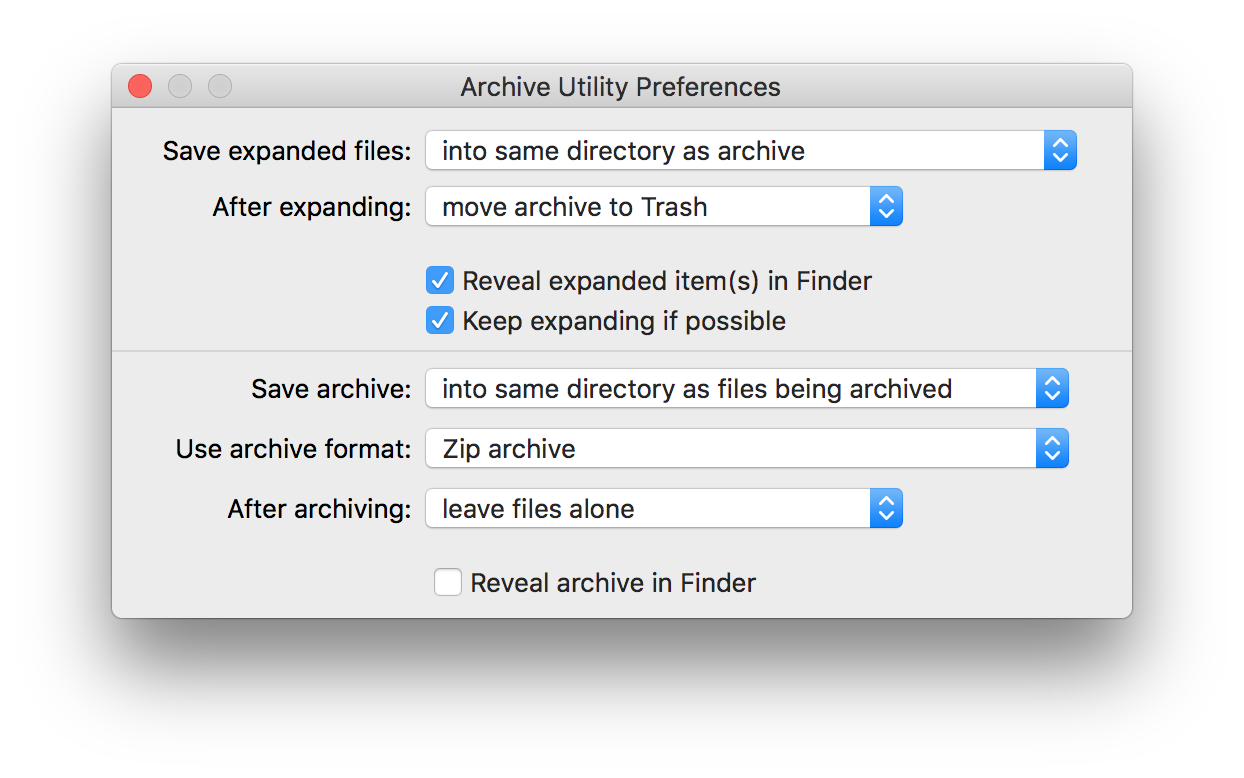
Archive Utility preferences can be very useful if you work with compressed files often. There are two sections to the window, with a horizontal rule dividing them. The top section controls what happens when you decompress archives. These settings are as follows:
Save expanded files lets you choose to save decompressed archives in the same folder as the original, or in a specific folder. If you want to use a different location, click the popup menu and choose Into, then select a folder. This can be useful if you get lots of .zip archives—such as daily backups, or database dumps—and want to automatically store them in a specific location after expanding them.
After expanding lets you leave the archive where it is, move it to the Trash, or delete it (without putting it in the Trash). You can choose one of these options from the popup menu. You can also choose Move archive to, and select a folder, if you want to save your archives.
Reveal expanded item(s) in Finder tells Archive Utility to select the decompressed file or folder and bring its window to the front. If you don’t move the expanded files to a different folder, you probably don’t need to change this.
Keep expanding if possible tells Archive Utility to decompress any archives it finds within an archive. This isn’t common, but there are some types of archives that may present like this, such as Unix archives that first use a .tar compressed, then a .gz compression.
The bottom section, below the horizontal line, tells Archive Utility how to create compressed archives.
If you want to tell Archive Utility where to save the archives you create, from the Save archive popup menu, choose Into, then select a location. Otherwise, they are created in the same folder as the original items.
You can use one of three archive formats. Compressed archive, regular archive, and Zip archive.
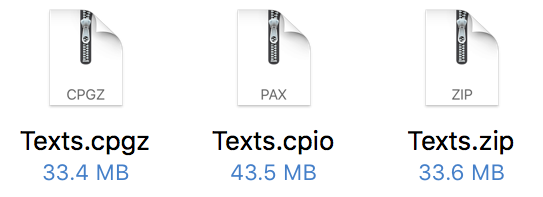
- A Compressed archive is a .cpgz archive. This is used on Unix and Linux, and you won’t want to use this format unless you’re sending archives to a computer running one of these operating system.
- A Regular archive is a .cpio archive, which combines multiple files in a single file without compressing them. As above, you won’t need to use this unless you’re working with other operating systems.
- A Zip archive is what we’re all familiar with; it combines and compresses files, in some cases reducing the overall size by half or more. It both saves space, and makes it easy to manage large numbers of files. It’s also the most compatible, being readable on both macOS and Windows.
After archiving, Archive Utility can leave files alone (do nothing to them), move them to the Trash, or delete them (without moving them to the Trash). You can also check Reveal archive in Finder to have Archive Utility show you archives when it’s finished. This can be useful if you create large archives that can take several minutes to create, and want a sort of notification when they’re finished.
I prefer to leave all the settings at their defaults, with the exception of the After expanding option; I’ve set that to move archives to the Trash. It’s rare that you’ll need to keep an expanded archive, and this saves time, because you won’t have to manually trash them. You may want to change other settings, especially if you need to keep your .zip archives, or want to expand them in a different location from where you access them (often the Downloads folder).
Archive Utility is an essential tool. With the awareness that you can change some of its settings, you’ll find it easier to work with archives.
New to Mac? Learn more macOS tips at Intego’s New Mac User Center!
Want to get the most out of your new MacBook, iMac or other Apple computer? Whether this is your first laptop or you’ve just switched from Windows, there are a few things you should know about your new Mac, like basic keyboard shortcuts or how to use the various features macOS has to offer. Learn more about what your Mac computer can do for you at the Intego New Mac User Center: Get started now!
About Kirk McElhearn
Kirk McElhearn writes about Macs, iPods, iTunes, books, music and more on his blog Kirkville. He is co-host of the Intego Mac Podcast and PhotoActive, and a regular contributor to The Mac Security Blog, TidBITS, and several other websites and publications. Kirk has written more than twenty books, including Take Control books about iTunes, LaunchBar, and Scrivener. Follow him on Twitter at @mcelhearn. View all posts by Kirk McElhearn → This entry was posted in Apple, How To and tagged archive, Archive Utility, Compress Files, productivity. Bookmark the permalink.List of macOS components
This is a list of macOS (earlier called Mac OS X and OS X) components, features that are included in the current Mac operating system.
Applications[edit]
App Store[edit]
The App Store is macOS's digital distribution platform for macOS apps, created and maintained by Apple Inc. The platform was announced on October 20, 2010, at Apple's "Back to the Mac" event.[1][2][3] First launched on January 6, 2011, as part of the free Mac OS X 10.6.6 update for all current Snow Leopard users,[1][2] Apple began accepting app submissions from registered developers on November 3, 2010, in preparation for its launch.[4] After 24 hours of release, Apple announced that there were over one million downloads.[5]
Automator[edit]
Automator is an application developed by Apple Inc. for macOS that implements point-and-click (or drag and drop) creation of workflows for automating repetitive tasks into batches for quicker alteration, thus saving time and effort over human intervention to manually change each file separately. Automator enables the repetition of tasks across a wide variety of programs, including Finder, Safari, Calendar, Contacts and others. It can also work with third-party applications such as Microsoft Office, Adobe Photoshop or Pixelmator. The icon features a robot holding a pipe, a reference to pipelines, a computer science term for connected data workflows. Automator was first released with Mac OS X Tiger (10.4).[6]
Automator provides a graphical user interface for automating tasks without knowledge of programming or scripting languages. Tasks can be recorded as they are performed by the user or can be selected from a list. The output of the previous action can become the input to the next action.
Automator comes with a library of Actions (file renaming, finding linked images, creating a new mail message, etc.) that act as individual steps in a Workflow document. A Workflow document is used to carry out repetitive tasks. Workflows can be saved and reused. Unix command line scripts and AppleScripts can also be invoked as Actions. The actions are linked together in a Workflow. The Workflow can be saved as an application, Workflow file or a contextual menu item. Options can be set when the Workflow is created or when the Workflow is run. A workflow file created in Automator is saved in /Users/{User Name}/Library/Services.
The icon for Automator features a robot, known as Otto the Automator.
Books[edit]
Calculator[edit]
Calculator is a basic calculatorapplication made by Apple Inc. and bundled with macOS. It has three modes: basic, scientific, and programmer. Basic includes a number pad, buttons for adding, subtracting, multiplying, and dividing, as well as memory keys. Scientific mode supports exponents and trigonometric functions, and programmer mode gives the user access to more options related to computer programming.
The Calculator program has a long history going back to the very beginning of the Macintosh platform, where a simple four-function calculator program was a standard desk accessory from the earliest system versions. Though no higher math capability was included, third-party developers provided upgrades, and Apple released the Graphing Calculator application with the first PowerPC release (7.1.2) of the Mac OS, and it was a standard component through Mac OS 9. Apple currently ships a different application called Grapher.
Calculator has Reverse Polish notation support, and can also speak the buttons pressed and result returned.
The Calculator appeared first as a desk accessory in first version of Macintosh System for the 1984 Macintosh 128k. Its original incarnation was developed by Chris Espinosa and its appearance was designed, in part, by Steve Jobs when Espinosa, flustered by Jobs's dissatisfaction with all of his prototype designs, conceived an application called The Steve Jobs Roll Your Own Calculator Construction Set that allowed Jobs to tailor the look of the calculator to his liking. Its design was maintained with the same basic math operations until the final release of classic Mac OS in 2002.[7]
A Dashboard Calculator widget is included in all versions of macOS from Mac OS X Tiger onwards. It only has the basic mode of its desktop counterpart. Since the release of OS X Yosemite, there is also a simple calculator widget available in the notifications area.[8]
Since the release of Mac OS X Leopard, simple arithmetic functions can be calculated from Spotlight feature.[9] They include the standard addition, subtraction, division, multiplication, exponentiation and the use of the percent sign to denote percentage.
Calendar[edit]
Calendar is a personal calendar app made by Apple Inc. that runs on both the macOSdesktopoperating system and the iOSmobile operating system. It offers online cloud backup of calendars using Apple's iCloud service, or can synchronize with other calendar services, including Google Calendar and Microsoft Exchange Server.
Chess[edit]

Apple Chess is a 3Dchess game for macOS, developed by Apple Inc. It supports chess variants such as crazyhouse and suicide chess. It originates in OpenStep and Mac OS X 10.2 and is based on open source software. Apple redistributes the source code under its own Apple Sample Code License.[10][11]
Contacts[edit]
Contacts, called Address Book before OS X Mountain Lion, is a computerized address book included with Apple Inc.'s macOS. It includes various synchronizing capabilities and integrates with other macOS applications and features.
Dictionary[edit]
Dictionary is an application that includes an in-built dictionary and thesaurus.[citation needed]
FaceTime[edit]
Find My[edit]
Font Book[edit]
GarageBand[edit]
Home[edit]
Image Capture[edit]
iMovie[edit]
iMovie is a video editing software application developed by Apple Inc. for macOS and iOS devices. iMovie was released in 1999
Launchpad[edit]
Launchpad is an application launcher for macOS that was first introduced in Mac OS X Lion. Launchpad provides an alternative way to start applications in macOS, in addition to other options such as the Dock (toolbar launcher), Finder (file manager), Spotlight (desktop search) or Terminal (command-line interface).[12]
Mail[edit]
Maps[edit]
Messages[edit]
Mission Control[edit]
Music[edit]
News[edit]
Notes[edit]
Notes is macOS's notetaking app. It had first been developed for iOS, but had first been introduced to macOS starting with OS X Mountain Lion. Its main function is provide a service for creating short text notes in the computer, as well as being able to be shared to other macOS or iOS devices via Apple's iCloud service.
Photo Booth[edit]
Photo Booth is an application where the user can take pictures of themselves.[citation needed]
Photos[edit]
Photos is a photo management and editing application that was designed based on the in-built app released for iOS 8. On macOS, Photos was first introduced to OS X Yosemite users in the 10.10.3 update on April 8, 2015,[13][14][15] replacing iPhoto.[16][17]
Podcasts[edit]
Preview[edit]
QuickTime Player[edit]
The QuickTime player is an application that can play video and sound files.[citation needed]
Reminders[edit]
Safari[edit]
Safari is a web browser.
Siri[edit]
Siri is a new feature introduced in macOS 10.12. This application allows the user to interact with it to ask questions, make recommendations, and perform actions on the device. It had been previously included in iOS.
Stickies[edit]
Stocks[edit]
Stocks is an application that provides information regarding stocks of various companies around the world.
System Preferences[edit]
TextEdit[edit]
Time Machine[edit]
Time Machine is an application where the user can back up their files.[citation needed]
TV[edit]
Utilities[edit]
Activity Monitor[edit]
Activity Monitor is a system monitor for the macOSoperating system, which also incorporates task manager functionality.[18][19] Activity Monitor appeared in Mac OS X v10.3, when it subsumed the functionality of the programs Process Viewer (a task manager) and CPU Monitor found in the previous version of OS X.[20][21] In OS X 10.9, Activity Monitor was significantly revamped and gained a 5th tab for "energy" (in addition to CPU, memory, disk, and network).[22]
AirPort Utility[edit]
AirPort Utility is a program that allows users to configure an AirPortwireless network and manage services associated with and devices connected to AirPort Routers. It comes pre-installed on macOS, and is available to download for Microsoft Windows and iOS. AirPort Utility is unique in that it offers network configuration in a native application as opposed to a web application. It provides a graphical overview of AirPort devices attached to a network, and provides tools to manage each one individually. It allows users to configure their network preferences, assign Back to My Mac accounts to the network, and configure USB attached Printers and hard drives.[23] The current versions are 6.3.6 for recent versions of macOS, 5.6.1 for Microsoft Windows and older versions[24] of Mac OS X,[25] and 1.3.4 for iOS.[26]
On January 30, 2013, Apple released AirPort Utility 6.0 for macOS featuring a redesign of the user interface focused on increasing usability for novice users.[27] Reception was mixed with some media outlets reporting IT professionals and network administrators being frustrated over some removed features.[27] It was reported that most end users, however, wouldn't notice the feature omissions.[28] Users requiring the removed features can still access the previous version of AirPort Utility using a workaround.[29]
Audio MIDI Setup[edit]
The Audio MIDI Setup utility is a program that comes with the macOS operating system for adjusting the computer's audio input and output configuration settings and managing MIDI devices.
It was first introduced in Mac OS X 10.5 Leopard as a simplified way to configure MIDI Devices. Users need to be aware that prior to this release, MIDI devices did not require this step, and it mention of it might be omitted from MIDI devices from third-party manufactures.
Bluetooth File Exchange[edit]
Bluetooth File Exchange is a utility that comes with the macOSoperating system, used to exchange files to or from a Bluetooth-enabled device. For example, it could be used to send an image to a cellphone, or to receive an image or other documents from a PDA.
Boot Camp Assistant[edit]
Assists users with installing Windows on their Mac using Boot Camp.[30]
ColorSync Utility[edit]
ColorSync Utility is software that ships with macOS. It is used for management of color profiles and filters used in Apple's PDFworkflow, or applying filters to PDF documents.
The interface is composed of two parts: the document browser and the utility window. The document browser lets you zoom in and out of an image or apply a Filter to it. The utility window has several options: Profile First Aid, Profiles, Devices, Filters and Calculator.
Profile First Aid allows you to repair ColorSync color profiles so they conform to the International Color Consortium specification.
Profiles allows you to browse the profiles installed on your system, grouped by location, class or space, and graphically compare any two profiles.
The profile map is displayed as a rotatable, scalable 3D object and can be plotted in CIELAB, CIELUV, YXY, YUV and CIEXYZ.
The Devices section allows you to see a list of all registered ColorSync devices such as your displays and printers, and see what ColorSync profile is applied to each one. You can also override the default setting.
The Filters section allows you to build and modify PDF filters that are available to the rest of the operating system. Each filter can be set to appear in one of three domains: Application, PDF Workflows, and Printing.
Filters set to Printing will appear in the drop-down menu under the "Save as PDF..." button in the standard Mac OS X print dialog box. Filters set to PDF Workflow will appear in the Quartz Filters drop-down menu in the ColorSync section of a print dialog box. The default filters that ship with Mac OS X are:
- Black & White
- Blue Tone
- Create Generic PDFX-3 Document
- Gray Tone
- Lightness Decrease
- Lightness Increase
- Reduce File Size
- Sepia Tone
User-created filters can have color management, image effects, PDF retouch, domain selection and comments.
The Color Management section allows assigning a profile, choosing a default profile, rendering intent, converting to a profile or intermediate transform.
The Intermediate Transform section allows adjustment of brightness, tint, hue, saturation, bilevel (high pass filter) or profile assignment, to either grayscale, RGB or CMYK, or all data in the file. This can be applied to either text, graphics, images or shading.
Complex filters can be created by stacking multiple effects. Any changes made to the PDF file can then be saved as a new PDF file.
Calculator can convert between RGB, CMYK and other color value schemes, and features an interactive color-picker for identifying a color on the screen, duplicating a feature of another bundled utility, DigitalColor Meter.
ColorSync is Apple Inc.'s color managementAPI for the Classic Mac OS and macOS. Apple developed the original 1.0 version of ColorSync as a Mac-only architecture, which made it into an operating system release in 1993. In the same year, Apple co-founded the International Color Consortium (ICC) to develop a cross-platform profile format which became part of ColorSync 2.0. The system Color Management Module (CMM) was "LinoColorCMM", which was developed by Linotype-Hell AG (now part of Heidelberger Druckmaschinen AG). The same CMM was used in Microsoft Windows 2000 and XP under the rubric of "Image Color Management" (ICM).[citation needed] Apple, with the help of Adobe had ported ColorSync 2.0 and its SDK to Microsoft Windows. With ColorSync 3.0, the Windows version which was initially planned was discontinued. ColorSync 4.0 is the latest version, introduced in Mac OS X 10.1.
Human color perception is a very complex and subtle process, and different devices have widely different color gamuts or ranges of color they can display. To deal with these issues, ColorSync provides several different methods of doing color matching. For instance, perceptual matching tries to preserve as closely as possible the relative relationships between colors, even if all the colors must be systematically distorted in order to get them to fit within the gamut of the destination device. Because the human eye is more sensitive to color differences rather than absolute colors, this method tends to produce the best-looking results, subjectively speaking, for many common uses, but there are other methods that work better in some cases. (This set of rendering intents is part of the ICC system, and is available on all systems with ICC.)
As dictated by the ICC system, the profile connection space in ColorSync is the CIE XYZ color space. All image input and output devices (scanners, printers, displays) have to be characterized by providing an ICC profile that defines how their color information is to be interpreted relative to this reference color space. This profile might be provided by the device manufacturer, but for better quality results, it might be generated by performing actual measurements on the device with a colorimeter. Thus, when an image is scanned on a scanner, the image file will include a copy of the scanner's profile to characterize the meaning of its color information. Then, before the image is sent to an output device, a matching process converts the color information at the time of rendering from the source profile (that attached to the image) to the destination profile (that attached to the output device) so that the resulting colors print or display as closely as possible to the original image.
Console[edit]
Console is a log viewer developed by Apple Inc. and included with macOS. It allows users to search through all of the system's logged messages, and can alert the user when certain types of messages are logged.[31] The Console is generally used for troubleshooting when there is a problem with the computer.[32] macOS itself, as well as any applications that are used, send a constant stream of messages to the system in the form of log files. The console allows you to read the system logs, help find certain ones, monitor them, and filter their contents.[33]
Clicking on "Show Log List" in the toolbar will bring up the Log List. The Log List opens a sidebar which shows all of the different logs that the system maintains. This list helps in viewing the many different logs maintained in various parts of the system by bringing them all together to one place. By clicking on a particular log category, all of the logs will be shown.[34]
The System Log Queries contains all of the logs that have to do with the entire system. This includes system logs as well as individual application logs.[34]
Selecting All Messages gives a live look at your computer's activities, updated live. This includes all activities from both the system as well as any applications running. Logs in this section of the Console are all formatted uniformly. They all include a timestamp, the name of the process or application, and the actual message of the log. When the message displayed includes a paperclip icon next to it, it means that it is a shortened version of a longer report, and clicking the icon will show the complete report.[35]
In addition to viewing all messages, users can also create custom queries with any criteria that they like. These custom queries will filter the messages and will also be shown in the All Messages section. In order to make a new query, choose "New System Log Query" from the File menu.[36]
Digital Color Meter[edit]
Disk Utility[edit]
Grapher[edit]
Keychain Access[edit]
Migration Assistant[edit]
Migration Assistant is an application for migrating information from another computer to the computer in use. It may be from a Windows computer or a Mac.
Screenshot[edit]
Application to create a screenshot
Script Editor[edit]
System Information[edit]
System Information is an application that shows the system information about a Macintosh product.
Terminal[edit]
VoiceOver Utility[edit]
VoiceOver is an application where the user can listen to spoken descriptions on the computer.[citation needed]
System / Library / CoreServices[edit]
AddPrinter[edit]
AddressBookUrlForwarder[edit]
AirPlayUIAgent[edit]
AirPort Base Station Agent[edit]
AppleFileServer[edit]
AppleScript Utility[edit]
Automator Installer[edit]
AVB Audio Configuration[edit]
Bluetooth Setup Assistant[edit]
BluetoothUIServer[
What’s New in the Mac Apps Archives?
Screen Shot

System Requirements for Mac Apps Archives
- First, download the Mac Apps Archives
-
You can download its setup from given links:

Mac Apps Archives & Key Download

Mac Apps Archives& Apps for Laptop & PC Free Download
