
Microsoft office student Archives

microsoft office student Archives
Archiving classes at the end of the school year in Microsoft Teams
At the end of the school year, it’s a good idea to archive the teams you’ve made for classes in Microsoft Teams as you prepare for next year’s classes. Archiving a team removes the team from your “Active Teams” list and freezes team activity. All content associated with the team will still be saved and you will be able to access it at any time. This includes files, conversations, grades, and assignments that you can re-use later.
Archiving teams with SDS
If you are an IT Admin planning to use SDS to archive teachers’ classes, please give teachers notice of when classes will be archived. You can share the following information with them so they know where to find archived classes from prior school years, and how to re-use assignments for future teaching.
What happens when a team is archived
Archiving does not delete a team. In an archived team, all activity in the team is frozen. This includes the ability to add or edit channels, post messages, or create new assignments. However, team owners can still add or remove team members and update roles. The team will no longer appear with your view of active teams.
Manually archiving a team
If you are a teacher and your IT Admin will not be using SDS to archive class teams, you can archive teams on your own.
Select More options
 next to the filter icon, then Manage teams.
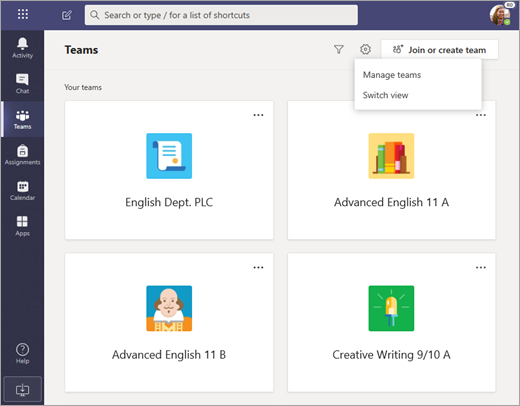
Select More options
 next to a team’s name >Archive team.
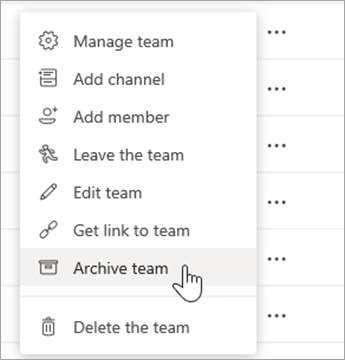
To view a team you’ve archived, select More options
 > Manage teams again and scroll down to view the expandable list of Archived teams at the bottom of your teams list.
Restoring an archived team
Make a team active again by selecting More options  next to the team’s name and choosing Restore team.

Re-use assignments from archived teams
Microsoft Teams allows you to re-use assignments you’ve created in any team, whether it’s from an archived class or not. To re-use an assignment:
Navigate to the General class of your current class, then select Assignments.
Select Create > From existing.
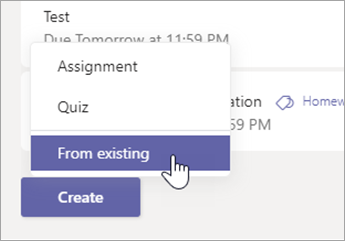
Follow the steps to choose the original class and the assignment you’re re-using.

Fill in or edit assignment details as usual and choose classes or individual students to assign the work to.
Select Assign.
Additional resources for educators
(Archives) Microsoft Office 2003: Using WordArt
Last updated
This article is based on legacy software.
You can use WordArt to make display text (e.g., the heading of your document) more eye-catching. WordArt can be resized, moved, and edited to fit your needs.
Creating WordArt
WordArt can be inserted through a button on the Drawing toolbar, the WordArt toolbar, or through the Insert menu.
Accessing WordArt
From the View menu, select Toolbars »Drawing orWordArt.
Inserting WordArt
From the Drawing or WordArt toolbar, click Insert WordArt.

OR
From the Insert menu, select Picture »WordArt...
The WordArt Gallery dialog box appears.
From the WordArt Gallery, select the desired style.
Click OK.
The Edit WordArt Text dialog box appears.
In the Text text box, type your text.
To format your text, from the Font or Size pull-down lists, make the desired selections.
To change the front style, click Bold or Italics.
Click OK.
Your selected WordArt and the WordArt toolbar appears. For a description of the options available, refer to Editing WordArt with the WordArt Toolbar.
Resizing WordArt
WARNING: Be careful when resizing text so that you do not distort the letters excessively, making them unreadable. Using side handles does not resize proportionally. To resize proportionally, use the corner handles and hold down [Shift].
Select the WordArt.
Sizing handles appear on the text box area.Place the pointer over one of the square handles.
When the pointer changes to a two-directional arrow, you can move the pointer in any direction.
HINT: To resize proportionally, hold down [Shift] while moving a corner handle or open box.Click and drag the border to the desired size.
A dotted outline appears indicating the new size.Release the mouse.
Moving WordArt
If the WordArt you have created is in the wrong place, the image can be easily moved.
Select the WordArt.
From the WordArt toolbar, click Text Wrapping
 » In Front of Text.
Place your pointer over a letter of your WordArt.
When the pointer turns into a four-directional arrow, click and drag the WordArt to the desired location.
Release the mouse.
Editing WordArt
To change the spelling or wording of the WordArt you have created, use the WordArt toolbar.
Select the appropriate piece of WordArt by clicking it once.
The WordArt toolbar appears.Click Edit Text...
The Edit WordArt Text dialog box appears.Make the desired changes.
Click OK.
To edit the style of your WordArt, refer to Editing WordArt.
Was this article helpful? YesNo
View / Print PDFArchive or restore a team
Archive a team when it’s no longer active, but you want to keep it around for reference or to reactivate in the future. The conversations and files in the team become read-only once you archive it. You’ll still be able to search through it for stuff you need—you can even keep it as a favorite. Only team owners can archive and restore teams.
Archive a teamSelect Teams
 on the left to see the list of your teams.
At the bottom of the list, select Manage
 .
. In the Active list, find the name of the team you want to archive, then select More options
 > Archive team.
 To prevent people from editing the content in the SharePoint site and Wiki tab associated with the team, select Make the SharePoint site read-only for team members. (Teams owners will still be able to edit this content.)
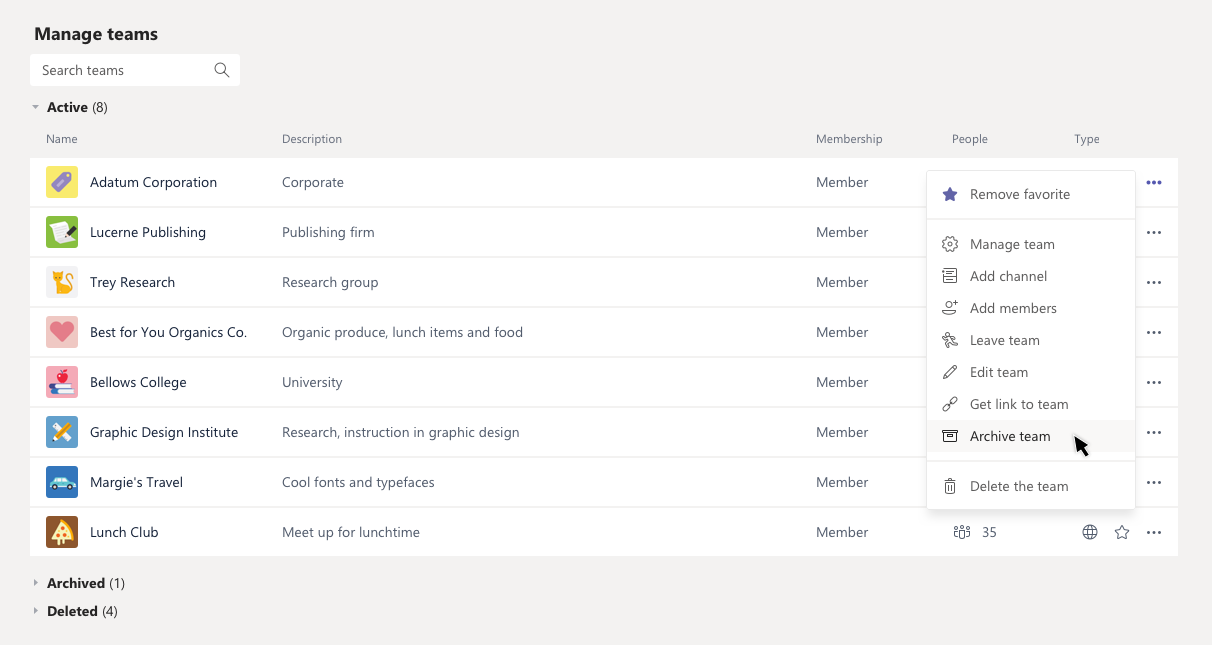
To view and search through the content of the archived team, click its name in the Archived list. Or, make it a favorite if you think you’ll refer to it often (in the list, select the team, then More options > Favorite).
All of the team activity is frozen once the team is archived. No one will be able to start new conversations or reply to posts in a channel, add or remove channels, edit team settings, or add apps. As a team owner, you’ll still be able to add or remove members, update roles, and delete, renew, or restore an archived team.
Restore a teamTo restore an archived team, follow steps 1 and 2 above. Then, in the Archived list, find the name of the team you want to archive, and select More options
 > Restore team.

For now, go to the Teams desktop app or Teams on the web to archive or restore a team. To view an archived team on your mobile device, first make it a favorite team (again in the Teams desktop app or Teams on the web). It'll then show up in your Favorites list.
What’s New in the microsoft office student Archives?
Screen Shot

System Requirements for Microsoft office student Archives
- First, download the Microsoft office student Archives
-
You can download its setup from given links:


