
Remove pc

remove pc
How to uninstall a program on Windows: remove unwanted apps from your PC
The best place to start when uninstalling a program on Windows is the “Add or remove programs” window, which is found in Control Panel. We suggest you make this your first port of call, as it’s the standard and safest method of removing unwanted software. See also: how to format a USB drive on a Mac or Windows.
If, for whatever reason, a program fails to uninstall cleanly, we’d suggest using a third-party clean-up utility such as Piriform’s CCleaner.
If you really can’t get rid of a program – yet can see it still running in the Processes tab of Task Manager – then it may be malware, in which case you will need to use security/antivirus software to remove it.
How to uninstall a program using “Add or remove programs”
Step 1
Go to Control Panel and open “Uninstall a Program”. Alternatively, press the Windows key and type “remove programs” then hit Enter.Step 2
Locate the program you wish to remove: if you can’t find it, try clicking the label at the top of the “Installed on” column to bring the most recently installed programs to the top of the list.Step 3
Click on the “Uninstall” button. You will then see a message asking you to confirm that you want to uninstall the selected program. Click “OK” and Windows will begin uninstalling the program from your PC.
How to clean up after a failed uninstallation using CCleaner
If the Windows uninstall method doesn’t seem to completely get rid of the unwanted software, we suggest using a third-party app such as CCleaner. Go to the Piriform website, download and install CCleaner, and follow the steps below.
Step one
Open CCleaner, select Tools and click on the Uninstall tab on the left hand side.
Step two
Find the program you wish to remove in the listings and click on it once so it’s highlighted. Next, click on the Uninstall button on the right hand side and the task will begin.
If you previously uninstalled a program, yet an error has led to it still being listed in CCleaners uninstall list, you can highlight the program and press the Delete button on the right hand side of the Window. CCleaner with then delete any associated files it can find.
Step three (optional)
To really make sure you’ve completely removed every trace of a program, you can use CCleaner to scan your Windows Registry for references to missing files and other invalid entries. Any leftovers from a partial uninstallation will be picked up and listed here – as well as other any Registry issues Windows may have picked up. To remove these, click Scan and then the “Fix selected issues…” button.
What to do if a program won’t uninstall
If the above methods fail or present an error, it’s possible that a part of the software may be missing, preventing a clean uninstallation.
A good way to solve this problem is to re-install the program, or upgrade it to the latest version available. Once you’ve done this, simply retry uninstalling using one of the methods detailed above.
How to uninstall/remove a program that isn’t listed in “Add or remove programs”
If you can’t see the program listed in either of the uninstallers mentioned above, but can still see the process running in Task Manager, it may be some type of malware (e.g. spyware, adware or a virus) that’s intended to resist being removed from your PC.
To combat this, we recommend installing a reputable antivirus tool – such as the free Avast! – and carrying out a full system scan.
How to remove malware from your Windows PC
Beware the signs of a PC plagued by malware: slower-than-usual performance, a sudden spate of pop-ups, and other anomalous issues. Yes, out-of-the-ordinary behavior is sometimes the result of hardware conflicts, but your first action should be to rule out the possibility of infection by a virus, spyware, or other nefarious entity—even if you have an antivirus program installed.
Follow this step-by-step guide for instructions on how to get rid of malware.
Step 1: Enter Safe Mode
Before you do anything, you need to disconnect your PC from the internet, and don’t use it until you’re ready to clean your PC. This can help prevent the malware from spreading and/or leaking your private data.
If you think your PC may have a malware infection, boot your PC into Microsoft’s Safe Mode. In this mode, only the minimum required programs and services are loaded. If any malware is set to load automatically when Windows starts, entering in this mode may prevent it from doing so. This is important because it can make removing the nefarious files easier since they’re not actually running or active.
AV suite cheat sheet
Our quick-hit recommendations:
Sadly, Microsoft has turned the process of booting into safe mode from a relatively easy process in Windows 7 and Windows 8 to one that is decidedly more complicated in Windows 10. To boot into Windows Safe Mode, first click the Start button in Windows 10 and select the Power button as if you were going to reboot, but don’t click anything. Next hold down the Shift key and click Reboot. When the full-screen menu appears, select Troubleshooting, then Advanced Options, then Startup Settings. On the next window click the Restart button and wait for the next screen to appear (just stick with us here, we know this is long). Next you will see a menu with numbered startup options; select number 4, which is Safe Mode. Note that if you want to connect to any online scanners you’ll need to select option 5, which is Safe Mode with Networking.
You may find that your PC runs noticeably faster in Safe Mode. This could be a sign that your system has a malware infection, or it could mean that you have a lot of legitimate programs that normally start up alongside Windows. If your PC is outfitted with a solid-state drive it’s probably fast either way.
Step 2: Delete temporary files
Now that you’re in Safe Mode, you’ll want to run a virus scan. But before you do that, delete your temporary files. Doing this may speed up the virus scanning, free up disk space, and even get rid of some malware. To use the Disk Cleanup utility included with Windows 10 just type Disk Cleanup in the search bar or after pressing the Start button and select the tool that appears named Disk Cleanup.
Step 3: Download malware scanners
Now you’re ready to have a malware scanner do its work—and fortunately, running a scanner is enough to remove most standard infections. If you already had an antivirus program active on your computer, you should use a different scanner for this malware check, since your current antivirus software may not have detected the malware. Remember, no antivirus program can detect 100 percent of the millions of malware types and variants.
There are two types of antivirus programs. You’re probably more familiar with real-time antivirus programs, which run in the background and constantly watch for malware. (Another option is an on-demand scanner, which searches for malware infections when you open the program manually and run a scan. You should have only one real-time antivirus program installed at a time, but you can have many on-demand scanners installed to run scans with multiple programs, thereby ensuring that if one program misses something a different one might find it.
If you think your PC is infected, we recommend using an on-demand scanner first and then following up with a full scan by your real-time antivirus program. Among the free (and high-quality) on-demand scanners available are BitDefender Free Edition, Kaspersky Virus Removal Tool, Malwarebytes, Microsoft’s Malicious Software Removal Tool, Avast, and SuperAntiSpyware.
Step 4: Run a scan with Malwarebytes
Mentioned in this article
For illustrative purposes, we’ll describe how to use the Malwarebytes on-demand scanner. To get started, download it. If you disconnected from the internet for safety reasons when you first suspected that you might be infected, reconnect to it so you can download, install, and update Malwarebytes; then disconnect from the internet again before you start the actual scanning. If you can’t access the internet or you can’t download Malwarebytes on the infected computer, download it on another computer, save it to a USB flash drive, and take the flash drive to the infected computer.
After downloading Malwarebytes, run the setup file and follow the wizard to install the program. Once the program opens, it will automatically activate a trial of the paid version that enables real-time scanning. You won’t get charged after the trial ends, however—by default, the program reverts to the standard free version in 14 days. In the meanwhile, you can disable the real-time scanning for those two weeks if you prefer.
To run a scan, switch from the Dashboard tab to the Scan tab. Keep the default scan option (“Threat Scan”) selected and click the Start Scan button. It should check for updates before it runs the scan, but make sure that happens before you proceed.
Though it offers a custom-scan option, Malwarebytes recommends that you perform the threat scan first, as that scan usually finds all of the infections anyway. Depending on your computer, the quick scan can take anywhere from 5 to 20 minutes, whereas a custom scan might take 30 to 60 minutes or more. While Malwarebytes is scanning, you can see how many files or objects the software has already scanned, and how many of those files it has identified either as being malware or as being infected by malware.
If Malwarebytes automatically disappears after it begins scanning and won’t reopen, you probably have a rootkit or other deep infection that automatically kills scanners to prevent them from removing it. Though you can try some tricks to get around this malicious technique, you might be better off reinstalling Windows after backing up your files (as discussed later), in view of the time and effort you may have to expend to beat the malware.
Once the scan is complete, Malwarebytes will show you the results. If the software gives your system a clean bill of health but you still think that your system has acquired some malware, consider running a custom scan with Malwarebytes and trying the other scanners mentioned earlier. If Malwarebytes does find infections, it’ll show you what they are when the scan is complete. Click the Remove Selected button in the lower left to get rid of the specified infections. Malwarebytes may also prompt you to restart your PC in order to complete the removal process, which you should do.
If your problems persist after you’ve run the threat scan and it has found and removed unwanted files, consider running a full scan with Malwarebytes and the other scanners mentioned earlier. If the malware appears to be gone, run a full scan with your real-time antivirus program to confirm that result.
How to Remove Malware from Your Windows PC [Updated 2020]
Malware infection. You might think it will never happen to you. Until it does and you don’t know exactly what to do. How do you actually remove malware? Maybe you’ll ask your tech-savvy friend how to remove malware or you’ll try to clean the PC by yourself. Or perhaps you’ll address this issue on a security forum where other people encountered the same problem.
Warning signs: You’ve noticed your PC has started to slow down, it crashes often, pop-ups appear randomly in your browser, or that unusual apps start automatically.
All these signs can tell that your computer is infected with malware.
So, a malware infection has taken your computer hostage.
What do you do now?
In this article, I’ll walk you through all the steps you need to follow so you can easily clean up and restore your PC to a functional state.
Step 1. Back up all your documents and files before you start removing the malware infection.
Regardless of your malware infection, the first thing to do is backup all your important files and documents. You can do that by saving your essential data on the external source such as DVD/CDs, free cloud storage services, USB sticks or external drives. Use this guide to better back up your online data.
By performing a backup process, you can save your essential data on an external source to keep it safe. You can do this manually or automatically and we recommend using software backup tools.
Step 2. Enter your PC in Safe Mode with Networking
Here’s what you should do:
- Unplug DVDs, CDs or other USB drives from your PC and then shut it down.
- Restart by pressing F8 key over and over again until it takes you to the Safe Mode with Networking.
- This will make your system boot up only critical processes and prevent certain malware infections from starting up.
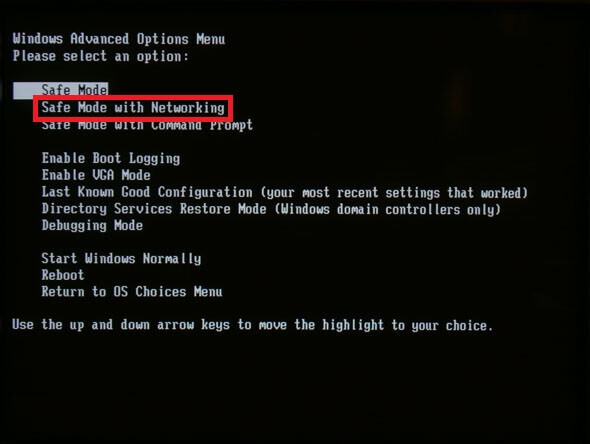
If you are using Windows 8 and/or Windows 10, here’s how you can start your PC in Safe Mode. For older versions of Windows, such as Windows 7 or XP, follow these steps.
Step 3. Delete your temporary files.
To make the scanning process smoother and simpler, you should delete all unessential temporary files from your computer.
You can do this by right-clicking on a Windows drive, such as C:/ or D:/ – > Properties -> Disk Cleanup. From the Menu, choose which files you want to delete and remove.
Step 4. How to remove malware with an anti-malware tool.
In order to clean up your PC, you’ll need some specialized software to find and clean up the malicious items. Here’s a list of all the software you can use.
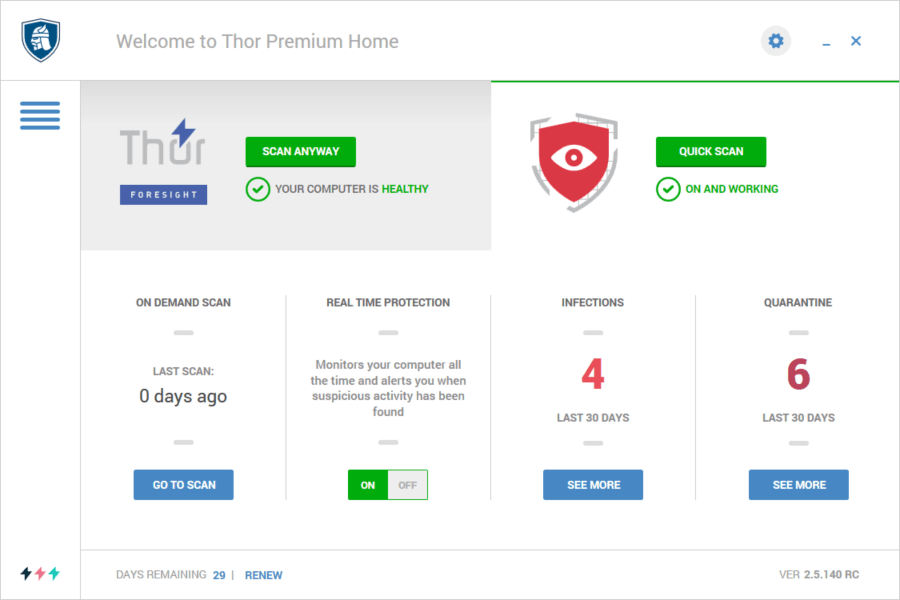
Thor Premium Home is completely free for the first 30 days and you can cancel your subscription anytime you want. This is a powerful anti-malware solution that will both remove malware and stop any other possible future infections.
Free Trial
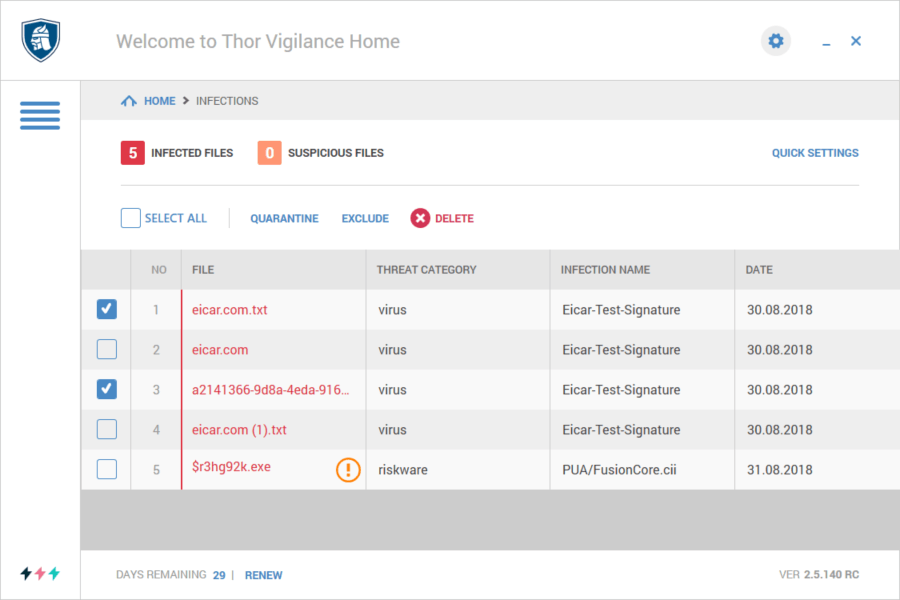
Once Thor Premium Home starts, it will enable automatic, real-time scanning and all the infected files can be removed using Thor Vigilance Home, the next-gen AV tool included in the Thor Premium Home package. You can also choose to perform scans by yourself and delete the infections.
It’s that easy. Now, your computer is clean and kept away from any type of malware, viruses, ransomware, phishing attacks, and many other online threats.
Advanced System Protectoris one of the best security tools, which protects your computer from trojans, spyware, adware, and other threats. The tool comes with three scanning modes to choose from Quick Scan, Deep Scan, and Custom Scan. It deletes browser cookies and internet browsing history to ensure privacy. This spyware tool isolates suspicious files from other files to restrict the spread of infection.
SUPERAntispywaremalware tool has a free edition that can detect different forms of malicious software, adware, and spyware, and efficiently scan and remove unwanted files from your PC. You can control the scanning options by choosing which files you want the tool to analyze. Scans will be performed manually, but the full control over scans makes it a good choice for users.
Kaspersky TDSSKiller is a free malware removal tool for Windows. It was designed to remove the rootkits which are malicious malware that boots up at the same time as your PC and hide the activity of other malicious software. Rootkits can gain access to administrator rights on an infected computer and provide deeper access to other types of malware. Online attackers can maintain the infection for a long time and are difficult to find and remove.
Malwarebytesanti-malware tool can detect, scan and remove malicious software found on your PC. It is free for a limited period of time and has a 14 day free trial with full features such as malware removal, ransomware protection, rooter killer and even a repair function for any damaged files. Use the “Start Scan” button to help you remove and kill any malware found with a manual scan. We recommend running this program at least once a week to check things you might have missed or when you notice your PC runs slowly or acts strangely.
ADWCleaner is a free software tool specialized in removing adware, browser hijackers and other potentially unwanted malicious programs that have infected your browser. The product was acquired by Malwarebytes in 2016 and includes features like toolbar removal functionality, light footprint.
If you’ve been using Junkware removal tool for a while, you should know that Malwarebytes has chosen to discontinue development for this free software. However, Malwarebytes “will continue to provide service and support for JRT until End of Life (EOL) on April 26, 2018.” As an alternative, you can use the free ADWCleaner tool that includes all major JRT features.
Here’s a list of malware removal online tools you can use to protect your computer:
Note: CCleaner was recently compromised by cybercriminals, but the tool is safe now.
Let’s move on to one more quick step, just to be sure malware didn’t mess up your browser’s settings.
Step 5. Reset your browser settings
In many cases, malware will change your browser settings in order to re-infect your computer, show advertisements, or facilitate any other malicious downloads. This is why you need to review some of your browser settings.
Here’s how to fix browser shortcuts the malware might have altered
First of all, access your browser, Right-click on your browser, then go to Properties.
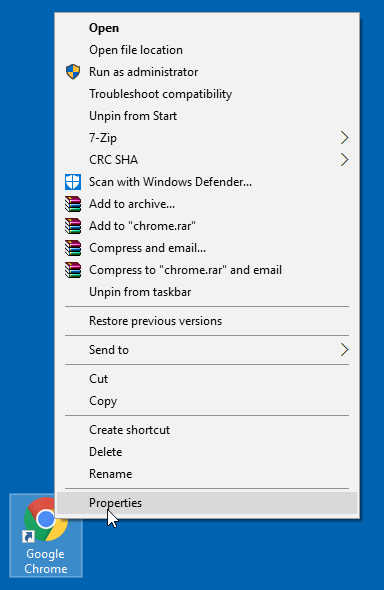
Under the Shortcut tab, you’ll see the Target field.
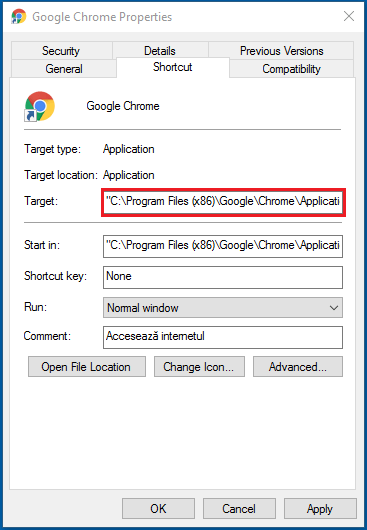
What can actually happen is that the malware might have altered the target field and included a malicious URL in it. So what happens is that now your browser will start up on this page each time you boot it up.
Normally, the browser target should look something like this:
Chrome: “C:\Program Files (x86)\Google\Chrome\Application\chrome.exe”
In our example case, the browser was targeted to go to a suspicious website, aimed at downloading malware on your PC.
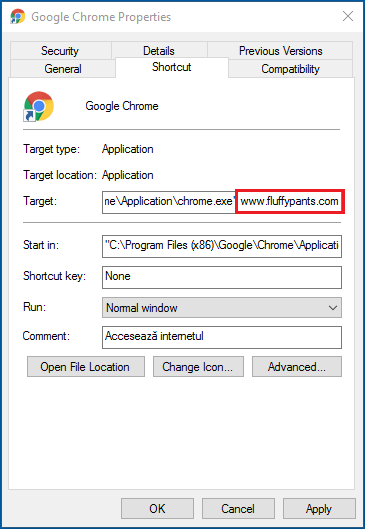
You can fix that by simply remove the URL that comes after .exe”.
Browser hijackers will change the homepage.
Instead of changing the “Target” field in the “Shortcut” tab, some malware might just modify your browser homepage.
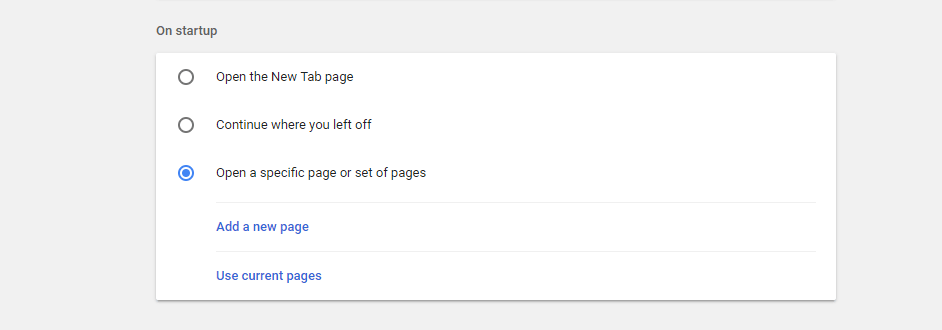
For the Chrome browser:
Go to the Settings in the top right corner of the browser. Once there, go to the On startup section. The first two options don’t have any homepage whatsoever, so you can go ahead and select either one of those.
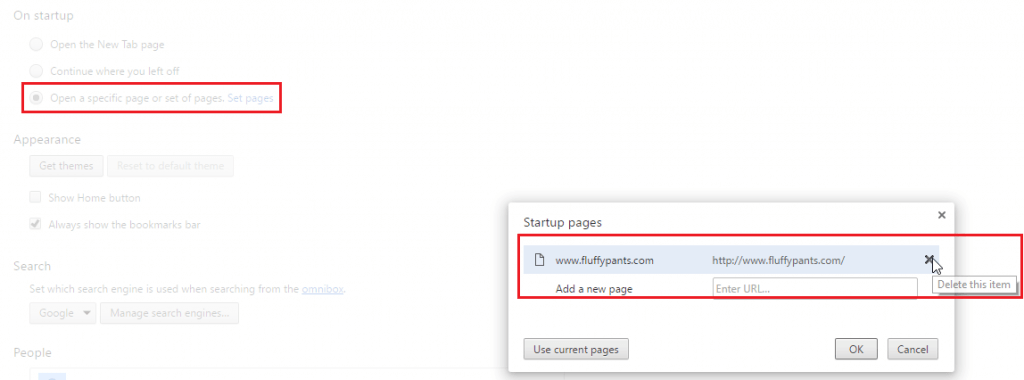
If however, you want to have your own homepage, then check the option to Open a specific page or set of pages and then click on Set pages. This should take you to this window where you can add or delete malicious links sneakily set as homepage.
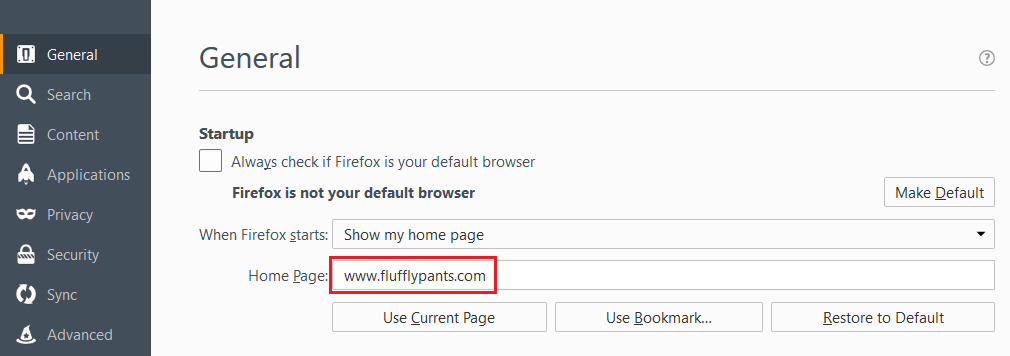
Settings for Firefox:
You can access the Options menu in the top right corner of the browser. This will immediately take you to the General tab, where you can reset your homepage as you see fit.
Malicious hackers can also take control of your accounts through session hijacking by entering the server and access its information without having to hack a registered account. Additionally, he can also make modifications on the server to help him hack it in the future or to simplify a data-stealing operation.
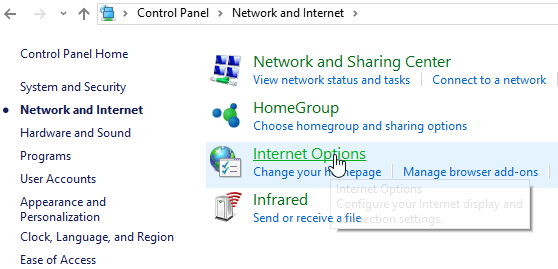
Verify your proxy settings
There is malware that can even change what Internet service you use to connect to the web. Simply removing the malware won’t reset these proxy settings, so it’s something you should fix before considering your PC squeaky clean.
To access your proxy settings, go to Control Panel -> Network and Internet and then press Internet Options.
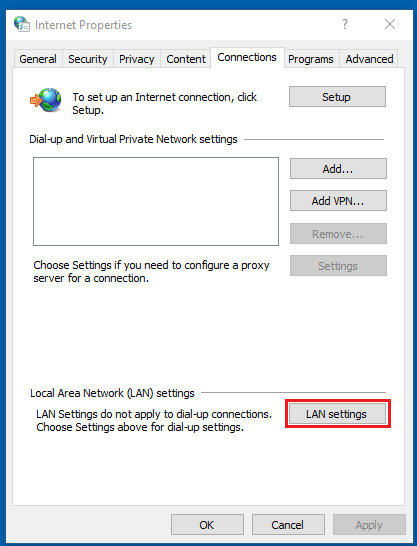
In the Internet Options menu, go to the Connections tab and press the LAN settings button.
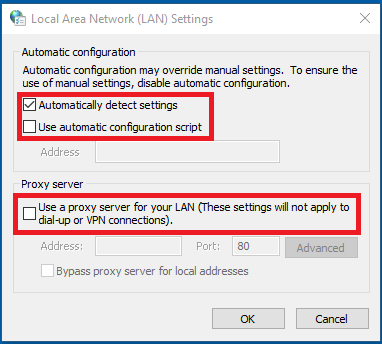
Make sure that Automatically detect settings is on, and that the other two options, “Use automatic configuration script” and “Use a proxy server for your LAN” are unmarked.
Here’s how your settings should look like:
How to make sure you’ll never get infected with malware again
Now that you’ve managed to clean up your PC and remove malware, it is important to take some protection measures to prevent getting another infection.
Some malware programs operate stealthily, and you may not know the infection is there. They don’t visibly affect your PC. Instead, they may collect sensitive information of yours such as passwords, credit card data, completed forms and screenshots.
We recommend following these protection measures to prevent getting your computer infected:
- Use two-factor authentication management system
If among other things you were also infected with a keylogger, then there’s a high chance your passwords and accounts were compromised. One of the first things you should do is start using the two-factor authentication management system and manage your passwords safely. There is some malware that can take full control of your passwords.
This password security guide will provide all the details needed to set strong and unique passwords to prevent malicious hackers exploiting them and lock you out of your accounts. With the two-factor authentication system, you will add another layer of protection to your account.
- Always keep your software up to date
Outdated software is one of the major cause of malware infections out there, mostly because they come with many vulnerabilities exploited by cybercriminals. Keeping up your software permanently up to date will lower the chances for malicious hackers to get inside your device or limit any possibility for them to infect computers.
We know it can become a tedious, yet necessary task to constantly update your software, particularly those that patch frequently. Thor FREE is a great solution that will automatically (and silently) update your software, without any annoying confirmation pop-ups. It’s light and unobtrusive, so it won’t slow down your system.
- Use a complete EDR (endpoint detection and response) solution to keep malware at bay
One layer of protection is not enough, and you need multiple layers of security to better protect your PC. A traffic filtering software will nicely and efficiently complement an antivirus since it scans incoming and outgoing traffic for any malware and then blocks that traffic from entering your PC. In other words, it gets difficult for new malware to reach your device.
Thor Premium Home does everything I mentioned in the paragraph above and is able to protect you from brand new and unlisted malware that traditional antivirus software can’t detect. It will also sanitize your Internet traffic and block malicious sources, making sure you have both your financial and confidential information safely kept.
Free Trial
BONUS:
I also added a list of in-depth articles we recommend reading so you can better know how to recognize different signs of malware infection and protect your computer with multiple layers of security.
This post was originally published by Paul Cucu in January 2017 and received relevant updates from Ioana Rijnetu in November 2017 and from Bianca Soare in July 2019.
What’s New in the remove pc?
Screen Shot

System Requirements for Remove pc
- First, download the Remove pc
-
You can download its setup from given links:


