
IBooks Author For PC Archives

iBooks Author For PC Archives
Books and Texts - A Basic Guide
How do I read a book online?
1. Click on the book that you would like to read.

2. You can read the book directly online by clicking on the cover.

3. There are three ways to turn the pages and navigate through the book.

4. To view the book in full screen, click on the expand icon  in the bottom right-hand corner.

5. If you want to exit full screen, click on the x in the bottom right-hand corner.

How do I enlarge a book on my mobile device
For mobile devices such as smartphones and tablets the controls for the bookreader are found by clicking the "hamburger" (three horizontal lines) icon in the upper right side.
To enlarge the text follow these steps:
1. Use the fullscreen mode by clicking the icon in the lower navigation bar

2. Click the "hamburger icon in the upper right

3. Click the "Settings" link

4. Click the zoom magnifier icon to enlarge the text

How do I view the PDF books?
Usually, you can click the PDF link and it will open in your browser.

Otherwise, you should download the pdf file and read it on your device using a reader such as Adobe Acrobat Reader.
How do I read the books in other formats, like ePub, Mobi, PDF?
- ePub is an open textual format (not images of pages). Many readers are available. A free one is from Adobe.
- Mobi is a proprietary textual format from Amazon supported on the Kindle.
Tips for uploading scanned books and other text documents
- Scan individual pages rather than spreads.
- PDF is the easiest format to use for uploading books.
- Use hi-res files (we use 600 ppi). Add _images.zip to uploaded zip files that contain images. png, jpg, jp2 and tif files are the accepted formats.
- For file names, use only unaccented Roman letters, numbers, dashes, underscores, and spaces.
- Keep file names to under 100 characters.
- When uploading multiple books to a single page, prepend the file names with numbers to force the list order you would like to see. e.g. use 01, 02, 03, etc.
- Always specify the language so OCR can run correctly. if there is more than one language, add additional metadata field for each additional language.
- Include as much metadata as possible such as date (published), creator (author), ISBN and LCCN numbers (add a metadata field for these), description, subject tags, creative commons license, etc.
- For the title field, use the title as it is shown on the title page of the book. That is how the system tries to choose the title page to display in the preview and in search results.
- If possible, upload a MARC file along with your book file. The name is the same as the book file and, depending on the MARC file format, end with _marc.xml or _meta.mrc. For example, a book file named mybook.pdf would have a MARC file named mybook_marc.xml.
- Upload books to the Community Texts collection if you do not have a private collection. If you feel the book should be in another collection, please contact us at info@archive.org with that request. Collections can be created on request when you have created at least 50 item pages on archive.org.
What file format should I upload?
A hi-res pdf is the easiest format to upload. To upload image files, read the How do I make a flip book out of loose images section.
How do I make a flipbook out of loose images?
To make a flipbook, you need to upload a zip or tar that contains the files.
Here's how:
- Use only jpg, jpeg, jp2, tif, tiff, png, gif or bmp files. Any combination of them is acceptable.
- Name your files sequentially. It is best to use the identifier in the name. For example:
- 000yourfilename.jpg
- 001yourfilename.jpg
- 002yourfilename.jpg
- Create a zip or tar of the files and name that zip file using the page identifier e.g. yourfilename_images.zip or yourfilename_images.tar. If possible, use a compression tool that does not add extra extraneous files. Sometimes the compression tool that comes with your computer does this (as with the Mac tool for example.) Terminal or Cygwin work well.
- Upload the zip or tar file. Be sure to specify a language to help OCR. The system should do the rest. (Tip: If your images don't result in a flip book embedded in the page, click Edit in the item and make sure the zip or tar file format is listed as "Generic Raw Book Zip.")
Can I upload a MARC record?
- You can upload a MARC record with your text file.
- The MARC record will populate the item as soon as the item derives if the MARC file is named correctly.
- If it's a binary (ISO 2709) MARC, it should be called {itemID}_meta.mrc.
- If it's MARCXML, it should be called {itemID}_marc.xml.
Related articles
Comments
0 comments
Article is closed for comments.
Download iBooks Author for Pc
Now anyone can create stunning textbooks, cookbooks, history books, picture books, and more for iPhone, iPad, and Mac. Start with one of the Apple-designed templates that feature a wide variety of page layouts. Add your own text and images with drag-and-drop ease. Use Multi-Touch widgets to include interactive photo galleries, movies, Keynote presentations, 3D objects, and more. Preview your book on your iOS device or Mac at any time. Then submit your finished work to Apple Books in a few simple steps. And before you know it, you’re a published author. 11 or later • 2GB of RAM • 1.2GB of available disk space • Keynote 6.0 or later (required for importing presentations created in Keynote 6.0+) • Pages 5.0 or later (required for importing documents created in Pages 5.0+) • iBooks for iOS 4.3 or later (required for previewing on an iOS device) • iBooks for Mac 1.3 or later (required for previewing on Mac) • iTunes Producer 2.9 or later (required for book publishing) • Network Connection (required for book publishing)
How to find iBooks library location on your Mac?
 iTunes makes it a cinch to select a custom path for your music library and browse the media files, but finding the iBooks library location is a different story. So, where exactly are your electronic iBooks stored on your Mac?
You can use the iBooks app to read iBooks titles, iBooks Author books and PDF files.
Your iBooks, anywhere you go
In addition to storing iBooks you’ve purchased, the app can also manage and sync PDFs so they are accessible across all your devices. If you use iCloud Drive with iBooks, any PDFs that you add to the app on your iOS device will automatically appear in iBooks on Mac and all of your other Apple devices, and vice versa.
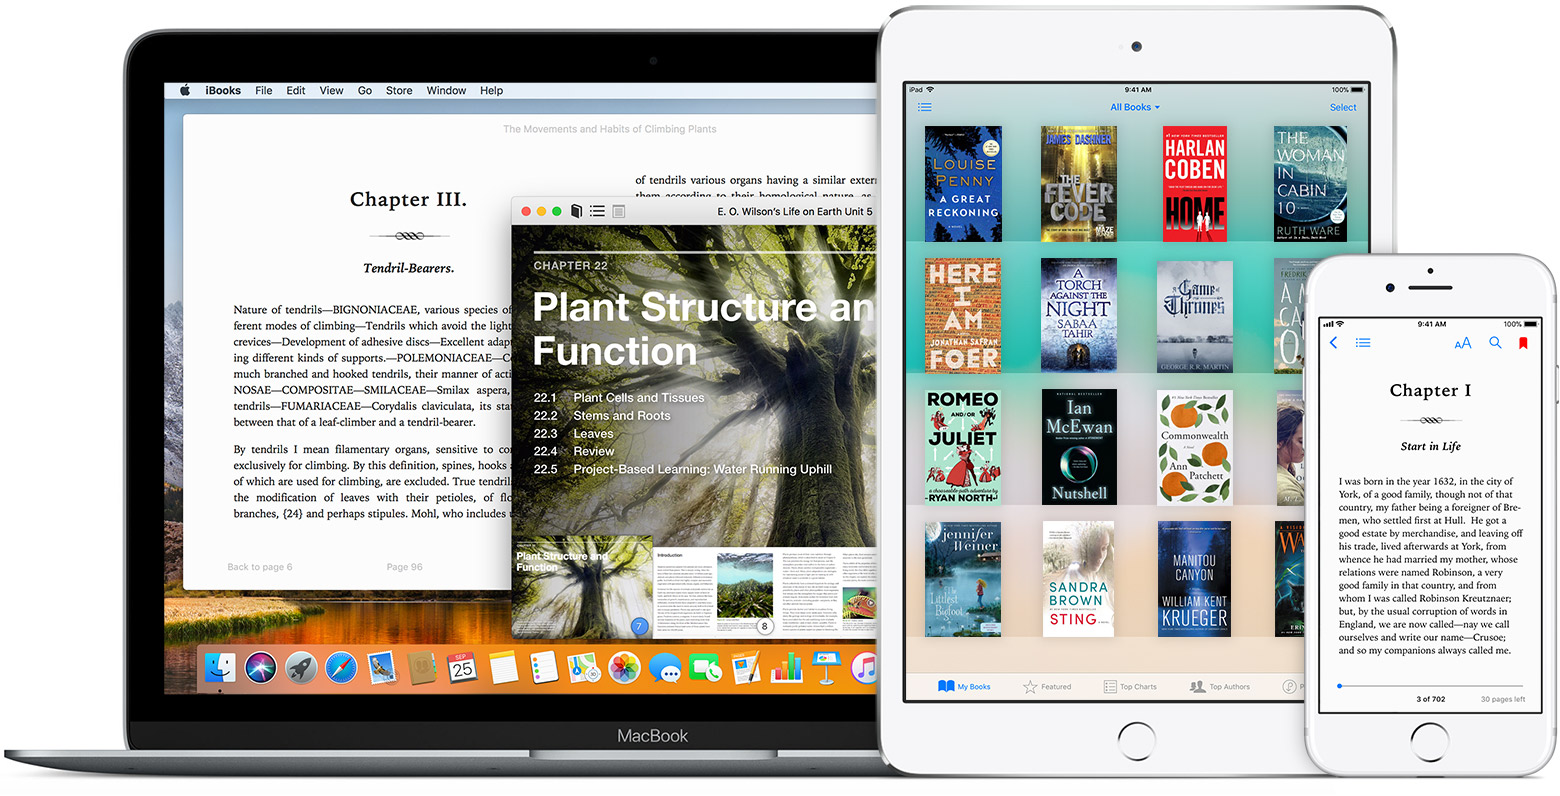
Available iBooks encoded in the ePub file format, as well as iBooks Author titles and PDF files in iCloud Drive, automatically download to your iBooks library so they can be easily accessed from any iPhone, iPad, iPod touch or Mac you own.
TUTORIAL:Six 3D Touch shortcuts in iBooks for iPhone
Here’s where your books from the iBooks app are stored on your Mac.
How to find iBooks library location
Unlike with iTunes, iBooks does not provide outward-facing options to change the iBooks library location. But don’t worry, you can still browse your iBooks library location manually, in the Finder, by following our step-by-step instructions.
1) Click the desktop on your Mac to select the Finder.
2) Choose the option Go To Folder from the Finder’s Go menu.
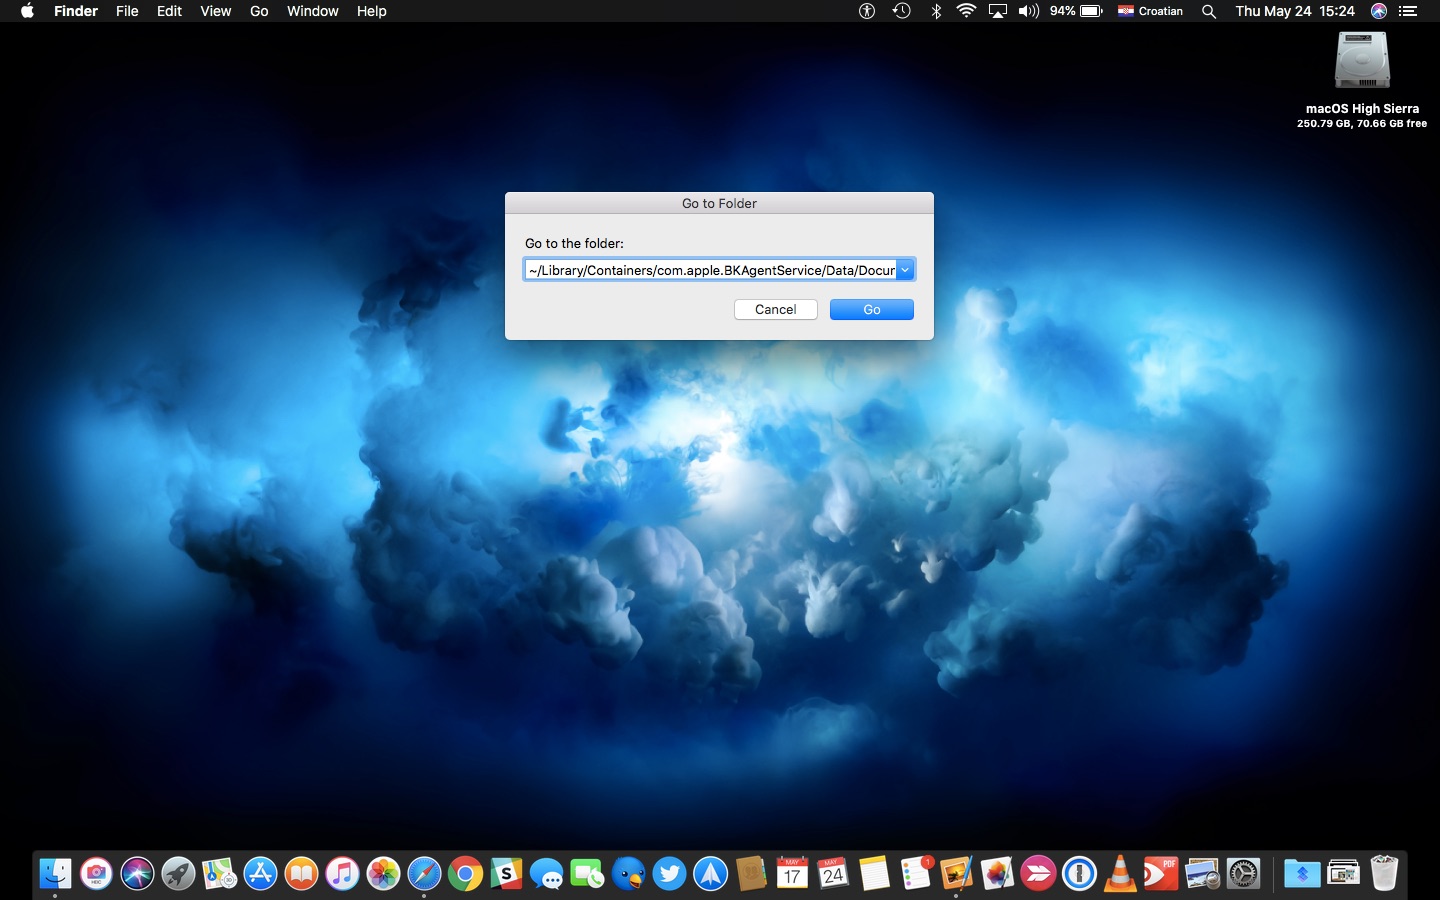
3) Type in the following path, then click the OK button.
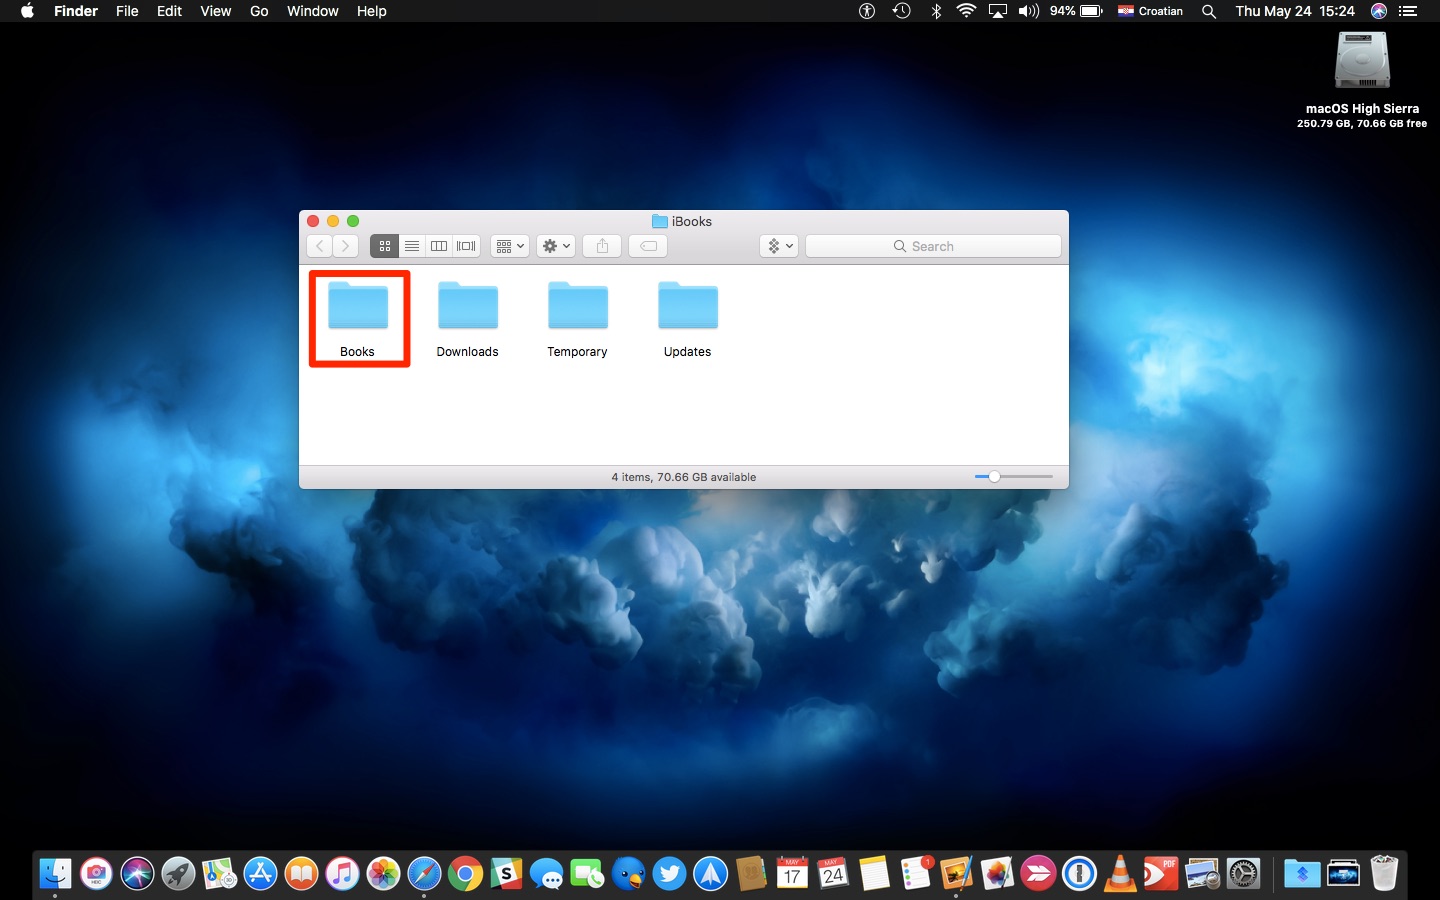
You should see a new Finder window with some sub-folders.
You may see these standard sub-folders:
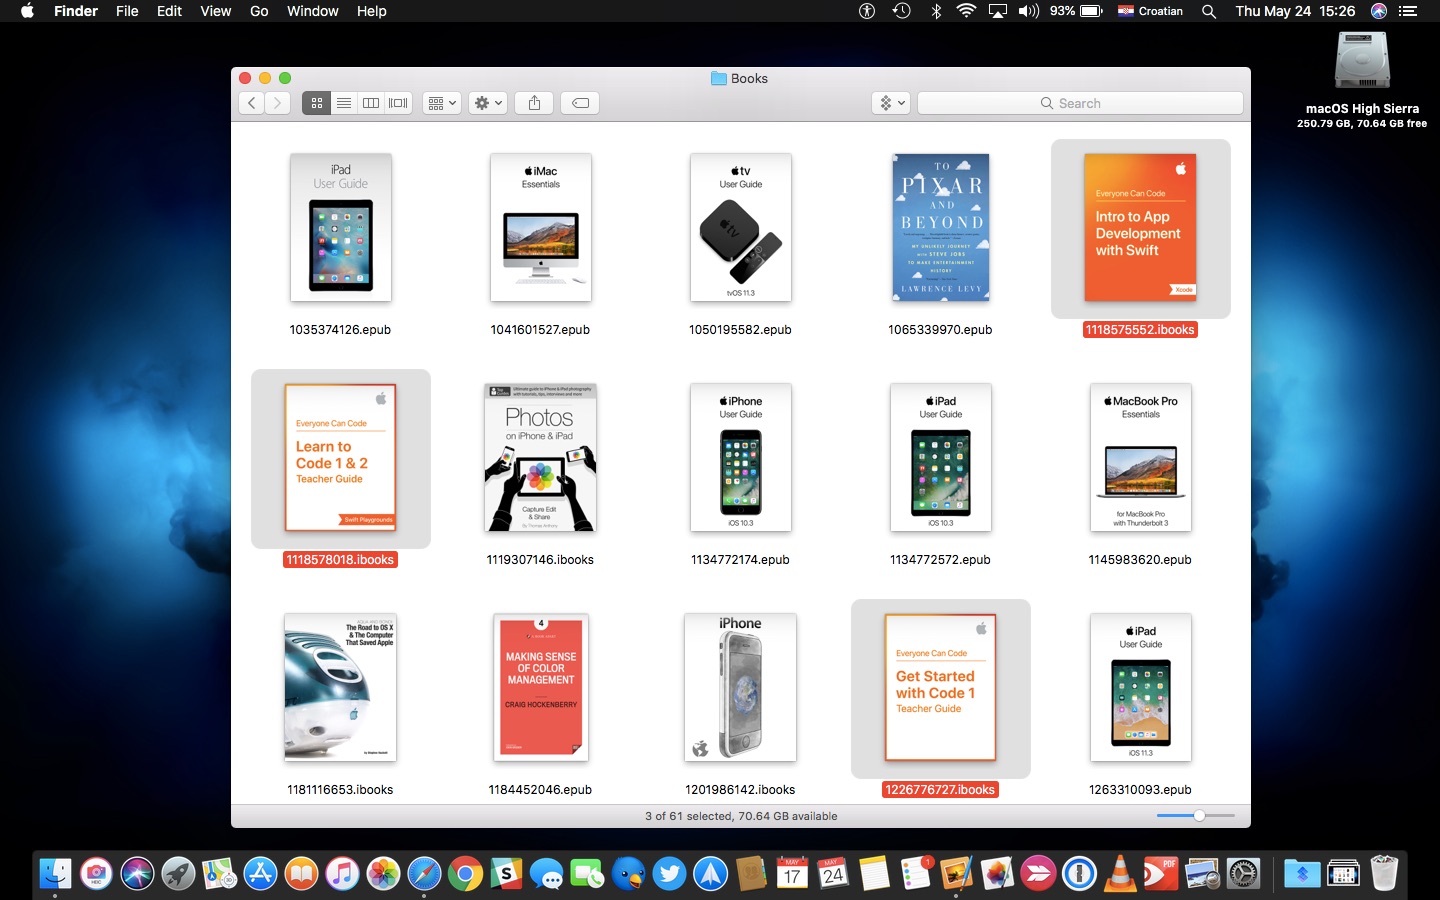
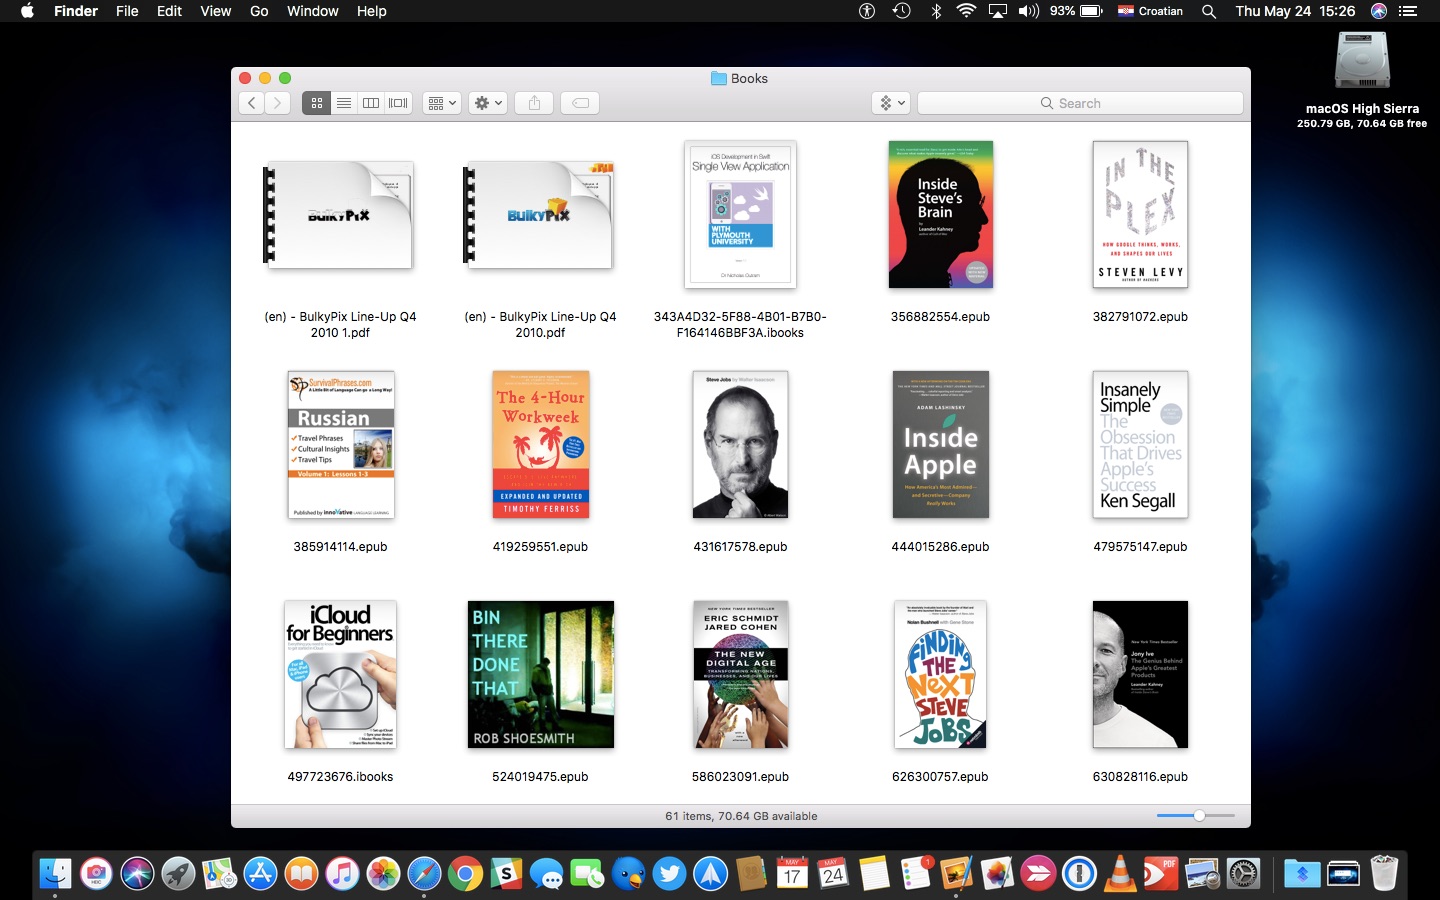
- Books—Your iBooks, iBooks Author titles and PDF files are here.
- Downloads—In-progress downloads are kept here until completed.
- Temporary—Temporary files. Moving on, nothing to see here, folks.
- Updates—New versions of your iBooks are temporarily stored here until installed.
4) To access your iBooks, double-click the folder Books to open it.
You can now browse your ePubs, iBooks and PDFs.
Changing files in your iBooks library
It might be a good idea to make backups of your iBooks by copying the files to a custom folder on your Mac and ensure that it’s included in your backup scheme. However, you are strongly discouraged from deleting, renaming or otherwise manipulating iBooks in your library using the Finder because doing so may break the iBooks library structure.
To delete an iBook properly, select it in the iBooks app and choose Delete from the Edit menu. To rename your iBooks, see other useful information about them or edit their metadata, switch to the list view by clicking the List button near the top of the iBooks window.

Use iBooks’ List view to edit metadata like a pro
Keep in mind that titles bought from iBooks Store don’t count against your iCloud storage—they’re not kept in iCloud Drive because you can re-download them at will. According to Apple, sample iBooks and audiobooks don’t sync with iCloud Drive at all.
TUTORIAL:Here’s where the media files from the Photos app are saved on your Mac
Our tutorials have covered other aspects of the iBooks app, including:
Feel free to share your own iBooks tips down in the comments.
Need help? Ask iDB!
If you like this how-to, pass it along to your support folks and leave a comment below.
Got stuck? Not sure how to do certain things on your Apple device? Let us know via [email protected] and a future tutorial might provide a solution.
Submit your how-to suggestions via [email protected].
What’s New in the iBooks Author For PC Archives?
Screen Shot

System Requirements for IBooks Author For PC Archives
- First, download the IBooks Author For PC Archives
-
You can download its setup from given links:

iBooks Author For PC Archives & Key Download

iBooks Author For PC Archives& Kali Software Crack
