
Lowest graphics settings Archives

Lowest graphics settings Archives
Choosing the Best Graphics Settings for PC Gaming
Home > GPUs > Graphics Settings
Game Settings 101, Low vs Medium vs High vs Ultra Compared, Are Ultra Settings Worth It, & Tips on Manually Tweaking Graphics Settings for Optimal Performance
Last Updated: Oct 28, 2018
Whether you're planning a new gaming computer build and wondering what graphics settings are all about and which settings (low, medium, high or ultra) you should be choosing hardware for when studying performance benchmarks, or perhaps you've already built a PC and looking to choose the best graphics settings to increase performance, in this beginner's guide to game settings we'll explain what you need to know.
As well as the basics of how PC graphics settings and presets work, how much better higher settings actually look, and whether or not ultra settings are worth it - we'll also cover some of the more advanced, specific graphics settings that you can manually tweak, including what they actually do and which are most taxing on your graphics card or CPU.
CONTENTS
Introduction to PC Graphics Settings: Newbie Basics
Low vs Medium vs High vs Ultra Settings
Are Ultra Settings Worth the Lower FPS?
Manually Tweaking Settings for Optimal Performance
Which Graphics Settings Affect FPS the Most?
What Graphics Settings Are the Most CPU Intensive?
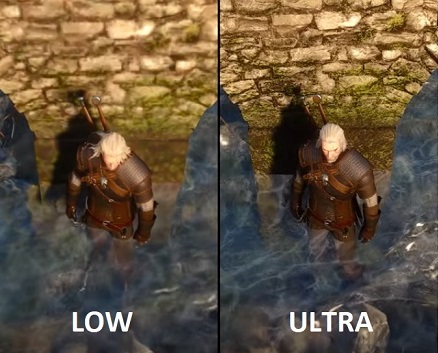
The Witcher 3: Low vs Ultra Settings Side by Side
Introduction to PC Graphics Settings: Newbie Basics
If you're new to PC gaming, you may hear all this talk about PC graphics/game settings and "ultra" settings and whatever else, but may wonder what exactly are PC graphics settings, why do they matter, and what you should know when planning and building a PC. When you game on consoles, everybody has the same hardware and so everyone is going to see the same quality of graphics on-screen. Whereas with PC games, the spectrum of possible hardware that a player may be using is vast.
One PC gamer may be playing a certain game a high-end PC that'll run the game and all its special graphics effects without a hiccup, whilst another player may be sporting a Potato PC of sorts that struggles to keep up and run the game smoothly. That's where game settings come in: unlike console games that have fixed graphics options for the most part, for PC games developers open up a whole host of different graphics options for players to be able to adjust and tweak in order to improve performance.
I'm all about the classics. If only WC4 was a thing...maybe one day if we get extremely lucky
The catch? When you lower settings, the graphics quality and effects won't be as good, but this is the sacrifice you have to make if you want better performance in a certain game that is struggling on your PC. If your computer can't run a certain game at its highest settings, you'll want to strike a nice balance of graphics quality and performance until you're happy with the frame rate and performance you get.
This balance varies from gamer to gamer, as some will want flawlessly smooth gameplay at all games, whereas others may not mind the occasional slow down here or there in the name of the highest quality graphics possible. It all comes down to you and what frame rate you think is best, the type of game you're playing (frame-rate slowdowns are less fun in fast-paced games where every millisecond counts; think Counter Strike or Overwatch).
So, if you really are new to the wonderful world of PC gaming, you may be wondering how do you lower or increase graphics settings? Simply put, to meddle with the settings of a game simply look for a section in the main menu called something like graphics options or video options.
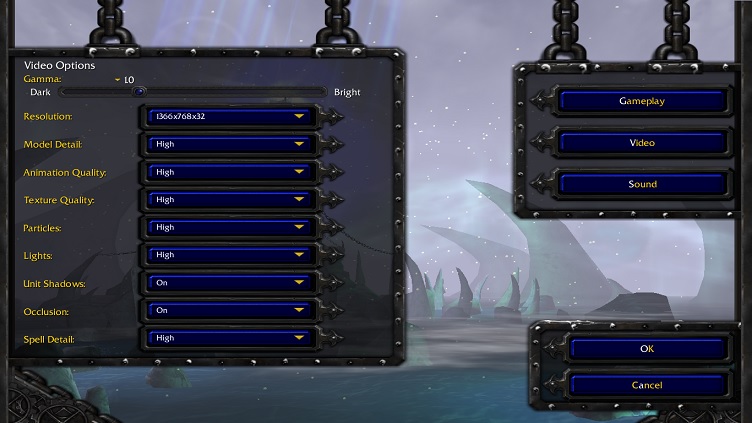
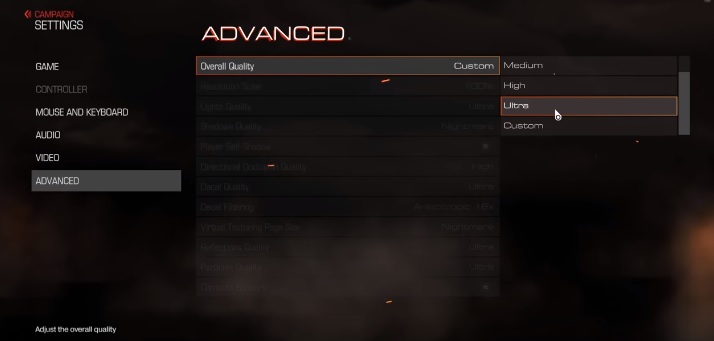
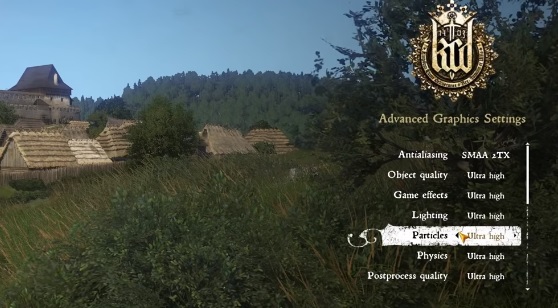
Many games will have various presets of settings such as Low, Medium, High, or Ultra presets, and as well as being able to select a preset (which selects a default range of settings for you: more in this below) you should also have the option to go in and change individual graphics settings for those who wish to customize further (you may have to select the "custom" preset to be able to do this as shown below).
Selecting a preset will automatically set all the graphics settings to a certain level
Low vs Medium vs High vs Ultra Settings
What are presets? As mentioned above, most PC games will have a list of available settings presets which are basically default overall settings for various levels of graphics quality that are pre-set by the developers. They make it easier to increase or lower the graphics settings of a game without having to go in and tweak individual settings, which can be confusing and won't make sense to some gamers (we'll get to them later in this guide if you're interested though). In most games there's usually 4, sometimes 3, default presets which are usually named the following:
- Low - When you select low settings, or specifically when you select the low preset, the game will display the lowest possible graphics settings across the board for the fastest possible performance (as in, for the highest frame rate possible).
- Medium - A medium preset bumps up your graphics quality slightly from Low, and might be all your system can handle depending on your PC, resolution, and the game you're running.
- High - Depending on the game, you might not even notice much of a difference between high and ultra settings, so this could be the sweet spot for your particular system and game. A high preset will run the game almost at its full graphical glory, but with a little extra performance and less quality than ultra.
- Ultra - Most games will call the maximum preset as "ultra" settings, but some may have it named "extreme", "ultra high" or "very high" instead. The ultra preset will, you guessed it, crank up all the graphics settings to the max, hence the term "maxed out" that gamers use. Although, keep in mind that even if you select the default ultra/maximum preset, that doesn't necessarily mean that your game is set to the highest possible graphics available, as there may be other specific graphic options that are not enabled when you select an ultra preset (such as Anti Aliasing etc - see below).
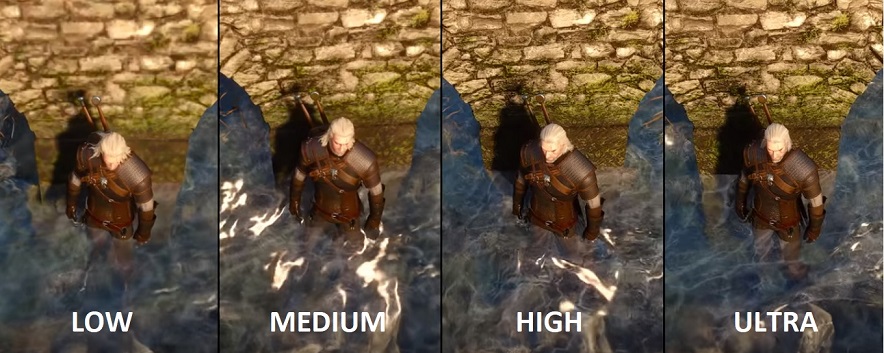
Differences in preset settings for Witcher 3
Are Ultra Settings Worth the Lower FPS?
Are ultra settings a must-have for PC gaming? How much better are they than high, or even medium settings/presets? Is it a waste of a game if you're NOT playing on ultra settings? Of course the answer to that last one is no - you don't NEED to be running maxed-out ultra settings to fully enjoy a game. But whether or not ultra settings are worth it, and how much of a difference they'll make on graphics and the overall experience, will vary from game to game, and from gamer to gamer. Some games will be more noticeable on maximum settings compared to high or medium graphics settings, whereas in other titles you may not even notice the difference.
Although keep in mind that generally speaking, the higher the settings the less of a difference you'll see. Meaning, that a jump from low to medium, or medium to high, is likely going to have more of a change than going from say high to ultra/maxed. So I'd say that playing on high vs ultra isn't too much of a difference in most games, and most gamers won't really notice much of a difference.
Another factor in whether ultra settings are worth aiming for, besides whether or not your PC can produce a good enough frame rate on ultra settings, is how much of a graphics nut you are and how much attention to detail you..well..pay attention to. The type of game you're playing also matters. In a fast-paced shooter or action game for instance, you're probably not taking too much time to stop and smell the roses and just stare at the pretty graphics.
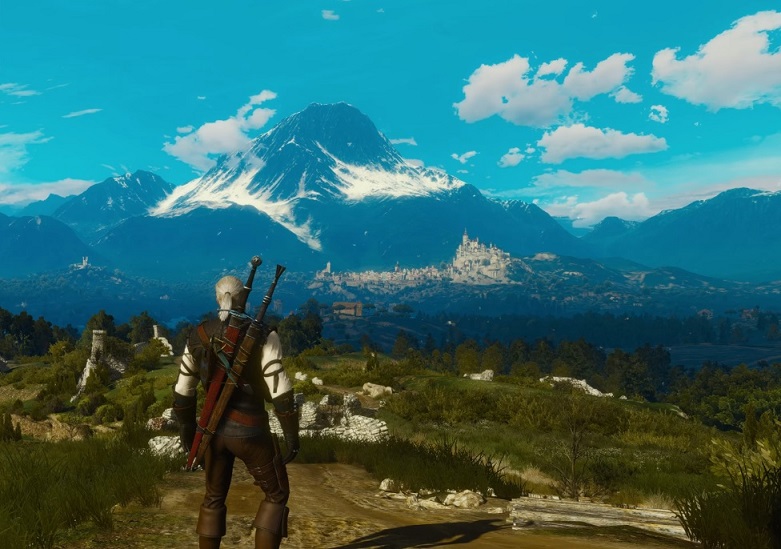
I'd say having higher settings is more important, and more noticeable, when playing immersive, atmospheric games like The Witcher 3 where there's plenty of time to soak in views like this
Stare at something for a millisecond too long in CSGO and you're dead. But in slower paced games that put more of a focus on amazing visuals, effects, and attention to detail - think Witcher 3 or the Crysis series as cliche examples - running the highest graphics settings you can is more important. Running Witcher 3 on PC on low settings is a bit of a waste of an epic experience IMO, and you know the developers are hurting inside when you do that.
Manually Tweaking Settings for Optimal Performance
If you want to spend more time changing graphics settings around to find the optimal balance of performance and graphics quality for your particular system and game, you can go beyond merely changing the default presets to manually tweaking the individual, specific graphics settings. Sometimes a certain preset may not be optimally set for maximum performance and you'll want to use a custom preset instead.
For example, if you have a game set on a high preset, which probably sets all of the game's graphics settings to high (not necessarily though as some developers will tweak presets more precisely), there may be certain settings you'll want to have to ultra instead (settings that don't affect FPS too much) and other specific settings you may wish to lower: settings that are perhaps most taxing on FPS/frame-rate, or maybe settings that are most CPU intensive in the case that your setup's weaker link is the processor.
When it comes to manually changing PC graphics settings for optimal performance, every game will be slightly different and it's going to take a bit of trial and error to find the best settings (or do some research online). We won't cover all the settings here as it's beyond the scope of this beginner's introduction to game settings, but let's quickly go over some of the more common ones such as Anti Aliasing, Anisotropic Filtering and Field of View.
What Graphics Settings Affect FPS Most?
Good questions. On your mission to find the optimal balance of quality and performance, not all settings are created equal and some are going to be more fruitful to play around with than others. In other words, there are some graphics settings that affect your frame rate more than others, and that also won't have a huge effect on the overall graphics quality (though it depends on the game), and these settings are the ones you should look to lower first.
First of all though, if you haven't already considered this, using a lower gaming resolution is the biggest way to improve performance and significantly up that fragile frame rate of yours. However, this is more of a last resort as lowering the resolution will have a noticeable affect on graphics quality, so only do so if your performance really is snail-like to begin with. So, if you're set on the resolution you're currently rocking, below are the biggest frame-rate eaters to consider lowering and tweaking around first. Note that these are general guidelines and how taxing settings are will vary from game to game, but the following game settings are a good place to start in most AAA games:
PC Graphics Settings to Lower First
- Anti Aliasing - Should you have anti aliasing on or off? What is Anti Aliasing? Anti Aliasing, or AA, is a post-process rendering technique that smooths out jagged edges on rendered polygons. It makes graphics looks better but comes at a great cost, although how much of a cost will depend on the type of Anti Aliasing being done as there are many different variations of the technique. If you're having performance issues, try turning it off, or lowering the type of Anti Aliasing if your game supports various modes of it.
- Shadows - Rendering shadows is another performance hog, and utilizes both your CPU and GPU. Shadows should be a customizable graphics option in your particular game, so have a play around with the different settings to see if it noticeably boosts your FPS. Lowering shadow quality shouldn't have a huge impact on the visuals and overall experience in most games, but do note that the odd title or two may feature shadows quite heavily in the overall feel of the game and in that case you'll want to have them on a fair setting at the very least.
- Shaders - Another potential performance killer at higher levels, look at lowering shader/shading quality if there is such a setting in the particular game you're tweaking and you're bound to see a boost in FPS. For example, in Rainbox Six Siege, shading quality is the second most taxing game setting of all only after AA.
- Special Effects - Things like PhysX, Hairworks, PureHair, TressFX should be lowered or even disabled altogether if you want better performance as these can be very taxing.
What Graphics Settings Are the Most CPU Intensive?
If you're wondering more specifically which game settings affect the CPU the most because you know that your performance issue is a weak CPU that may be bottlenecking your graphics card, I would still try lowering shadows as mentioned above as that is usually both GPU and CPU intensive. Although it does depend on the specific game's implementation of shadows. For example, in Fallout 4 the shadows are much more CPU dependant than the shadows rendered in other titles, and so if you were tweaking that game for a CPU bottleneck then definitely start with shadows.
Some games like Witcher 3, GTA V, and Skyrim have settings for Number of NPCs, Draw Distance, and Foilage Density (not in GTAV AFAIK) which would all release pressure off your CPU when lowered, so look into those settings for a CPU bottleneck as well. AI (Artificial Intelligence) is also CPU dependant. Furthermore, tweak and/or turn off any special effects such as PhysX, cloth effects, and anything physics-related, as these types of dynamic features can really use up CPU resources. Last but not least, particle effects can be quite CPU intensive so tweak that if your game has it.
Need Help Planning, Building, or Troubleshooting Your First PC?
Hope this guide helped in your research, and good luck with your new setup. Need further help?
For Simple Questions
If you need further help choosing the optimal bang-for-buck parts-list for your specific requirements, feel free to post a question in our main comments section (on our Latest Gaming PC Builds page). We'll respond to you ASAP and do our best to help steer you in the right direction.
For Detailed Help (Premium Email Support)
To have ongoing access to our exclusive support email (reserved for customers only), check out the "Master" or "VIP" editions of our book (The Gaming Build Blueprint Manual). These editions come with included long-term support which may just come in real handy if you're building your first PC but are still a bit worried or intimidated.
You'll have the peace of mind to be able to ask us directly for help at any stage of your build. Our book is also the best way to directly support our work here at BGC, with profits often re-invested back into creating more and better content, including being able to buy more hardware and equipment for testing and so on.
Our Full-Length Manual for DIY Beginners
Graphics Auto-Optimize...


A cursory forum search has brought up nothing, sooo... how the heck do I stop Tera from messing with my graphics?
I have long unchecked the "Automatically Apply" box in Options->Game, but that did jack squat nothing.
Tera still does this whenever the fps drop even just slightly. Can't even fish in full graphics glory now.Do I have to mess with the ini files somehow?
I'm not sure this can be fixed, since the auto-optimization is tied to activities and regions rather than what is actually going on. For instance, if you are doing guardian missions, Tera will always reduce your settings, regardless of your fps and the number of players present. It happens the moment you enter the zone, even if you're on ch5 at 6 am and you're the only person around.
I posted long time ago about this issue right after the disaster of the ui "upgrade" and nobody seemed to care.. so (as you know by know people are more worried about having the next dumb looking elin outfit than fixing actual gameplay improvements.. sigh). Its very irritating when it checks not only one, but twice or even more in the middle of a guardian mission or other places. Also i dont think it actually works as intended. As you say, even if you uncheck the option it will still ignore it. Why to even bother to add an option to disable it if it is completely pointless? well, i guess we will just need to get used to it. Tera keeps adding more and more throwbacks as time passes.

I'm not sure this can be fixed, since the auto-optimization is tied to activities and regions rather than what is actually going on. For instance, if you are doing guardian missions, Tera will always reduce your settings, regardless of your fps and the number of players present. It happens the moment you enter the zone, even if you're on ch5 at 6 am and you're the only person around.
Of course can be fixed. It is just an unreal engine feature, and as such can be disabled or whatever you want to do with it. We all know why it isnt fixed already, for the same reason other hundreds of problems / issues are not fixed either. They just dont care and prefer to invest time and efforts on new dumb events that will generate revenue. Why they would invest time on fixing or improving things when they actually dont need to (because apparently everybody is happy and they keep buying dumb things all the time)?. I cant blame em.
Of course can be fixed. It is just an unreal engine feature, and as such can be disabled or whatever you want to do with it. We all know why it isnt fixed already, for the same reason other hundreds of problems / issues are not fixed either. They just dont care and prefer to invest time and efforts on new dumb events that will generate revenue. Why they would invest time on fixing or improving things when they actually dont need to (because apparently everybody is happy and they keep buying dumb things all the time)?. I cant blame em.
I was talking about fixing it ourselves (on our end). I don't doubt that Bluehole could fix it, of course they could, but as you yourself pointed out, they won't. So as of right now? This most likely can't be fixed.
...as you know by know people are more worried about having the next dumb looking elin outfit than fixing actual gameplay improvements.. sigh
Elin Outfits are important too :<
I contacted the support about it earlier, since with this new fishing update it gets more and more annoying. They told me that the "Automatically Apply" checkbox in Options/Game is linked to the value CITYWAR_USE_AUTO_OPTIMIZE=False, that is in the TERA\Client\S1Game\Config\S1Option.ini.
But no matter what you set there, it does nothing to the optimization so it’s nothing they can fix and they have to forward it.A cursory forum search has brought up nothing, sooo... how the heck do I stop Tera from messing with my graphics?
I have long unchecked the "Automatically Apply" box in Options->Game, but that did jack squat nothing.
Tera still does this whenever the fps drop even just slightly. Can't even fish in full graphics glory now.Do I have to mess with the ini files somehow?
But that option is for Guardian Legion (even so isn't working) and has nothing to do with graphics (at least for me it never activated), have u tried using specific graphics option setup? For me the only time when Tera change my Graphics it's just when it's running out of memory, it will change the graphics to make it more stable.

But that option is for Guardian Legion (even so isn't working) and has nothing to do with graphics (at least for me it never activated), have u tried using specific graphics option setup? For me the only time when Tera change my Graphics it's just when it's running out of memory, it will change the graphics to make it more stable.
It has everything to do with graphics... what it does (supossedly since it doesnt seem to work) is to reduce your graphic details (shadows, view distance and other things) to allow smooth gameplay when in group missions, something like that. When the game does that you will see a msg in the screen telling you that if you want to disable the feature, you need to go to that option (auto optimize system settings or whatever) and uncheck it.
And what you say about Tera reducing the resolution of the textures when low memory is a different thing. And you dont see any msg on the screen. Just in the chat box.
The huge problem is, apparently Tera keeps checking all the time while in game, and it interrupts the gameplay everytime it happens, usually it happens at the beginning of entering the zone but lately its doing it even in the middle. This is really noticeable in flying guardian missions, for example. Also note that this only happens more often in older computers. If yours is not that old, thats why you probably not suffering from this. My pc is old but i can play at max settings smoothly and im getting very annoyed with this, because i dont need / want that option activated, because it is interrupting my gameplay.
I see my bad, my lap is from 2016 sorry.
Try looking in Google if u can disable the option via config.ini or if there is a guide to do itI contacted the support about it earlier, since with this new fishing update it gets more and more annoying. They told me that the "Automatically Apply" checkbox in Options/Game is linked to the value CITYWAR_USE_AUTO_OPTIMIZE=False, that is in the TERA\Client\S1Game\Config\S1Option.ini.
But no matter what you set there, it does nothing to the optimization so it’s nothing they can fix and they have to forward it.
This is working, u only have to set on your file options do not overwrite.No mate, it doesnt. Thats the whole problem. No matter what you change in the text file it doesnt fix the issue. Its getting really irritating. Yesterday i almost directly close the game out of frustration. Five times in the middle of a flying guardian mission.
And again, yes of course they can fix this they only need to actually care about it. Sadly we all know wasting time and efforts on something that is not monetizable is a no no. I just hope this doesnt escalate making the game unplayable.
Happend to me yesterday, too... what is this shit??
I have an 1080GTX 32 GB RAM and an I7 8700K.
First i discovered that my texture in velica was kind of strange. everytime i adopt new Video settings i can watch live
how tera downscale my Textures....I could fix this by change some Settings in the S1engine.ini. Instead of 140MB cache 2 GB etc.But when i arrived at "Cutthroat Habor" my Video Settings got messed up very hard. No Shaddows at all and everything in the video Settings got turned down.
A Red Text appeard which said "System Setting Optimization kicks in, You can deactivate it in the System Settings". But it don't worked.I am starting to think that this "Automatically Apply" is too go automatic back too your old settings after you run out of the zone.
But There is no way to deactivate this shit.Everytime i get near the Habor City my game freeze for 2 Sec and change the video settings. Even when i run into the Habor with more than 100 FPS.
Pretty sure there are a lot of other areas where this happens...
I cam back after years to play tera again, but i am extremely upset about this Bullshit.
Thats why i did stop to waste any more money on this game for now. I even cancelled my tera club membership. If someday i see the devs are actually trying to fix and improve the game, i will return to throw some money, but for now, not in hell. The game, in the state it is right now, with all these useless options and shenanigans, terrible ui, nonsense grinding, terrible events, etc its not worthy at all to waste a dime on it. Sorry, but its a big fact. Let it to survive thanks to the nonbrained rich kids and money whales in the meantime.
Any updates on this`? I assume no, but I hate this thing so here goes nothing
Ingame>options>video all set to max except :
. Presets 5 (this doesn't trigger the unoptimized UE options from '6' ). Lurid display 0 (it triggers a texture bug if set higher to '0' linked with the pc view distance)
. Shadows 2 (but the impact is lowered on high end specs, with a loss of approx 4fps if set higher than '2' )
. PC view distance 4 (creates bugs of low quality texture at close range or mid distance whenever it is set higher than 4)
. Character effects quality (dungeon) 0 (if you really don't want to kill your fps during some intense fight)
. Lightning enrichment 1 (personal preference on '1' since '2' activates an ugly bloom to fake an AA)Try these settings to not trigger the bad ones

Adobe PDF conversion settings
Choose an Adobe PDF preset for converting files
Start Acrobat Distiller.
In an Adobe Creative Cloud application, choose File > Print, select Adobe PDF as the target printer, and click Print Settings (Photoshop) or Setup > Preferences (InDesign).
(Windows) In Office 2010 or later applications, choose Acrobat > Preferences.
(Windows) In another authoring application or utility, choose Adobe PDF > Change Conversion Settings.
- Choose a preset from the Default Settings (or Conversion Settings) menu.
A PDF preset is a group of settings that affect the process of creating a PDF. These settings are designed to balance file size with quality, depending on how the PDF are used. Most predefined presets are shared across Adobe Creative Cloud applications, including InDesign CC, Illustrator CC, Photoshop CC, and Acrobat. You can also create and share custom presets for your unique output requirements. A saved PDF preset file has the suffix .joboptions.
A few of the following presets are not available until you move them from the Extras folder (where they installed by default) to the Settings folder for custom settings.
Note:
Acrobat Standard does not include the Extras folder. The presets installed in the Extras folder are only available in Acrobat Pro.
Typically, the Extras and Settings folders for default settings are found at the following locations.
(Windows XP) Documents and Settings/All Users/Application Data/Adobe/Adobe PDF
(Windows Vista, Windows 7, or Windows 8) ProgramData/Adobe/Adobe PDF
(Acrobat Pro on Mac OS) Library/Application Support/Adobe PDF
The default settings files installed with Distiller are Read OnlyHidden.
The custom settings are found in the following locations:
(Windows XP) Documents and Settings/[username]/Application Data/Adobe/Adobe PDF/Settings
(Windows Vista, Windows 7, or Windows 8) Users/[username]/AppData/Roaming/Adobe/Adobe PDF/Settings
(Acrobat Pro on Mac OS) Users/[username]/Library/Application Support/Adobe/Adobe PDF/Settings
Some presets are not available in some Adobe Creative Cloud applications.
Note:
Review your PDF settings periodically. The settings do not automatically revert to the default settings. Applications and utilities that create PDFs use the last set of PDF settings defined or selected.
Creates PDFs for quality printing on desktop printers and proofing devices. This preset uses PDF 1.4, downsamples color and grayscale images to 300 ppi and monochrome images to 1200 ppi. It also embeds subsets of all fonts, leaves color unchanged, and does not flatten transparency (for file types capable of transparency). These PDFs can be opened in Acrobat 5.0 and Acrobat Reader 5.0 and later.
Oversized Pages (Acrobat Pro)
Creates PDFs suitable for viewing and printing of engineering drawings larger than 200 x 200 in. (508 x 508 cm). These PDFs can be opened in Acrobat and Reader 7.0 and later.
PDF/A‑1b: 2005 (CMYK and RGB)
Used for long-term preservation (archival) of electronic documents. PDF/A‑1b uses PDF 1.4 and converts all colors to either CMYK or RGB, depending on which standard you choose. These PDFs can be opened in Acrobat and Reader versions 5.0 and later.
PDF/X‑1a (2001 and 2003) (Acrobat Pro)
PDF/X‑1a requires all fonts to be embedded, the appropriate PDF bounding boxes to be specified, and color to appear as CMYK, spot colors, or both. Compliant files must contain information describing the printing condition for which they are prepared. PDF files created with PDF/X‑1a compliance can be opened in Acrobat 4.0 and Acrobat Reader 4.0 and later.
PDF/X‑1a uses PDF 1.3, downsamples color and grayscale images to 300 ppi and monochrome images to 1200 ppi. It embeds subsets of all fonts, creates untagged PDFs, and flattens transparency using the High Resolution setting.
Note:
The PDF/X1‑a:2003 and PDF/X‑3 (2003) presets are placed on your computer during installation. However, they aren’t available until you move them from the Extras folder to the Settings folder.
This preset is based on PDF 1.4, which includes support for live transparency. PDF/X‑4 has the same color-management and International Color Consortium (ICC) color specifications as PDF/X‑3. You can create PDF/X‑4‑compliant files directly with Creative Suite 3 applications (Illustrator, InDesign, and Photoshop). In Acrobat 9, use the Preflight feature to convert PDFs to PDF/X‑4 DRAFT.
PDF files created with PDF/X‑4 compliance can be opened in Acrobat 7.0 and Reader 7.0 and later.
Creates PDF files for high-quality print production (for example, for digital printing or for color separations to an imagesetter or platesetter). However, it does not create files that are PDF/X compliant. In this case, the quality of the content is the highest consideration. The objective is to maintain all the information in a PDF file that a commercial printer or print service provider requires to print the document correctly. This set of options uses PDF 1.4, converts colors to CMYK, and downsamples color and grayscale images to 300 ppi and monochrome images to 1200 ppi. It embeds subsets of all fonts and preserves transparency (for file types capable of transparency).
These PDF files can be opened in Acrobat 5.0 and Acrobat Reader 5.0 and later.
Note: Before creating a PDF file to send to a commercial printer or print service provider, find out what output resolution and other settings are required. Or, ask for a .joboptions file with the recommended settings. You sometimes must customize the Adobe PDF settings for a particular provider and then provide a .joboptions file of your own.
Rich Content PDF (Acrobat Pro)
Creates accessible PDF files that include tags, hyperlinks, bookmarks, interactive elements, and layers. This set of options uses PDF 1.6 and embeds subsets of all fonts. It also optimizes files for byte serving. These PDF files can be opened in Acrobat and Reader 7.0 and later. (The Rich Content PDF preset is in the Extras folder).
Note:
This preset was called eBook in earlier versions of some applications.
Creates PDF files for displaying on the web or an intranet, or for distribution through an email system. This set of options uses compression, downsampling, and a relatively low image resolution. It converts all colors to sRGB, and (for Adobe Acrobat Distiller-based conversions) does not embed fonts. It also optimizes files for byte serving.
These PDF files can be opened in Acrobat and Reader 6.0 and later.
Creates PDF files to be printed to desktop printers or digital copiers, published on a CD, or sent to a client as a publishing proof. This set of options uses compression and downsampling to keep the file size down. However, it also embeds subsets of all (allowed) fonts used in the file, converts all colors to sRGB, and prints to a medium resolution. Windows font subsets are not embedded by default. PDF files created with this settings file can be opened in Acrobat and Reader 6.0 and later.
About PDF/X, PDF/E, and PDF/A standards
PDF/X, PDF/E, and PDF/A standards are defined by the International Organization for Standardization (ISO). PDF/X standards apply to graphic content exchange; PDF/E standards apply to the interactive exchange of engineering documents; PDF/A standards apply to long-term archiving of electronic documents. During PDF conversion, the file that is being processed is checked against the specified standard. If the PDF does not meet the selected ISO standard, you are prompted to either cancel the conversion or create a non-compliant file.
The most widely used standards for a print publishing workflow are several PDF/X formats: PDF/X‑1a, PDF/X‑3, and (in 2008) PDF/X‑4. The most widely used standards for PDF archiving are PDF/A‑1a and PDF/A‑1b (for less stringent requirements). Currently, the only version of PDF/E is PDF/E-1.
For more information on PDF/X, PDF/E, and PDF/A, see the ISO and AIIM websites.
For details on creating and working with PDF/A files, see www.adobe.com/go/learn_acr_pdfa_en.
Customize Adobe PDF settings
You may want to create custom conversion settings for certain jobs or output devices. The selections you make determine such things as whether the document fonts are embedded and subsetted at 100%, how vector objects and images are compressed and/or sampled, and whether the resulting PDF includes high-end printing information such as OPI (Open Prepress Interface) comments. Default settings files cannot be modified, but can be duplicated to help create new settings files.
Note:
If the PDF is intended for high-end printing, ask your service provider for their custom .joboptions file with the recommended output resolution and other settings. This way, the PDF you give them will have characteristics optimized for your print workflow.
Create a custom Adobe PDF settings file
In Acrobat Distiller, select one of the predefined sets of options from the Default Settings menu to use as a starting point, and then choose Settings > Edit Adobe PDF Settings.
In authoring applications or utilities, select Adobe PDF as the target printer—typically in the Page Setup or Print dialog boxes—and click Properties.
(Windows) In the Acrobat PDFMaker dialog box, clickAdvanced Settings in the Settings tab.
Note: In Windows, you can switch to a different preset from within the Adobe PDF Settings dialog box. To do this, select Show All Settings at the bottom left and then select a preset from the list on the left.
 Adobe PDF Settings dialog box (Windows)
- Select panels one at a time, and make changes as needed.
- Save your customized preset in one of the following ways:
Click OK to save a duplicate of the custom preset file, which will automatically be renamed. For example, if you edit the Press Quality preset, your first customized version appears as Press Quality (1).
Click Save As, type a new descriptive name for the file, and click Save.
The custom file is saved in (Windows) /Documents and Settings/[user name]/Application Data/Adobe/Adobe PDF/Settings, (Vista/7/8) User/[user name]/AppData/Roaming/Adobe/Adobe PDF/Settings, or (Mac OS) Users/[user name]/Library/Application Support/Adobe PDF/Settings.
Delete custom Adobe PDF settings files
In Acrobat Distiller, choose Settings > Remove Adobe PDF Settings.
Select the custom file and click Remove.
Repeat step 2 as needed, and then click Cancel to close the Remove Adobe PDF Settings dialog box.
The Acrobat Distiller Adobe PDFMaker Settings > Advanced Settings contains panels of options that you can select to customize your PDF output.
Use this panel to select a version of Acrobat for file compatibility and other file and device settings.
Sets the compatibility level of the PDF. Use the most recent version (in this case, version 1.7) to include all the latest features and functionality. If you’re creating PDFs that will be distributed widely, choose an earlier level, to ensure that all users can view and print the document.
Compresses structural information (such as bookmarks, accessibility, and noncompressible objects), making this information neither visible or usable in Acrobat 5.0 or Reader 5.0. Tags Only compresses structural information; Off applies no compression.
Automatically rotates pages according to the direction of text.
Note:
If Process DSC Comments is selected in the Advanced panel and if %%Viewing Orientation comments are included, these comments take precedence in determining page orientation.
Rotates all pages to match the orientation of the majority of text in the document.
Rotates each page based on the orientation of the text on that page.
Prevents pages from rotating.
Specifies whether to display a PDF with left side or right side binding. The Binding setting affects the appearance of pages in the Two-Up Continuous view and the appearance of thumbnails side by side.
Use for PostScript files to emulate resolutions based on the printer they are printing to. Permitted values range from 72 to 4000. Use the default setting unless you plan to print the PDF on a specific printer while emulating the resolution defined in the original PostScript file.
Note:
Increasing the resolution setting increases file size and may slightly increase the time required to process some files.
Specifies which pages to convert to PDF.
Embeds a thumbnail preview for each page in the PDF, increasing the file size. Deselect this setting when users of Acrobat 5.0 and later will view and print the PDF; these versions generate thumbnails dynamically each time you click the Pages panel of a PDF.
Optimize For Fast Web View
Restructures the file for faster access (page-at-a-time downloading, or byte serving) from web servers. This option compresses text and line art, overriding compression selections on the Images panel.
Specifies the page size to use when one is not specified in the original file. EPS files give a bounding box size, not a page size.
The options in the Images panel specify compression and resampling for color, grayscale, and monochrome images. You may want to experiment with these options to find an appropriate balance between file size and image quality.
The resolution setting for color and grayscale images should be 1.5 to 2 times the line screen ruling at which the file will be printed. The resolution for monochrome images should be the same as the output device, but be aware that saving a monochrome image at a resolution higher than 1500 dpi increases the file size without noticeably improving image quality. Images that will be magnified, such as maps, may require higher resolutions.
Note:
Resampling monochrome images can have unexpected viewing results, such as no image display. If this happens, turn off resampling and convert the file again. This problem is most likely to occur with subsampling, and least likely with bicubic downsampling.
The following table shows common types of printers and their resolution measured in dpi, their default screen ruling measured in lines per inch (lpi), and a resampling resolution for images measured in pixels per inch (ppi). For example, if you were printing to a 600-dpi laser printer, you would enter 170 for the resolution at which to resample images.
Printer resolution | Default line screen | Image resolution |
|---|---|---|
300 dpi (laser printer) | 60 lpi | 120 ppi |
600 dpi (laser printer) | 85 lpi | 170 ppi |
1200 dpi (imagesetter) | 120 lpi | 240 ppi |
2400 dpi (imagesetter) | 150 lpi | 300 ppi |
Reduces image resolutions that exceed the For Images Above value to the resolution of the output device by combining pixels in a sample area of the image to make one larger pixel.
Averages the pixels in a sample area and replaces the entire area with the average pixel color at the specified resolution.
Replaces an entire area with a pixel selected from that sample area, at the specified resolution. Causes faster conversion time than downsampling, but resulting images are less smooth and continuous.
Uses a weighted average, instead of a simple average (as in downsampling) to determine pixel color. This method is slowest but produces the smoothest tonal gradations.
Compression/Image Quality
Applies compression to color, grayscale, and monochrome images. For color and grayscale images, also sets the image quality.
Smooths jagged edges in monochrome images. Choose 2 bit, 4 bit, or 8 bit to specify 4, 16, or 256 levels of gray. (Anti-aliasing may cause small type or thin lines to look blurry.)
Note:
Compression of text and line art is always on. To turn it off, set the appropriate Distiller parameter. For details, see the SDK information on the Acrobat Developer Center at www.adobe.com/go/learn_acr_devcenter_en (PDF, English only).
Opens the Image Policy dialog box, where you can set processing options for Color, Grayscale, and Monochrome images that are less than the resolutions you specify. For each type of image, enter a resolution value, and then choose Ignore, Warn And Continue, or Cancel Job.
The Fonts options specify which fonts to embed in a PDF, and whether to embed a subset of characters used in the PDF. You can embed OpenType®, TrueType, and PostScript fonts. Fonts that have license restrictions are listed with a lock icon ![]()
. If you select a font that has a license restriction, the nature of the restriction is described in the Adobe PDF Options dialog box.
Note:
When you combine PDF files that have the same font subset, Acrobat attempts to combine the font subsets.
Embeds all fonts used in the file. Font embedding is required for PDF/X compliance.
Embeds all OpenType fonts used in the file, and maintains OpenType font information for advanced line layout. This option is available only if either Acrobat 7.0 (PDF 1.6) or Acrobat 8 (PDF 1.7) is selected from the Compatibility menu in the General panel.
Subset Embedded Fonts When Percent Of Characters Used Is Less Than
Specifies a threshold percentage if you want to embed only a subset of the fonts. For example, if the threshold is 35, and fewer than 35% of the characters are used, Distiller embeds only those characters.
Specifies how Distiller responds if it cannot find a font to embed when processing a file.
To embed only certain fonts, move them into the Always Embed list. Make sure that Embed All Fonts is not selected.
Move fonts that you do not want to embed to this list. If necessary, choose a different font folder from the pop-up menu to display the font in the font list.
Note:
Fonts that have license restrictions are listed with a lock icon. If you select a font with a license restriction, the nature of the restriction is described in the Adobe PDF Options dialog box.
If the font you want is not in a font folder, click Add Name. Enter the name of the font, select Always Embed List (or Never Embed List), and click Add.
Note:
A TrueType font can contain a setting added by the font designer that prevents the font from being embedded in PDF files.
Removes a font from the Always Embed or Never Embed list. This action doesn’t remove the font from your system; it removes the reference to the font from the list.
Note:
Acrobat does not include the Times, Helvetica, and ZapfDingbats fonts. If you want PDF recipients to view and print these fonts in PDFs that you create, embed the fonts.
Whether you’re using color management information in the PostScript file, using Distiller CSFs, or defining custom settings, you set all color management information for Distiller on the Color panel of the Adobe PDF Settings dialog box.
Lists color settings, including those used in graphics applications. The None setting lets you edit the Color Management Policies and Working Spaces settings.
Color Management Policies
Specifies how Distiller converts unmanaged color in a PostScript file when you don’t use a Distiller color settings file. This menu is available when None is selected in the Settings File menu.
Note:
Color Management Policies values may affect a PDF differently depending on the compatibility setting you choose in the General panel.
Leaves device-dependent colors unchanged and preserves device-independent colors as the nearest possible equivalent. This is a useful option for print shops that have calibrated their devices, have used that information to specify color in the file, and are only outputting to those devices.
Tag (Or Convert) Everything For Color Management
Tags color objects with an ICC profile and calibrates colors, making them device-independent in PDFs compatible with Acrobat 4.0 (PDF 1.3) and later. Converts device-dependent color spaces in images (RGB, Grayscale, and CMYK) to device-independent color spaces (CalRGB, CalGray, and Cie L*a*b) in Acrobat 3.0 (PDF 1.2) compatible PDFs.
Tag (Or Convert) Only Images For Color Management
Tags ICC profiles in images only (not text or vector objects), which prevents black text from undergoing any color shift when distilling Acrobat 4.0 (PDF 1.3) compatible PDFs. Converts device-dependent color spaces in images (RGB, Grayscale, and CMYK) to device-independent color spaces (CalRGB, CalGray, and Lab) in Acrobat 3.0 (PDF 1.2) compatible PDFs.
Convert All Colors To sRGB (or Convert Everything To CalRGB)
Calibrates color, making it device-independent. Converts CMYK and RGB images to sRGB in PDFs compatible with Acrobat 4.0 (PDF 1.3) or later. Converts CMYK and RGB images to calibrated RGB (CalRGB) in Acrobat 3.0 (PDF 1.2) compatible PDFs. Recommended for PDFs that will be used onscreen or with low-resolution printers.
Convert All Colors To CMYK
Converts color spaces to DeviceGray or DeviceCMYK according to the options specified in the Working Spaces menu. All Working Spaces must be specified.
Document Rendering Intent
Choose a method to map colors between color spaces. The result of any particular method depends on the profiles of the color spaces. For example, some profiles produce identical results with different methods.
Acrobat shares four rendering intents (Perceptual, Saturation, Relative Colorimetric, and Absolute Colorimetric) with other Creative Suite applications.
Acrobat also includes a rendering intent called Preserve, which indicates that the intent is specified in the output device rather than in the PDF. In many output devices, Relative Colorimetric is the default intent.
Note:
In all cases, intents may be ignored or overridden by color management operations that occur subsequent to the creation of the PDF file.
For all Color Management Policies values other than Leave Color Unchanged, choose a working space to specify which ICC profiles are used for defining and calibrating the grayscale, RGB, and CMYK color spaces in distilled PDFs.
Choose a profile to define the color space of all grayscale images in files. The default ICC profile for gray images is Adobe Gray - 20% Dot Gain. Choose None to prevent grayscale images from being converted.
Choose a profile to define the color space of all RGB images in files. The default, sRGB IEC61966-2.1, is recognized by many output devices. Choose None to prevent RGB images from being converted.
Choose a profile to define the color space of all CMYK images in files. The default is U.S. Web Coated (SWOP) v2. Choose None to prevent CMYK images from being converted.
Note:
Choosing None for all three working spaces has the same effect as selecting the option Leave Color Unchanged.
Note:
You can add ICC profiles (such as ones provided by your print service bureau) by placing them in the ICCProfiles folder in the Common folder, the Windows\System\Color folder (Windows), or the System Folder/ColorSync folder (Mac OS).
Preserve CMYK Values For Calibrated CMYK Color Spaces
When selected, device-independent CMYK values are treated as device-dependent (DeviceCMYK) values, device-independent color spaces are discarded, and PDF/X-1a files use the Convert All Colors To CMYK value. When deselected, device-independent color spaces convert to CMYK, provided that Color Management Policies is set to Convert All Colors To CMYK.
Preserve Under Color Removal And Black Generation
Retains these settings if they exist in the PostScript file. Black generation calculates the amount of black to use when reproducing a color. Undercolor removal (UCR) reduces cyan, magenta, and yellow to compensate for black generation. Because UCR uses less ink, it’s suitable for uncoated stock.
When Transfer Functions Are Found
Specifies how to handle transfer functions in PDFs. Transfer functions are used for artistic effect and to correct for the characteristics of a specific output device.
Deletes any applied transfer functions. Applied transfer functions should be removed, unless the PDF is to be output to the same device that the source PostScript file was created for.
Retains the transfer functions traditionally used to compensate for dot gain or dot loss that may occur when an image is transferred to film. Dot gain or loss occurs when the ink dots that make up a printed image are larger or smaller than in the halftone screen.
Applies the transfer function, changing the colors in the file but doesn’t keep it. This method is useful for creating color effects in a file.
Preserve Halftone Information
Retains any halftone information in files. Halftone information is intended for use with a particular output device.
Advanced options specify which Document Structuring Conventions (DSC) comments to keep in a PDF and how to set other options that affect the conversion from PostScript. In a PostScript file, DSC comments contain information about the file (such as the originating application, the creation date, and the page orientation) and provide structure for page descriptions in the file (such as beginning and ending statements for a prologue section). DSC comments can be useful when your document is going to print or press.
For more information, see the documents on the Adobe PDF Technology Center at www.adobe.com/go/learn_acr_pdftechnology_en (PDF, English only).
Note:
The ASCII Format option has been removed from Distiller, but is still available as a Distiller parameter.
Allow PostScript File To Override Adobe PDF Settings
Uses settings stored in a PostScript file rather than the current PDF settings file. For more information about customizing PDF settings, see the SDK information on the Acrobat Developer Center at www.adobe.com/go/learn_acr_devcenter_en (PDF, English only).
Allow PostScript XObjects
PostScript XObjects store fragments of PostScript code to be used when a PDF is printed on a PostScript printer. Use only in controlled workflows where there is no other option. Available when the Standard or Smallest File Size is selected from the Default Settings menu.
Convert Gradients To Smooth Shades
Converts blends to smooth shades for Acrobat 4.0 and later, improving quality and reducing file size of PDFs. Distiller converts gradients from Adobe Illustrator, Adobe InDesign, Adobe FreeHand®, CorelDraw, QuarkXPress, and Microsoft PowerPoint.
Convert Smooth Lines To Curves
Reduces the amount of control points used to build curves in CAD drawings, which results in smaller PDFs and faster onscreen rendering.
Preserve Level 2 Copypage Semantics
Uses the copypage operator defined in PostScript Level 2 rather than in Language Level 3 PostScript. If you have a PostScript file and select this option, a copypage operator copies the page. If this option is not selected, the equivalent of a showpage operation is executed, except that the graphics state is not reinitialized.
Preserve Overprint Settings
Retains any overprint settings in files being converted to PDF. Overprint settings create color by printing one ink on top of another ink.
Overprinting Default Is Nonzero Overprinting
Prevents overprinted objects with zero CMYK values from knocking out CMYK objects beneath them.
Save Adobe PDF Settings Inside PDF File
Embeds the settings file (.joboptions) used to create the PDF as an attachment. (To view the settings file, choose View > Show/Hide > Navigation Panes > Attachments in Acrobat.)
Save Original JPEG Image In PDF If Possible
Processes compressed JPEG images (images that are already compressed using DCT encoding) without recompressing them. When deselected, performance improves because only decompression, not recompression, occurs.
Save Portable Job Ticket Inside PDF File
Preserves a PostScript job ticket in a PDF. Job tickets describe the PostScript file and can be used later in a workflow or for printing the PDF.
Use Prologue.ps and Epilogue.ps
Sends a prologue and epilogue file with each job. These files can be used to add custom PostScript code that you want to have executed at the beginning or end of every PostScript job being converted.
Sample Prologue.ps and Epilogue.ps files are located in (Windows) /Documents and Settings/All Users/Application Data/Adobe/Adobe PDF/Distiller/Data, (Vista) /Users/All Users/Adobe/Adobe PDF/Distiller/Data, (Windows 7/8/Vista) /Users/[Username]/AppData/Roaming/Adobe/Adobe PDF/Distiller/Data or (Mac OS)/Library/Application Support/Adobe/Adobe PDF/Distiller/Data.
In Windows Explorer, the Application Data folder is typically hidden; to make it visible, choose Tools > Folder Options, click the View tab, and select Show Hidden Files And Folders. For Windows 7, Start > Control Panel > Folder Options > View > Show Hidden Files, Folders, and Drives. Or, you can type the path into the Address text box.
Note:
In Acrobat Standard, Distiller processes prologue and epilogue files only if both files are present and located properly. The two files must be used together.
Note:
In Acrobat Pro, Distiller processes prologue and epilogue files only if both files are present and located properly. The two files must be used together. If the prologue and epilogue files are at the same level as the In and Out folders of a watched folder, they are used instead of the ones in the Distiller folder.
Maintains DSC information from a PostScript file.
Displays warning messages about problematic DSC comments during processing and adds them to a log file.
Preserve EPS Information From DSC
Retains information for an EPS file, such as the originating application and creation date.
Retains information needed to replace a For Placement Only (FPO) image or comment with the high-resolution image located on servers that support Open Prepress Interface (OPI) versions 1.3 and 2.0. For more information, see the OPI 2.0 specification at www.adobe.com/go/learn_acr_opi2spec_en (PDF, English only).
Preserve Document Information From DSC
Retains document properties, such as the title, creation date, and time, in the PDF.
Resize Page And Center Artwork For EPS Files
Centers an EPS image and resizes the page to fit closely around the image. If deselected, the page is sized and centered based on the upper left corner of the upper left object and lower right corner of the lower right object on the page. This option applies only to jobs that consist of a single EPS file.
By using Standards options, you can check document content in the PostScript file to make sure it meets standard PDF/X1-a, PDF/X-3, or PDF/A criteria before creating the PDF. For PDF/X-compliant files, you can also require that the PostScript file meet additional criteria by selecting options in the Standards panel. The availability of options depends on the standard you select. You can also create a PDF/X file from a compliant PDF by using the Preflight feature in Acrobat.
Complies with the PDF/X standard for high-resolution print production.
Note:
PDFMaker, the conversion method used to convert Microsoft Word and other application files to PDF, does not create PDF/X-compliant files.
Complies with the PDF/A standard for archival documents.
Note:
If you set up a watched folder for creating PDF/A-compliant files in Acrobat Pro, do not add security to the folder. The PDF/A standard does not allow encryption.
Produces a report that indicates whether the file complies with the standard you select, and if not, what problems were encountered. The .log file appears at the bottom of the dialog box.
Note:
PDFs that complied with both PDF/X-1a and PDF/X-3 standards in Acrobat 6.0 default to PDF/X-1a in Acrobat XI.
Specifies whether to create the PDF if the PostScript file does not comply with the requirements of the standard.
Creates a PDF even if the PostScript file does not meet the requirements of the standard, and notes these problems in the report.
Creates a PDF only if the PostScript file meets the requirements of the standard, and is otherwise valid.
Report As Error (Acrobat Pro)
Flags the PostScript file as noncompliant if one of the reporting options is selected and a trim box or art box is missing from any page.
Set TrimBox To MediaBox With Offsets (Acrobat Pro)
Computes values for the trim box based on the offsets for the media box of respective pages if neither the trim box nor art box is specified. The trim box is always as small as or smaller than the enclosing media box.
Set BleedBox To MediaBox (Acrobat Pro)
Uses the media box values for the bleed box if the bleed box is not specified.
Set BleedBox To TrimBox With Offsets (Acrobat Pro)
Computes values for the bleed box based on the offsets for the trim box of respective pages if the bleed box is not specified. The bleed box is always as large as or larger than the enclosed trim box. This option uses the units specified on the General panel of the Adobe PDF Settings dialog box.
Output Intent Profile Name (Acrobat Pro)
Indicates the characterized printing condition for which the document has been prepared, and is required for PDF/X compliance. If a document doesn’t specify an output intent profile name, Distiller uses the selected value from this menu. If your workflow requires that the document specify the output intent, choose None.
Output Condition Identifier (Acrobat Pro)
Indicates the reference name that is specified by the registry of the output intent profile name. For more information, click the question mark next to the option.
Output Condition (Acrobat Pro)
Describes the intended printing condition. This entry can be useful for the intended receiver of the PDF. For more information, click the question mark next to the option.
Registry Name (URL) (Acrobat Pro)
Indicates the web address for finding more information about the output intent profile. The URL is automatically entered for ICC registry names. The registry name is optional, but recommended. For more information, click the question mark next to the option.
Indicates the state of trapping in the document. PDF/X compliance requires a value of True or False. If the document does not specify the trapped state, the value provided here is used. If your workflow requires that the document specify the trapped state, choose Leave Undefined.
When you create PDFs, you need to decide which PDF version to use. You can change the PDF version by switching to a different preset or choosing a compatibility option when you save as PDF or edit a PDF preset.
Generally speaking, unless there’s a specific need for backward compatibility, you should use the most recent version (in this case version 1.7). The latest version will include all the newest features and functionality. However, if you’re creating documents that will be distributed widely, consider choosing Acrobat 5.0 (PDF 1.4) or Acrobat 6.0 (PDF 1.5) to ensure that all users can view and print the document.
The following table compares some of the functionality in PDFs created using the different compatibility settings.
Note:
Acrobat 8.0 and 9.0 also use PDF 1.7.
Acrobat 4.0 (PDF 1.3) | Acrobat 5.0 (PDF 1.4) | Acrobat 6.0 (PDF 1.5) | Acrobat 7.0 (PDF 1.6) and Acrobat X (PDF 1.7) |
|---|---|---|---|
PDFs can be opened with Acrobat 3.0 and Acrobat Reader 3.0 and later. | PDFs can be opened with Acrobat 3.0 and Acrobat Reader 3.0 and later. However, features specific to later versions may be lost or not viewable. | Most PDFs can be opened with Acrobat 4.0 and Acrobat Reader 4.0 and later. However, features specific to later versions may be lost or not viewable. | Most PDFs can be opened with Acrobat 4.0 and Acrobat Reader 4.0 and later. However, features specific to later versions may be lost or not viewable. |
Cannot contain artwork that uses live transparency effects. Any transparency must be flattened prior to converting to PDF 1.3. | Supports the use of live transparency in artwork. (The Acrobat Distiller feature flattens transparency.) | Supports the use of live transparency in artwork. (The Acrobat Distiller feature flattens transparency.) | Supports the use of live transparency in artwork. (The Acrobat Distiller feature flattens transparency.) |
Layers are not supported. | Layers are not supported. | Preserves layers when creating PDFs from applications that support the generation of layered PDF documents, such as Illustrator CS and later or InDesign CS and later. | Preserves layers when creating PDFs from applications that support the generation of layered PDF documents, such as Illustrator CS and later or InDesign CS and later. |
DeviceN color space with 8 colorants is supported. | DeviceN color space with 8 colorants is supported. | DeviceN color space with up to 31 colorants is supported. | DeviceN color space with up to 31 colorants is supported. |
Multibyte fonts can be embedded. (Distiller converts the fonts when embedding.) | Multibyte fonts can be embedded. | Multibyte fonts can be embedded. | Multibyte fonts can be embedded. |
40-bit RC4 security supported. | 128-bit RC4 security supported. | 128-bit RC4 security supported. | 128-bit RC4 and 128-bit AES (Advanced Encryption Standard) security supported. |
What’s New in the Lowest graphics settings Archives?
Screen Shot

System Requirements for Lowest graphics settings Archives
- First, download the Lowest graphics settings Archives
-
You can download its setup from given links:

Lowest graphics settings Archives & Crack

Lowest graphics settings Archives& Key Download
