
Pages for Mac Archives

Pages for Mac Archives
The Mac Security Blog
Apple + How To
Understanding Compressed Files and Apple’s Archive Utility
Posted on April 18th, 2018 by Kirk McElhearn

Compressed files and archives are very common. You certainly see these files often—they bear the .zip extension, and contain one or more files that have been shrunk to save space. Archives also allow you to store a number of files in a single file, making them easier to move around or send to others. (For instance, if you sent a hundred text files to someone by email without compressing them, it would be very annoying to receive that many attachments.)
Apple’s macOS uses Archive Utility, a small app hidden away in an obscure folder and used to create and decompress .zip files. The Archive Utility app has some options that may make working with archives easier. In this article, you’ll learn about compressed files and Archive Utility, and we’ll show you some options you can adjust that will make working with compressed files easier.
Where is the Archive Utility?
Archive Utility is a small app hidden in a system folder. To access Archive Utility on your Mac, go to /System/Library/CoreServices/Applications. Here you’ll find Archive Utility along with some other apps that you may occasionally use, such as About this Mac, Network Utility and Screen Sharing. All of these apps are generally launched in other ways, but not by double-clicking. About this Mac launches when you click the Apple menu and choose About this Mac. You can launch Screen Sharing by choosing Go > Connect to Server in the Finder.
How to use Archive Utility
In most cases, you’ll use Archive Utility without launching it directly. If you want to compress a file, a folder, or a group of items, select it/them, then right click and choose Compress [item name]. Archive Utility launches, compresses the item(s), and then it quits.

The same is the case if you receive a .zip archive and want to expand it; just double-click the archive. Archive Utility opens, decompresses the archive, and then it quits.
However, if you need to create a lot of archives, you might want to launch the app, so you can drag files and folders onto its Dock icon and not have to bother with the contextual menu.
Archive Utility Preferences
If you launch Archive Utility, then choose Archive Utility > Preferences, you see a small window with a number of options.
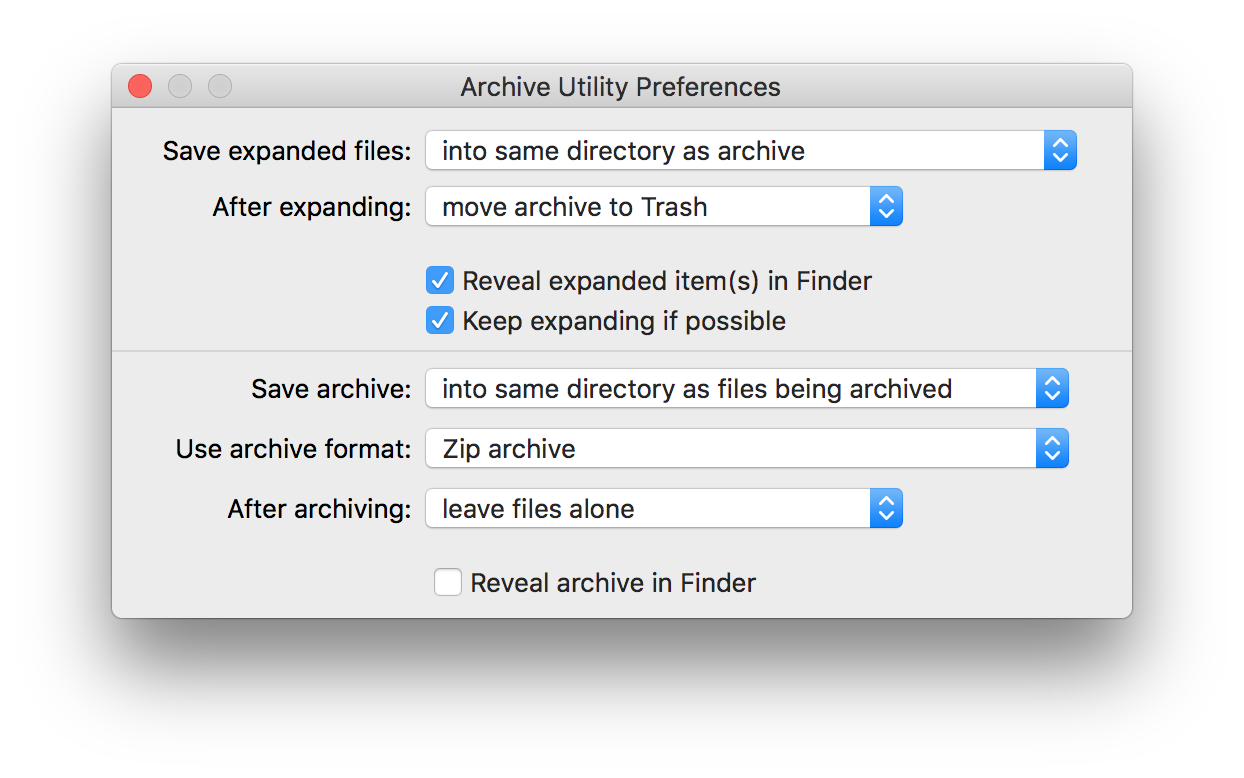
Archive Utility preferences can be very useful if you work with compressed files often. There are two sections to the window, with a horizontal rule dividing them. The top section controls what happens when you decompress archives. These settings are as follows:
Save expanded files lets you choose to save decompressed archives in the same folder as the original, or in a specific folder. If you want to use a different location, click the popup menu and choose Into, then select a folder. This can be useful if you get lots of .zip archives—such as daily backups, or database dumps—and want to automatically store them in a specific location after expanding them.
After expanding lets you leave the archive where it is, move it to the Trash, or delete it (without putting it in the Trash). You can choose one of these options from the popup menu. You can also choose Move archive to, and select a folder, if you want to save your archives.
Reveal expanded item(s) in Finder tells Archive Utility to select the decompressed file or folder and bring its window to the front. If you don’t move the expanded files to a different folder, you probably don’t need to change this.
Keep expanding if possible tells Archive Utility to decompress any archives it finds within an archive. This isn’t common, but there are some types of archives that may present like this, such as Unix archives that first use a .tar compressed, then a .gz compression.
The bottom section, below the horizontal line, tells Archive Utility how to create compressed archives.
If you want to tell Archive Utility where to save the archives you create, from the Save archive popup menu, choose Into, then select a location. Otherwise, they are created in the same folder as the original items.
You can use one of three archive formats. Compressed archive, regular archive, and Zip archive.
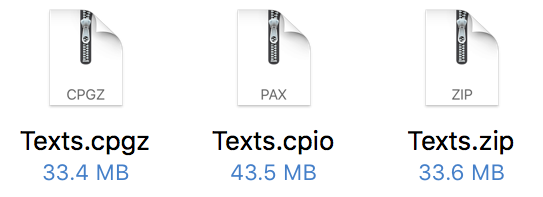
- A Compressed archive is a .cpgz archive. This is used on Unix and Linux, and you won’t want to use this format unless you’re sending archives to a computer running one of these operating system.
- A Regular archive is a .cpio archive, which combines multiple files in a single file without compressing them. As above, you won’t need to use this unless you’re working with other operating systems.
- A Zip archive is what we’re all familiar with; it combines and compresses files, in some cases reducing the overall size by half or more. It both saves space, and makes it easy to manage large numbers of files. It’s also the most compatible, being readable on both macOS and Windows.
After archiving, Archive Utility can leave files alone (do nothing to them), move them to the Trash, or delete them (without moving them to the Trash). You can also check Reveal archive in Finder to have Archive Utility show you archives when it’s finished. This can be useful if you create large archives that can take several minutes to create, and want a sort of notification when they’re finished.
I prefer to leave all the settings at their defaults, with the exception of the After expanding option; I’ve set that to move archives to the Trash. It’s rare that you’ll need to keep an expanded archive, and this saves time, because you won’t have to manually trash them. You may want to change other settings, especially if you need to keep your .zip archives, or want to expand them in a different location from where you access them (often the Downloads folder).
Archive Utility is an essential tool. With the awareness that you can change some of its settings, you’ll find it easier to work with archives.
New to Mac? Learn more macOS tips at Intego’s New Mac User Center!
Want to get the most out of your new MacBook, iMac or other Apple computer? Whether this is your first laptop or you’ve just switched from Windows, there are a few things you should know about your new Mac, like basic keyboard shortcuts or how to use the various features macOS has to offer. Learn more about what your Mac computer can do for you at the Intego New Mac User Center: Get started now!
About Kirk McElhearn
Kirk McElhearn writes about Macs, iPods, iTunes, books, music and more on his blog Kirkville. He is co-host of the Intego Mac Podcast and PhotoActive, and a regular contributor to The Mac Security Blog, TidBITS, and several other websites and publications. Kirk has written more than twenty books, including Take Control books about iTunes, LaunchBar, and Scrivener. Follow him on Twitter at @mcelhearn. View all posts by Kirk McElhearn → This entry was posted in Apple, How To and tagged archive, Archive Utility, Compress Files, productivity. Bookmark the permalink.
Backup and Archiving Solutions for Mac Environments
Overland-Tandberg has enjoyed a long and successful relationship with Apple. Overland-Tandberg's data storage products are designed to operate seamlessly within Mac environments, and offer a selection of archiving and backup products which can also be obtained via apple-store.
Backup and Archiving
Backup and archiving are two different tasks, but should be combined. While backup secures data and is used for a restore of files, folders or systems after data loss, archiving is used for migrate data for long term storage or regulatory compliance requirements. In addition, archiving obsolete files frees up disk space, speed up applications and reduce backup windows and storage capacity.
Best practice for backup and data protection is to store at least one copy on a removable  media to keep it off-site for disaster protection. Removable media is also ideal for archiving tasks as it reduces operational expenses significantly.
RDX® QuikStor™, our removable disk system, connects via USB 3.0 and appears as another hard drive and can be easily integrated into all popular backup and archiving applications.
Overland-Tandberg’s tape and tape-automation products are best for server and big data environments. They are scalable and grow with performance and capacity needs. All tape and tape automation products can be easily integrated via SAS, Fibre Channel or Thunderbolt (using a Fibre Channel to Thunderbolt bridge).
For more information on dedicated solutions on backup and archiving for MAC visit the pages below:
PAGES to Word Converter
PAGES
.pages files are documents, created with Apple's word processor Pages, which is part of the iWork package. Pages is available for Mac OS X and iOS and is a competitor to Microsoft Word. .pages files can contain complex documents with tables, charts and pictures.
DOC
DOC is a word processing file created by Microsoft. This files format turns a plain-text format into a formatted document. It supports almost all the Operating Systems. It can contain large amount of text, data, charts, table, image etc. It can contain rich text format (RTF) and HTML texts also.
+200 Formats Supported
CloudConvert is your swiss army knife for file conversions. We do support nearly any audio, video, document, ebook, archive, image, spreadsheet or presentation format. No need to download and install any software.
Data Security
CloudConvert is trusted by our users and customers since 2012. No one will ever have access to your files. We earn money by selling access to our API, not by selling your data. Read more about that in our privacy policy.
High Quality Conversions
Besides using open source software under the hood, we have partnered with various software vendors to provide the best possible results. Most conversion types can be adjusted to your needs, such as setting the quality and many other options.
Powerful API
Our API allows custom integrations with your app. You only pay for what you actually use and there are huge discounts for high volume customers. We do provide a lot of handy features, such as a full Amazon S3 integration. Check out the API documentation.
What’s New in the Pages for Mac Archives?
Screen Shot

System Requirements for Pages for Mac Archives
- First, download the Pages for Mac Archives
-
You can download its setup from given links:

Pages for Mac Archives & Apps for Laptop & PC Free Download

Pages for Mac Archives& Free Download
