
Halo Wars 2 Cracked Archives

Halo Wars 2 Cracked Archives
Halo Wars 2
Reviewed By Steve Polak


It has been a long time between drinks for the Halo inspired real time strategy offshoot and the games market has changed massively since the original first graced our consoles.
Back then PC based RTS games were extremely popular and this was perhaps why it was logical for Microsoft to have a crack with the genre and the Halo world. The result, developed by one of my favourite developers, Ensemble Studios, was a solid accessible strategy offering that took the milieu in a fresh direction and was pretty good fun too.

Can this sequel scale similar heights? It has been jointly developed by 343 Games as well as another of my favourite developers in Creative Assembly, so the pedigree is promising.
Well the good news is Halo Wars 2 is a worthy successor. If you enjoyed the original, which is still arguably one of the best real time strategy games from the Xbox 360 generation, you will be delighted by Halo Wars 2. This sequel will still feel rather lightweight if you are a hardened PC RTS fan (like myself) as there are some aspects of the genre, like resource management and base building, which have been largely set aside.

However, Halo Wars 2 delivers big time when it comes to intense firefights and the joy of building up a large army and slogging it out with an equally imposing force.
The interface takes some getting used to if you aren’t an RTS fan, as there are different menus and control profiles you have to learn to adjust to, but given this genre is generally better handled by a PC and mouse, this interface is about as good as it could be for a console and is perfectly playable after you do take the time to acclimatise to it.

Halo Wars 2 has a pretty good story that serves as a backdrop for the action too. You are aboard a task force ship that has been dormant for several decades and once the cryogenic systems bring everyone back to life, you discover that you and your crew have stumbled across a rogue force that have managed to absolutely devastate the local Covenant forces on a planet in a far away corner of the galaxy.
So, naturally you investigate with a view to finding out who leads these hostile forces, and you are wary, well conscious of the mantra, ‘the enemy of mine is not necessarily my friend.’

In this sense your instincts are bang on, as the army you stumble across is hostile not just towards the Covenant forces, but picks a fight with pretty much anyone. The leader of these forces is a huge brute called Atriox and your battles with him and his lieutenants are amusing and varied and the game keeps the action varied and full of new technologies to play with.
The narrative is presented in some rather stylish segues and there are plenty of characters for you to become emotionally attached to, including a new Cortana inspired AI.
Just like one of my favourite RTS titles, C+C Generals Zero Hour, in Halo Wars you also develop special powers that can be triggered intermittently and can have a major impact on the events as they are unfolding on the battlefield. There are directed mass missile strikes, unit healing options and reinforcements you can call in that are dropped into an area.

Often your objectives will span the map and focus on controlling choke points or technology sites that are vital to success. In this way managing the flow of your reinforcements to the battlefield is key, as is ensuring that you have a good mix of force types to counter any opposition you may come across. In a typically RTS inspired ‘paper, rock, scissors’ dynamic, most of your units will have a type of foe they are best at taking down, while also being vulnerable to another type of unit.

Thus, it is critical to make sure you have a balanced force that you can bring to the conflict hot spot when required. The game does make it pretty easy to assign different groups to buttons, so you can call them up and handle a number of conflict areas at the one time. This can see the action getting a little busy as fights flare up all over the place, but it is manageable.

Being able to assign waypoints for base production can really help in directing your efforts where they are needed most too.
Halo Wars 2 is a very balanced game in this sense. You have to look at the entire map and make sure you can continue to hold the sites that provide resources, while also protecting your bases.

While you can power up these bases when it comes to the technologies and units you can access, you don’t get to set them up anywhere you like and this is annoying if, like me, you are used to more open ended strategic approaches. The base management dynamic is thus far simpler than other games in the genre, but this also makes it easier for you to concentrate on combat and this is plenty of fun.

Oh, also as an added bonus in this area you can also recruit Spartans (like the Master Chief). These guys can dominate the battlefield and also hijack vehicles. It is hard to kill a Spartan hero character, but you wouldn’t want to lose them as they are so critical to your success.
For a real time strategy game Halo Wars 2 is a pretty looking offering. There are plenty of big explosions and masses of interesting units to command. Give the game a go, even if you are a Halo fan, but haven’t really played strategy games much before. It is worth your time.

Game: Halo Wars 2
System: Xbox One
Developer: 343 Studios / Creative Assembly
Publisher: Microsoft

Light the Fuse
Light the Fuse is the seventeenth campaign level in Halo Wars 2, and the third of the Awakening the Nightmare expansion. The map used for this level is also the basis of the map Fissures.
Transcript[edit]
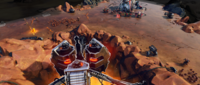
BANISHED SALVAGE DRILLS
LIGHT THE FUSE
Mission Briefing
- Pavium: "Voridus, my troops and I are nearly at your position at the salvage drills. Have you reached the Forerunner defense station?"
- Voridus: "Some kind of Flood forms block the entrance to the station, it's as if they understand it's a threat to them. We barely even had a time to establish a base before they besieged us!"
- Pavium: "We MUST reach that station. If we can't reactivate the Forerunner defenses, we will have no chance against the parasite!"
- Voridus: "We haven't the numbers, Pavium. Each time we kill one, another appears. The Flood is everywhere, scattered across every surface, every crack and fissure!"
- Pavium: "The fissures! That whole area is honeycombed with explosive power. If we can start the salvage drills, we can use them to cause a chain reaction and burn the parasite away!"
- Voridus: "I will start the extractors up immediately to start stockpiling power."
Mission Summary
Gather power to start up salvage drills.
Scouting Report
Multiple Flood Bursters have been detected in the area.
{Cutscene}
Voridus' base is under attack by the Flood while he starts up the power extractors.
- Voridus: "Start the extractors! We'll need all the powers we can to start the salvage drills up!"
The Augmented Extractor is destroyed.
- Voridus: "Pavium, the power is too unstable for our extractors."
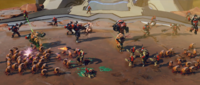
Cut to the salvage drills area where the Flood are swarming.
- Voridus: "However, there are many small eruptions where the power has crystallized. If we collect them in that state, we can break them down for use in the drills."
The Flood attack Pavium's base, and Pavium leads his troops in to defeat the incoming Flood.
- Pavium: "Very well, Voridus. I've set up my own operation, we'll start gathering the power we need for the salvage drills."
{Gameplay}
- Pavium: "With me! The liquid form of that energy has crystallized where it has broken through the surface. We can use those crystals to start the drills again."
Pavium leads the Banished to destroy the crystals and collect power, while setting up defenses to defend the Salvage Drills.
The screen moves to where a massive Flood bulb is about to explode.
- Pavium: "That thing, something's happening!"
- Voridus: "Pavium, it's about to release more Flood! Get clear!"
It erupts and releases hordes of Pod Infectors.
- Pavium: "They breed faster than Grunts! We must end this quickly, they're heading for our base!"
The Banished retreat to their base to repel the attack.
After repelling it, the Banished continue to gather crystals.
- Voridus: "Brother, I witnessed one of those things decimate a squad of my troops earlier! They are everywhere here. They seem to occur on a cycle."
- Pavium: "Monitor them as best you can. I'll need to know when they're about to burst."
While gathering, the Burster pressure starts to increase from 0%, and is shown on the HUD.
- Voridus: "Pavium, pressure escalating now."
or
- Voridus: "Brother, the pressure has started building."
or
- Voridus: "Pavium, the pressure's begun building up again."
When the pressure reaches 50%.
- Voridus: "Pavium, the pressure is halfway to full release!"
or
- Voridus: "Brother, the pressure is at half!"
or
- Voridus: "Pavium, the pressure is at mid-point. Soon the bursters will loose more Flood!"
While gathering, the Banished spot some Flood blisters.
- Pavium: "So many ways this sickness spreads itself! Keep your distance from those blisters, they seem to know when we are close!"
When the pressure reaches 85% or red level.
- Voridus: "The pressure will soon force the Flood bursters out, brother!"
or
- Voridus: "Pavium, the pressure is reaching critical state! The Flood bursters will erupt soon!"
or
- Voridus: "Brother, the pressure is close to releasing the Flood bursters!"
When it's about to reach 100%.
- Pavium: "Ready your weapons, here they come!"
or
- Pavium: "It's getting ready to spew out more of its filth! Move!"
or
- Pavium: "Ready yourselves, it's about to erupt!"
or
- Pavium: "The bursters is about to erupt, fall back!"
or
- Pavium: "Move! It's about to set loose more Flood!"
The Flood bursts out from another location and start attacking the base. The Banished fall back to the base to repel the assault and continue gathering crystals for power once the Flood has been repelled.
After repelling the third wave, Flood Seeder Infectors appear near the Salvage Drills.
- Pavium: "Stay alert, the Flood infection forms have taken to the air. Keep our aerial units away from them!"
A Flood burster releases Flood Spawners.
- Pavium: "What now? How many forms can these things take?"
- Pavium: "That thing appears to react to our units and spawns opposing forms! It's too dangerous to ignore, take it out!"
The Banished continue to salvage more crystals while leaving some units to defend the base from the Flood attack.
The Banished discovered another Flood Burster guarded by four tentacles, with crystals spread around it.
- Pavium: "Another burster! Grab the power before it erupts!"
or
- Pavium: "Collect the power, but be ready!"
or
- Pavium: "Cleanse this place!"
or
- Pavium: "There's a burster here, collect the power!"
If the area has no crystals left.
- Pavium: "We've secured the power here, move on."
or
- Pavium: "We have exhausted the power from this area, move on!"
Exploring the area for more power resources, the Banished encountered a Flood base and destroy it.
Later, the Flood start coming in with infected Blisterbacks.
- Voridus: "Pavium! The parasite has taken over some of our Blisterbacks! They've bombarding your base!"
- Pavium: "We must neutralize them quickly! If we lose our base, we'll lose the battle!"
The Banished continue salvaging for power and discover a base that has been taken by the Flood.
- Pavium: "The Flood has started overtaking our bases! The rate at which they're spreading is incredible!"
Destroying it, the Banished can call for another base drop.
When Power reserves reach 100%.
- Pavium: "We've gathered enough power for a drill. Keep going."
or
- Pavium: "This is enough power for a drill. We can start one up!"
The Banished activate one of the three salvage drills
- Pavium: "The first drill has been activated.
The Banished start gathering more crystals.
- Pavium: "We need more power, we've used too much on the battle!"
The second drill is activated.
- Pavium: "The second drill is working.
If the crystal reserves are running low.
- Pavium: "We've used too much power elsewhere, we need to restock!"
The final drill is activated.
- Pavium: "The third drill has been activated."
The drills start to calibrate.
- Pavium: "Stand fast! We need to give drills time to calibrate!"
The drills start working.
- Pavium: "Voridus, the salvage drills have begun blasting through. We just need to protect them until they've breached the surface and ignited the liquids beneath."
Voridus starts to feel suspicious when the drilling progress is around 20%.
- Voridus: "Pavium, it's grown quiet. Could we have finally pushed them back?"
- Pavium: "You know better than that, brother. Be ready."
The drills continue working and crystals start to appear on the surface.
- Pavium: "The drills have broken the surface and will soon start the chain reaction!"
When the drilling progress reaches 33%, the rupture pressure immediately turns red and accelerates faster than before.
- Pavium: "The underground pressure is spiking! It's working!"
- Voridus: "Pavium! The Flood reinforcement are accelerating! They must recognize the threat those drills pose to them!"
A Flood Abomination arrives from the southwest.
- Pavium: "Their forms are endless! This thing seems to be leading the others, enhancing their strength! Focus fire on it!"
The Banished defeat the abomination but the rupture pressure stays at 100%.
When the drill progress reaches 50%
- Pavium: "Hold them off a bit longer! We're close to triggering the chain reaction!"
The Flood continue to attack, and the Banished continue to hold them off.
When the drill progress reaches 66%
- Pavium: "The drills are close to starting the chain reaction! Keep the Flood away from them!"
The Banished continue to defend against the Flood until the drilling progress reaches 100%.
{Cutscene}
Two Banshees fly overhead as the Banished ground forces are holding the Flood off. The ground beneath the drill erupts, and the camera pans across cracks in the ground now glowing orange from the explosive energy sent through them towards a Flood burster near the elevator to the structure Voridus found.
- Voridus: "It's working, Pavium!"
- Pavium: "I would have preferred a cleaner solution, but it is clearly effective."
The Flood burster near the structure explodes.
Pavium and Voridus along with their packs are holding off the Flood assault, which, though greatly lessened by the salvage drills, hasn't been completely stopped.
- Voridus: "Pavium, the way is clear! I can reach the Forerunner station!"
- Pavium: "I will stay here with the rest of our troops to guard your exit. Find a way to reactivate the Sentinel defenses down below. Voridus. Redeem yourself."
Voridus takes three Sangheili Rangers and three Brute jump pack with him and the elevator descends into the ground.
- Voridus: "I will not return until I have, brother. Good luck."
- Pavium: "And to you. Now go. I will inform Atriox of what has taken place here."
Level ends.
Mission Complete.
Unit Deployment[edit]
- Voridus' base
- 2 Augmented Extractors (Destroyed)
- 2 Augmented Harvesters
- 1 Foundry
- 4 Turrets
- 1 Raid Camp
- 1 War Council
- Pavium's base
- Stronghold
- 2 Harvesters
- Pavium
- 2 Hunters
- 1 Locust
- 3 Grunt Infantry Squad
- 2 Sangheili Rangers
- 900 Supplies
- 400 Power
Leader Powers[edit]
- Atriox's Bulwark I, II and III
- Lich Vanguard I
- Rain of Fire I, II and III
- Orbital Designator I and II
- Burnout I, II and III
- Stasis I and II
- Ultra Mines I and II
Trivia[edit]
- At the ending cutscene, 1 Skitterer can be seen fighting the flood however the player can't train any Skitterers.
Miscellaneous[edit]
- You will not get access to the Power Extractor on this level, so you will need to harvest it manually from the crystals.
- This mission is the longest in the entire Halo Wars 2 campaign.
- Flood bursters are invulnerable and cannot be damaged by any ordinances, but the tentacles guarding it can be damaged.
- Par time on this level is 35 minutes.
- Two Flood Forms are introduced on this level.
- Seeder Infectors can infect air units, and Flood Spawners will create a counter unit for the unit that attacks it.
Strategy[edit]
- Since you will start with no Extractors and you cannot construct one, the best option is to upgrade your base to its maximum capabilities before activating the Salvage Drills.
- You can also utilize it to build some Mega Turrets and Harvesters.
- Without Extractors, which will be destroyed as they can't handle the power running through the area, any power you use to construct buildings, defenses, units etc. will be deducted from the power you gather to activate the Salvage Drills.
- If you remember the time for each cycle of Flood bursters' pressure, you can utilize it to your advantage.
- Only dispatch small forces to salvage the crystals, since you will be focused on defense in this mission.
- Seize the base at the South-West and at North-East to gain a supply advantage as quickly as possible.
- Minibases, however, are not recommended, since you will be lacking in defenses when the Flood Bursters' pressure reaches 100% and spawns hordes of Flood forms.
- The Mega Turret is useful for long-range defense.
- The Flood will always attack in hordes every time the pressure reaches 100%.
- Do note that the Flood will never attack the base when the pressure is not at 100%.
- The hardest part tends to be gathering enough power to charge the Drills as you have to leave your base and collect the needed power three different times. Once the Drills are charged, its simply a matter of defending the area until the Drills are calibrated and then ready to create the chain reaction.
- After the Drills are charged and break the surface, the power crystals that were destroyed earlier by the player will be replaced, allowing the player to gather more power to help in their defense of the Drills.
- A useful unit to have in this level is the Banished Scarab due to it's high level of firepower and health. In addition, unlike in The Foundry, the Scarab is fully operational and unlike in What Could Go Wrong?, it's completely under the player's control.
References[edit]
- The power gathering method is similar to Command and Conquer series where units are deployed to harvest resources around the battlefield.
Gallery[edit]
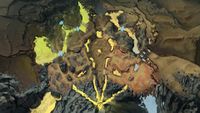
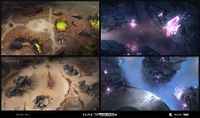
Concept overview of the map.

Concept art of the mission.
Concept art of the mission.
Concept art of the mission.
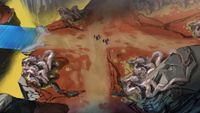
Concept art of the mission.

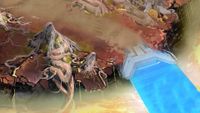
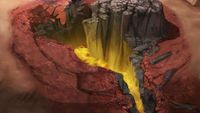
Concept art of the ruptures.

Concept art of the ruptures.
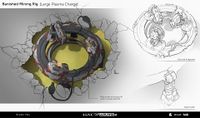
Concept art of the mining rig.
Concept art of the mission.
Sources[edit]
Halo Wars Dev Blogs (page 2)
Halo Wars Ranks and Skill Levels Explained
Halo Wars has a couple different ways of tracking our players history from matchmade, public games. Some we use primarily to get you good games, others are more oriented to helping players rank themselves against the community. Lets go through each of them:
Player Trueskill™
This is the standard Xbox LIVE Trueskill™ tracking value that rates players to help match them in competitive games. We use this only for matchmaking and we use it for all matchmade games. We track a separate Trueskill™ value for each of the different Halo Wars hoppers you can play in. So you if are great at 1v1 Standard but just getting started playing 2v2 Deathmatch games – then you will be matched with similar skill level opponents in those different games. Also for team games, we average your skill with everyone else on your team – so you don’t have to worry about the skill level of the party host versus everyone else on the team – everyone’s skill is taken into account. These Trueskill™ levels are meant only to help get our players the best matched game for all our different hoppers – but if you are ever curious about your level, you can always check it out under Multiplayer | Leaderboards. Select a Leaderboard Type of “MP Skill” and set the Filter to “Pivot” (that means “Find me in the list!”). You can also see the Trueskill™ value being used during matchmaking – right after the countdown starts you will see in the middle of the screen “Party TrueSkill™ Rank X”. X will be the Trueskill™ level averaged for the entire party (if the party is just you, then that is your exact Trueskill™ level). If you are interested in more detail about how this is calculated, here are the details: TrueSkill™ Ranking System
Skill Level
While the Xbox LIVE TrueSkill™ values are what help us get you good matches for each hopper, we also have our servers track a global skill value for you as well. If you look up on the website, the Player Stats for yourself (or any other player), right under your gamer tag is your Skill Level . That is a value between 1 and 50 for how skilled you are at playing competitive Halo Wars games. We calculate that on the Halo Wars servers with the stats from each matchmade game you play. Note that just like for the Player Trueskill™, if a player leaves early through any means (turning off the box, exiting the game, resigning, etc ) then the system will count that as a loss.
Score
Skill level isn’t always the best way for tracking a player experience with the game, so we also keep a total running score of all multiplayer, matchmade games you have played. As this global score for a player goes up, we award the players various ranks to reflect their experience with the game. See the Rank section below to see what total score is needed for the various ranks. To find your score (and rank), in game go to the multiplayer menu and select Service Record | Skirmish. Note that one of the best ways to boost your score per game is to complete the game (as opposed to resigning or disconnecting). While you get a 40% bonus if you win, you also get a 20% bonus if you just complete the game. On team games if you are defeated, the award happens right then – not at the end of the game – so you don’t need to wait around in that game unless you want to watch the action.
Rank
| Rank | Score Needed |
| Recruit | Play 1 Game |
| Lieutenant | 80,000 |
| Captain | 200,000 |
| Major | 400,000 |
| Commander | 800,000 |
| Colonel | 1,600,000 |
| Brigadier | 2,400,000 |
| General | 3,200,000 |
What’s New in the Halo Wars 2 Cracked Archives?
Screen Shot

System Requirements for Halo Wars 2 Cracked Archives
- First, download the Halo Wars 2 Cracked Archives
-
You can download its setup from given links:

Halo Wars 2 Cracked Archives & Software

Halo Wars 2 Cracked Archives& Software
