
IPhoto For PC Free Download Archives

iPhoto For PC Free Download Archives
【送料無料】 業務用スチールラック ボルトレス·単体型【最終決算】 三方パネル付 耐荷重:1段500kg 棚板4枚(有効段数3段) 【高さ1800 x 横幅1800 x 奥行900 x 棚板4枚(有効段数3段)】:棚·ラックの専門店 ミクニヤ国産なのに激安!【発売中】!簡単組み立て業務用スチールラック·スチール棚 オフィス家具 三方パネル付。個人のお客様もご購入頂けます!
治療中も口腔内を殺菌する稀な歯科院内システムです
院内感染予防対策 や 歯周病治療 のために給水ユニットに 次亜塩素酸水 を院内のコップ水から手洗い水まで、すべての場所で使用しております。
次亜塩素酸水 は高い殺菌力で、ほぼ全ての細菌・ウイルスを殺菌・失活化します。
治療用タービンから出る水や うがい に使用する水など院内全ての配管に供給されており、治療している最中から口腔内を殺菌できます。
生成にあたって、薬剤・薬品は一切不使用で、高純度の塩と超純水だけを電気分解して生成した 次亜塩素酸水 は小さいお子様からご年配の方まで老若男女どなたでも、ご不安なく治療をお受け頂くことが可能です。
(コロナウイルス・インフルエンザウイルス・ノロウイルス・エイズ(hiv)・o-157(腸管出血性大腸菌)・mrsa(メチシリン耐性黄色ブドウ球菌)・肝炎ウイルス・サルモネラ菌・緑膿菌・レンサ球菌・枯草菌・カンジダ・黒コウジカビなど)
それだけでなく、院内に複数台の次亜塩素酸水の噴霧器を設置し、治療だけでなく、空間殺菌も行っております。 噴霧された次亜塩素酸水は患者様の靴裏も殺菌します。
治療を受診された方には、うがい用の 高濃度 次亜塩素酸水 の特別販売も行っております。
新型コロナウイルス(sars-cov-2)に対する
次亜塩素酸水の不活化効果を証明|帯広畜産大学
次亜塩素酸水だけでなく、患者様毎にドリルピースを取り付けるタービンなどの治療器具も全て、オートクレーブ(高圧蒸気滅菌器)にて滅菌処理をしておりますので、院内感染のリスクを大きく下げております。 当然、使用する 紙コップ・エプロン・トレー などは使い捨てです。
コストはかかりますがこれも医療に携わる人間の良心であると考えております。
一生涯、歯を失わない治療
東新宿歯科 予防ケアクリニック
【送料無料】 業務用スチールラック ボルトレス·単体型【最終決算】 三方パネル付 耐荷重:1段500kg 棚板4枚(有効段数3段) 【高さ1800 x 横幅1800 x 奥行900 x 棚板4枚(有効段数3段)】:棚·ラックの専門店 ミクニヤ国産なのに激安!【発売中】!簡単組み立て業務用スチールラック·スチール棚 オフィス家具 三方パネル付。個人のお客様もご購入頂けます!
【送料無料】 業務用スチールラック ボルトレス·単体型【最終決算】 三方パネル付 耐荷重:1段500kg 棚板4枚(有効段数3段) 【高さ1800 x 横幅1800 x 奥行900 x 棚板4枚(有効段数3段)】:棚·ラックの専門店 ミクニヤ国産なのに激安!【発売中】!簡単組み立て業務用スチールラック·スチール棚 オフィス家具 三方パネル付。個人のお客様もご購入頂けます!のポリシーとは?
東新宿歯科 予防ケアクリニック では、歯を失わないための予防歯科に力を入れています。
生涯に渡り、ご自身の歯とお付き合いできるよう、歯科医師と歯科衛生士がしっかりとカウンセリングを行い、患者様一人一人のライフスタイルに合わせた口腔内の健康を維持するためのプランをご提案させて頂きます。
院内感染対策にも配慮し、コップの水から手洗いの水まで院内全体で次亜塩素酸水を使用しており、次亜塩素酸水が治療用のタービンから出てきますので治療を行いながら口腔内を滅菌することが可能なので非常に衛生的です。
本院である、東中野 原歯科医院 においては、歯科医院で導入率の低い、マイクロスコープも用意しておりますので、肉眼よりも術野を拡大した治療を行うことが可能です。 また、東新宿歯科 予防ケアクリニック は【 かかりつけ歯科機能 強化型 歯科診療所 】に認定されております。 これによって予防歯科・フッ素塗布を毎月でも保険診療で受診することができます。 これは凄いことです。 患者様が一生涯ご自身の歯で食事が出来る為のお手伝いをさせて下さい。
栄養分子学では、病気になってから医者にかかって健康を取り戻すことを生きる目的にしないことに視点をおいています。 doctoryourself(あなた自身があなたの主治医)ということです。
生活習慣病はお薬では治りません。
症状を抑えることはできますが、これは 根本的な治療 ではありません。
これらは対処療法の為、ご自身で状況を変えてく努力を怠れば、いずれは悪化してしまいます。 とはいえ、不幸にも生活習慣病になってしまった場合は我慢せず、かかりつけ医 に頼ることも重要です。
医師による治療を受けつつ、それ以降は病気に再度ならない体に変えていくことです。
その為には、患者様ご自身で自分の健康を守っていく意識を高めていくことが重要 なことです。
そのためにとる具体的な行動は
従来の常識を超えた、ビタミン・ミネラルに関する正確な知識を養い、サプリメント(健康補助食品)をうまく利用しながら、3大栄養素(タンパク質・脂質・ビタミン)をバランスよく摂取することです。
あなた自身、必要な栄養素を把握されていますか?
何となくサプリメントを飲んでいませんか?
それは果たして、あなたの体にとって本当に必要な栄養素なのでしょうか。
「栄養バランスが大切」「1日30品目食べるようにしましょう」とよく言われています。
そう言われても、何をどうしたらよいか…なかなか難しいですよね。
バランス良く栄養を摂るよりも、足りない栄養素を補う方が健康への近道になるのです。
東新宿歯科予防ケアクリニックでは、
血液検査(¥8000~12000+tax)や、血液解析分析(¥5000+tax)を行っております。
自分の体に足りない栄養素が何か、調べてみませんか?
お口の中だけでなく、体も健康でいられるよう、お手伝いいたします。
血液検査を行うことで患者様ごとに足りない栄養素を分析できます。
【送料無料】 業務用スチールラック ボルトレス·単体型【最終決算】 三方パネル付 耐荷重:1段500kg 棚板4枚(有効段数3段) 【高さ1800 x 横幅1800 x 奥行900 x 棚板4枚(有効段数3段)】:棚·ラックの専門店 ミクニヤ国産なのに激安!【発売中】!簡単組み立て業務用スチールラック·スチール棚 オフィス家具 三方パネル付。個人のお客様もご購入頂けます!
【送料無料】 業務用スチールラック ボルトレス·単体型【最終決算】 三方パネル付 耐荷重:1段500kg 棚板4枚(有効段数3段) 【高さ1800 x 横幅1800 x 奥行900 x 棚板4枚(有効段数3段)】:棚·ラックの専門店 ミクニヤ国産なのに激安!【発売中】!簡単組み立て業務用スチールラック·スチール棚 オフィス家具 三方パネル付。個人のお客様もご購入頂けます!
区民のための「お口の健康講座」を開催しました! 「そばにいます!! あなたのかかりつけ歯科医」
医療法人社団 伸永会 理事長 原 愼一が講演を行いました。
テーマは 「歯周病は全身疾患だ」 でした。
講演に参加いただきありがとうございます。
皆様の健康管理の一助になれるよう尽力いたします。
土・日も診療していますので 通いやすいですよ!

東新宿歯科 予防ケアクリニック は、平日夜7時半まで診療を行っております。 お勤めの方も会社帰りに通っていただくことができ便利です。
また、土日も休まず診療を行っておりますので、平日では なかなか時間が取れない方も安心して通っていただくことができます。
ご予約・お問合わせは 受付までお電話ください。
03-6273-9285
9:30〜19:30(土日は18時まで)
13:30〜15:00は休憩時間です。 木・祝休診
英語と中国語での対応可能なスタッフがおります。
外国人が日本で歯科医院に来院する割合は全体の25%です。
その中で一番の不安は言葉の問題です。
この不安を解消するため、一人一人に歯の知識や治療の内容を丁寧に納得いくまで説明をすることを心がけています。
- 03-6273-9285
- 東京都新宿区新宿6-29-9
- 平日 夜7時半まで営業!土日も診療!


1. Upload your photos often and keep them organized by date. One thing that happens to almost everyone is they get a back-log of photos on their camera that need to be downloaded onto their computer. You put it off one day, and then another, and before you know it, you have a thousand photos of your kids that you haven't downloaded.
Since we take photos so often (and pretty much every weekend), Bob and I now make sure that the photos from that day or weekend need to be downloaded from the camera, edited, processed, and archived within a day of when the photos were taken. Otherwise, it will just build up and get too overwhelming.
We create folder for each day with year/month/date and then a short description of the photos. I use this method for my work photos as well which makes them easy to find and keeps them in date order. You can see the screen shot example above that shows a mix of what some of my personal and work photo folders look like.
2. Create a shared photo stream of your favorites photos. You need to have an iPhone and iPhoto to do this, but since most people do these days, it's so easy to share your favorite photos through a shared photo stream. We have one "flagged" stream for just us of our favorite photos from every download, one that gets shared with our parents so they can get regular updated photos of their grandchildren, and even folders that get shared with friends. It's an easy way to get the photos from your iPhoto straight to your phone without having to email it to yourself or taking too many extra steps to duplicate a photo for other uses. You can see what it looks like on my phone above. The nice thing is you can upload these photos from a shared folder to Instagram, text them, or email them to others.
3. Archive the best of each month and file them into a "year-end" folder. I create this folder in addition to our "flagged" shared folder in iPhoto, but this is an especially good option if you don't use iPhoto. If you have a folder for each month ready and waiting for photos, then whenever you have a great set of images from a fun weekend or vacation, you can drop the best of's into the folder for that month. That way, when it comes time to put together a book at the end of the year, it's all organized by month and ready for you to upload in order by month.
4. Make printed photo books of each year and keep your layouts simple. So this part seems obvious since making a book to keep your memories is the end goal for what this post is all about. But I think a lot of people get worried about having to "design" the book or having to write a ton of words about what happened that year. You don't have to make it complicated. And to me, just getting the images in the book is what's most important. I keep the layouts very simple and mostly keep one photo to a page with full bleeds or minimal borders. I rarely create a multi-photo page (unless I'm chronicling a fun series of the same scene like Coco's one month photo above).
Sometimes I'll also make additional smaller books with family trips, professional photos, or other outliers that I can group together by topic and might not fit in our main book. For example, one year, I made a mini book with photos from our trip to Mexico and another with our trip to France. Since something special like a vacation might have 50-100 great photos on just that alone, I separated them out into their own fun, little book.
5. Give extra copies as gifts. The one thing that gets my butt in gear to put together these books every December is to be able to give a copy to each set of our parents for Christmas. I know how much they love having something tangible to look through and show their friends, so that's enough to make sure that I don't get lazy about it and make those holiday shipping deadlines.
Okay, so if you're already behind on archiving but really want to get on top of it, I say attack it slowly and catch up by downloading photos off your camera, saving photos in folders, and keeping track of your favorites. Once you catch up on past photos and can archive as you go, it makes the whole process way easier and actually fun. And the best part is being to look back on all these moments that might have otherwise been lost in the digital abyss!
{Our books were made through Artifact Uprising}
To properly store digital photos requires the development of a workflow, a standard process of taking, storing, editing and archiving your digital photos. A workflow is generally a personal method reflecting how you like to organize data. I’ll detail my workflow, how much of it you wish to follow is up to you – simply adapt these concepts to your personal way of working.
Please note that references below to digital labelling (the International Press Telecommunications Council standard - IPTC and Adobe's XPM metadata standard) and captioning are described in the section of this site called Labelling Digital Photos.
There are lots of words below detailing how to properly take care of your digital photos - but it all boils down to the RULE OF THREE. If you follow this then you will likely never loose your photos. THE RULE OF THREE states that there should be 3 full sets of your photos, on three different storage devices, with one set stored off-site. In my case that means that I have:
That's it - the information presented below are just some suggested mechanics for how to follow these rules. |
Nightmare Scenarios - Why the Rule of Three
Backing up isn't rocket science. But to understand the rational behind the Rule of Three you have to look at some possible scenarios.
- Your house burns down - everything in the house, your computer, your backup HDs are all lost. Your recovery is the off-site backup.
- Your house floods - same as burning down if your computer & HDs drown (might be recoverable, but likely not)
- Your house gets robbed - thief takes the shiny baubles that are your computer, hard drives, smartphone.
- Your house gets hit by lightning - if you get a direct or very near hit, no surge protector in the world is going to prevent your electronics from getting fried, especially if they are running at the time.
- Your house gets blown down - a tornado or hurricane can wipe out your computer and HDs.
- You make a mistake with the files - various scenarios here related to either accidentally erasing your data or accidentally overwriting your files. Never underestimate the possibility of human error.
Backup Mechanics
At present I use hard drives for all my backups and archiving. Previously I'd used optical disks (CD/DVDs) for archival storage but these are no longer recommended (not just by me, but by most institutions). Keep in mind that backup and archiving isn't permanent with digital media, you're not storing the photos on a single medium for 50 years. So the longevity of the storage medium isn't relevant to this discussion. Digital storage needs to be refreshed on a regular basis. For me that's about a 10 to 15 year cycle. Back in the 1980s/90s it was tape backup, then in the 1990s/early2000s it was CD/DVS, now it's hard drives. Next it will be SSD drives (when capacity/price come down to the same as HDs and quality/longevity of these are better known).
Presently I'm using small format external drives with a 4 Tb capacity (inexpensive these days). Ideally when looking at HDs, you want to start with one that has the capacity of at least double the amount of data you wish to backup. I started with 2 Tb HDs a decade ago then moved to 4 Tb. You can do the calculation based on the amount of data you wish to backup.
I use a combination of auto and manual backups. This can be a confusing topic, I won't go into detail here (lots of info about this on the Internet). My requirement for any backup software is that it stores the data exactly "as is" - the same files, same folders - just as if I'd copied the information using my native OS file manager (i.e. File Explorer in Windows). I won't use backup software that doesn't do this. Some will compress backups using a proprietary format, or use a proprietary system for incremental backups. I avoid these.
If you don't use auto software, then you should have a rigid schedule. An example would be "backup Fridays" - that every Friday you do a backup to your external HD. I use a monthly schedule to do my offsite backup. Every month I swap my offsite external HD (I make a current archival set to the HD in my house and then take it to my offsite location and swap it with the HD there). If your house gets flooded out, blown away or burned down, this offsite copy of your photos will still be available. With the monthly swap of the HDs, the drives are checked and the data refreshed.
On-line Backup/Archive (Cloud Storage)
There is a digital divide in North America regarding who can or can't use Cloud Storage (mostly an urban/rural divide). At issue is the speed and data cap of your Internet connection. You need high speed and a sufficiently high data cap to be able to use cloud storage. Most rural areas in North America don't yet (as of 2019) have this.
If you do have the speed and Internet data capacity to use cloud storage, then it becomes a question of what type of service to use, an actual backup service or just a cloud storage service. Do Internet research, there are many horror stories about some of the backup services, mostly related to problems when it comes to recovering your data. At minimum, you want a service where you can easily retrieve, at any time, a single file, a single folder or any multiples. So a service where you see your photos, unaltered, in the same structure you have them on your computer, is ideal (just as if that data was parked on an external HD).
You also want to make sure that with photos, they are stored, unaltered, on the cloud service. So avoid any service that uses any type of lossy compression. The quick check if you are using a service is to retrieve some photos from the service and compare them to copies on your own computer, they should be identical. If not, dump that service and choose another.
There are also privacy concerns. You want to make sure your data is encrypted on the cloud servers, that only you and the service can see them. If the service gets hacked (there is no such thing as a non-hackable on-line service), the hacker will not be able to do anything with the data if it's properly encrypted.
So that's my criteria for any cloud storage service - that the files be easily viewable on the service, be unaltered in any way, be easily retrievable, and that they are properly encrypted. I have no recommendations for such a service - do careful research - read a variety of reviews/opinions (many of these aren't reliable - but an overall consensus can often be found).
Consolidate Your Photos
A problem that has recently cropped up, given that every portable digital device these days can take photos, is to make sure that ALL your photos are all stored in the same location on your computer (the location that you make your backups and archival copies from). This is also critical given the vulnerability of portable devices such as smartphones to theft, loss or damage. Get in the habit of transferring photos from your portable device to your computer on a regular basis. I do it the old fashioned way (a USB cable connecting my phone to my computer) - but there are also wireless solutions for this.
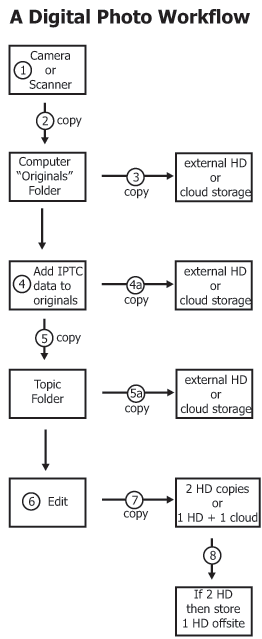
Digital Workflow
- Take your photos at the highest resolution/quality your camera will allow. When using a scanner, scan paper documents and photos at appropriate resolutions (usually 300 to 600 dpi).
- Copy the digital images to your computer as soon as it is convenient. The software that comes with your camera often determines where these photos end up*. In my case I use a chronological system of year and month, within a folder called Digital Photo Originals. So photos taken in October 2015 would be in a subfolder called "2015-10" within a "2015" folder within a folder called "Digital Photo Originals". So the path to a single photo on my system might look like "Digital Photo Originals > 2015 > 2015-10 > imagename.jpg". If you use the default setting of your camera’s image transfer software, it will often put the photos into your "My Documents > My Pictures" folder on a PC system. On a mac using iPhoto they will end up in your iPhoto Library. Note that this is not universal – each camera manufacturer has their own system – check your computer to see where all your original photos have ended up.
*For myself, I avoid the use of photo transfer software. I've simply created a master Digital Photos Originals folder (directory) on my computer and directly copy all my photos, from all my cameras (and smartphones), to that folder (within the folder structure mentioned above). This makes it extremely easy to both locate and backup my photos - Before you erase the photos from your camera’s memory card, make a copy of them to a separate storage medium such as an external HD, a memory stick or a reliable on-line backup service. This is your first backup. The idea is to always maintain at least two copies of your photos. For the paranoid, this backup will be something not physically attached to your computer (in the case of a disaster such as a lightning surge that would take out all the electronics connected to your computer). Once a copy of the photos has been safely backed up, you can erase them from your memory card.
- The original images from your camera or scanner are your "negatives." Once these original images are on my computer I usually add my IPTC/XMP data (digital labelling) to the images. During this process, I also batch rename the photos with a prefix of the date (so IMG_4612 becomes 2019-05-21-IMG_4612). I do this to ensure that I never have a duplicate filename. Some cameras and most smartphones will create a filename that includes the date, so that serves the same purpose of avoiding a potential duplicate filename.
- I then create a "topic" folders based what that particular series of photos is all about. Such a topic might be "Rideau boat trip", "Jimmy’s 6th birthday", etc. Since there could be several topics related to one camera download, I make as many topic folders as I need. These topic folders are located in a separate "Photos" folder with year subfolders. So the path to one of my topic folders might look like "Photos > 2007 > Jimmy’s 6th birthday." I copy all my "keepers" to the topic folder(s). I use a thumbnail photo software program to make easy work of this. All future work on these photos will now only be done on copies of the original photos now located in my topic folder(s). My original "negatives" are untouched in my original chronological folders. Since the originals and copies are in two completely separate folder systems, there is less chance of making a mistake such as editing an original photo.
For genealogical photos, specifically digital photographs and scans of old (pre my generation) family photos, I use the same topic based system, but this time using my family names for my photo folders. My topic names now become Watson, Wickenden, Stanfield, French, etc. These are located in a separate "Genealogy > Photos" folder system. - I now edit the photos within the topic based folder. Editing involves such things as cropping, removing "red-eye" and adjusting such things as brightness, contrast and sharpness. Of note, since you are working on a copy of the photo, if you make a mistake while editing, you can always go back to your original photo (in your chronological folder which contains your original "negatives"), make another copy of it into the topic based folder and start the edit again. Of note, I only edit selected photos, not every photo I take.
- It is now time to back-up and archive the photos, the third backup in the Rule of 3. In my case, a backup of all my files has been made automatically to an external hard drive at all steps of the workflow, but it could also be done manually. If you're 2nd data copy is cloud storage, then the 3rd should be an external HD. If your 2nd is an external HD, then the 3rd could be another external HD (one kept offsite) or cloud storage. The idea is to have an instantly accessible backup at hand (external HD) in the event of a computer HD failure.
- If you're not using cloud storage as the 3rd copy of your data, store one of your external HDs offsite (relative’s home, safety deposit box). In the event of catastrophe (flood, fire) your offsite copies will survive. I swap my external HDs every month. When swapping offsite, take your 2nd HD to the offsite location and swap it there, bringing home the one you put there a month previously to be your 2nd HD at home. This means that one HD is always offsite. If you brought your offsite home, murphy's law says your house will burn down that night and you'll lose everything. Offsite means always at least 1 copy of your data offsite.
Failure is a Possibility: Hard drives, memory sticks and even cloud storage can fail. Present day hard drives are much more reliable than they were even 10 years ago (more built in redundancy) - but they can still fail, or be caused to fail (i.e. by hitting one while it is running). Memory sticks can be problematic - it depends on the quality - I've had memory stick fail on me. Memory sticks are not the same as a SSD drives which are more reliable - but still have the potential to fail. With cloud storage you are relying on the company that provides that storage to protect your data. They are generally very reliable, but data has been lost, don't discount that possibility. If you follow the Rule of 3, you make the odds of losing data infinitesimally small.
In order to find my photos I use a simple visual method. I find that on-the-fly thumbnail generation programs (i.e. Breezebrowser, XnView, etc.) work very well. I use this type of program to quickly scan though my topic folders.
There are dedicated photo database programs available (i.e. iMatch). These usually rely on adding keywords (tags) to photos to make for a search type of retrieval. But you have to be disciplined enough to take the time to use keywords/tags with all your photos and make sure the keyword system you are using is consistent. I don't do this since I’m not disciplined enough to label all my photos with keywords, doing the IPTC/XMP captioning is chore enough. But for some a photo database system would work well. For most though, the software that came with your camera (which often includes some sort of thumbnail viewing option) will likely work just fine. Free programs such as XnView also do a good job.
The above process involves a lot of manual manipulations. There is software available to help simplify that process. A cautionary note here is that when it comes to archiving information, proprietary software systems are to be avoided. The idea is to store your information using long-term digital standards. The assumption is that if someone gets one of your JPEG images 50 years from now they will be able to easily view it with the software of the day. However, if that same photo only resides in your favourite genealogy program or photo album software, that future person may not be able to view it. So, my philosophy is to maintain all of my original data in long term archival digital data formats – these would include photo formats such as JPEG and TIF. It’s fine to keep copies of your photos in your genealogy and/or photo album software, just make sure you have archival copies in original JPEG or TIF format.
When a digital photo is taken or an image is scanned, the parameters set by the camera/scanner are applied to that image. With a camera these include such things as contrast, saturation, sharpness and white balance. The end result may not be 100% ideal. Some photos may require editing. This is usually done with software supplied by the camera manufacturer or a separate photo editing program such as Adobe Photoshop Elements. The process is the same no matter what software you use.
Load an image from your "topic" folder into the editor. This ensures that you are working on a copy of the photo, not your original "negative" (which should still be in your chronological folder). Always work on a copy of your photo, never edit the original. If you are planning to do multiple edits, then save the photo in a lossless format such as TIF. In this case I usually add a "-e" extender to the filename to indicate an edited file (i.e. "2015-08-23-5653-e.tif").
I won’t go into the details of digital photo editing (there are whole courses on the subject). Suffice to say that common edits would include cropping and adjusting things such as contrast, brightness, sharpness and the removal of red-eye. In the case of old colour photos that have colour shifted to magenta, it may involve restoring the original colours.
A genealogical editing tip is that photo editing should concentrate of the faces of the subjects in the photos. Adjustments to such things as contrast, brightness and sharpness should be focussed on the faces in the photos – to make these as recognizable as possible.
When you have achieved perfection, purists may wish to save the final image in lossless TIF format, but for most, a low compression (high quality) JPEG is fine.
Depending on the use of your photos, either digital labelling of photos using the IPTC/XMP standard is sufficient or in some instances both digital and visible labelling. The huge advantage of visible labelling is that it is not dependent of software, any device/app that can view a photo will show the visible labelling. For most, visible labelling is reserved for photos you wish to share (i.e. family photos shared with relatives). See Labelling Digital Photos.
As previously noted, the term "archiving" is a bit misleading when it comes to digital media since what you are doing is saving your images to the currently best available inexpensive storage medium (such as an external HD) while waiting for the next best available storage medium to come along (think of the progression of tape to floppy disk to zip disk to CD/DVD to external HDs). I used to use CDs and DVDs (which have a shelf life of 20 to 50 years depending on who you believe). I now exclusively use small HDs which is sufficiently long that when the next inexpensive storage standard comes along (high capacity flash memory drives or SSDs) you can move your archived images to that new medium. If you follow the Rule of 3, which includes an offsite storage (stored on external HDs or Cloud), then you can consider your photos properly archived.
Using Memory Sticks for Storage: - Memory sticks (USB drives, Flash memory drives, etc.) are rapidly coming down in per Gb price. The cautionary note here is that that memory sticks are not SSD drives, they tend to be more variable in quality and don't have as much redundancy built in. If used, choose good quality ones and try to store them in optimal conditions, ideally cool and dry. Heat and humidity will degrade any type of electronic storage.
All current storage media (CDs, DVDs, memory keys, HDs) have a shelf life and all can fail for various reasons. In any archival system the data must be refreshed every so often. That means checking the integrity of your archival storage and replacing your archival storage media with new media at regular intervals (every 10 years or so).
What’s New in the iPhoto For PC Free Download Archives?
Screen Shot

System Requirements for IPhoto For PC Free Download Archives
- First, download the IPhoto For PC Free Download Archives
-
You can download its setup from given links:

iPhoto For PC Free Download Archives & for Laptop

iPhoto For PC Free Download Archives& PC Free Download
