
Reason 11.0 Archives

Reason 11.0 Archives
25.3. Continuous Archiving and Point-in-Time Recovery (PITR)
At all times, PostgreSQL maintains a write ahead log (WAL) in the subdirectory of the cluster's data directory. The log records every change made to the database's data files. This log exists primarily for crash-safety purposes: if the system crashes, the database can be restored to consistency by “replaying” the log entries made since the last checkpoint. However, the existence of the log makes it possible to use a third strategy for backing up databases: we can combine a file-system-level backup with backup of the WAL files. If recovery is needed, we restore the file system backup and then replay from the backed-up WAL files to bring the system to a current state. This approach is more complex to administer than either of the previous approaches, but it has some significant benefits:
We do not need a perfectly consistent file system backup as the starting point. Any internal inconsistency in the backup will be corrected by log replay (this is not significantly different from what happens during crash recovery). So we do not need a file system snapshot capability, just tar or a similar archiving tool.
Since we can combine an indefinitely long sequence of WAL files for replay, continuous backup can be achieved simply by continuing to archive the WAL files. This is particularly valuable for large databases, where it might not be convenient to take a full backup frequently.
It is not necessary to replay the WAL entries all the way to the end. We could stop the replay at any point and have a consistent snapshot of the database as it was at that time. Thus, this technique supports point-in-time recovery: it is possible to restore the database to its state at any time since your base backup was taken.
If we continuously feed the series of WAL files to another machine that has been loaded with the same base backup file, we have a warm standby system: at any point we can bring up the second machine and it will have a nearly-current copy of the database.
Note
pg_dump and pg_dumpall do not produce file-system-level backups and cannot be used as part of a continuous-archiving solution. Such dumps are logical and do not contain enough information to be used by WAL replay.
As with the plain file-system-backup technique, this method can only support restoration of an entire database cluster, not a subset. Also, it requires a lot of archival storage: the base backup might be bulky, and a busy system will generate many megabytes of WAL traffic that have to be archived. Still, it is the preferred backup technique in many situations where high reliability is needed.
To recover successfully using continuous archiving (also called “online backup” by many database vendors), you need a continuous sequence of archived WAL files that extends back at least as far as the start time of your backup. So to get started, you should set up and test your procedure for archiving WAL files before you take your first base backup. Accordingly, we first discuss the mechanics of archiving WAL files.
25.3.1. Setting Up WAL Archiving
In an abstract sense, a running PostgreSQL system produces an indefinitely long sequence of WAL records. The system physically divides this sequence into WAL segment files, which are normally 16MB apiece (although the segment size can be altered during initdb). The segment files are given numeric names that reflect their position in the abstract WAL sequence. When not using WAL archiving, the system normally creates just a few segment files and then “recycles” them by renaming no-longer-needed segment files to higher segment numbers. It's assumed that segment files whose contents precede the last checkpoint are no longer of interest and can be recycled.
When archiving WAL data, we need to capture the contents of each segment file once it is filled, and save that data somewhere before the segment file is recycled for reuse. Depending on the application and the available hardware, there could be many different ways of “saving the data somewhere”: we could copy the segment files to an NFS-mounted directory on another machine, write them onto a tape drive (ensuring that you have a way of identifying the original name of each file), or batch them together and burn them onto CDs, or something else entirely. To provide the database administrator with flexibility, PostgreSQL tries not to make any assumptions about how the archiving will be done. Instead, PostgreSQL lets the administrator specify a shell command to be executed to copy a completed segment file to wherever it needs to go. The command could be as simple as a , or it could invoke a complex shell script — it's all up to you.
To enable WAL archiving, set the wal_level configuration parameter to or higher, archive_mode to , and specify the shell command to use in the archive_command configuration parameter. In practice these settings will always be placed in the file. In , is replaced by the path name of the file to archive, while is replaced by only the file name. (The path name is relative to the current working directory, i.e., the cluster's data directory.) Use if you need to embed an actual character in the command. The simplest useful command is something like:
archive_command = 'test ! -f /mnt/server/archivedir/%f && cp %p /mnt/server/archivedir/%f' # Unix archive_command = 'copy "%p" "C:\\server\\archivedir\\%f"' # Windowswhich will copy archivable WAL segments to the directory . (This is an example, not a recommendation, and might not work on all platforms.) After the and parameters have been replaced, the actual command executed might look like this:
test ! -f /mnt/server/archivedir/00000001000000A900000065 && cp pg_wal/00000001000000A900000065 /mnt/server/archivedir/00000001000000A900000065A similar command will be generated for each new file to be archived.
The archive command will be executed under the ownership of the same user that the PostgreSQL server is running as. Since the series of WAL files being archived contains effectively everything in your database, you will want to be sure that the archived data is protected from prying eyes; for example, archive into a directory that does not have group or world read access.
It is important that the archive command return zero exit status if and only if it succeeds. Upon getting a zero result, PostgreSQL will assume that the file has been successfully archived, and will remove or recycle it. However, a nonzero status tells PostgreSQL that the file was not archived; it will try again periodically until it succeeds.
The archive command should generally be designed to refuse to overwrite any pre-existing archive file. This is an important safety feature to preserve the integrity of your archive in case of administrator error (such as sending the output of two different servers to the same archive directory).
It is advisable to test your proposed archive command to ensure that it indeed does not overwrite an existing file, and that it returns nonzero status in this case. The example command above for Unix ensures this by including a separate step. On some Unix platforms, has switches such as that can be used to do the same thing less verbosely, but you should not rely on these without verifying that the right exit status is returned. (In particular, GNU will return status zero when is used and the target file already exists, which is not the desired behavior.)
While designing your archiving setup, consider what will happen if the archive command fails repeatedly because some aspect requires operator intervention or the archive runs out of space. For example, this could occur if you write to tape without an autochanger; when the tape fills, nothing further can be archived until the tape is swapped. You should ensure that any error condition or request to a human operator is reported appropriately so that the situation can be resolved reasonably quickly. The directory will continue to fill with WAL segment files until the situation is resolved. (If the file system containing fills up, PostgreSQL will do a PANIC shutdown. No committed transactions will be lost, but the database will remain offline until you free some space.)
The speed of the archiving command is unimportant as long as it can keep up with the average rate at which your server generates WAL data. Normal operation continues even if the archiving process falls a little behind. If archiving falls significantly behind, this will increase the amount of data that would be lost in the event of a disaster. It will also mean that the directory will contain large numbers of not-yet-archived segment files, which could eventually exceed available disk space. You are advised to monitor the archiving process to ensure that it is working as you intend.
In writing your archive command, you should assume that the file names to be archived can be up to 64 characters long and can contain any combination of ASCII letters, digits, and dots. It is not necessary to preserve the original relative path () but it is necessary to preserve the file name ().
Note that although WAL archiving will allow you to restore any modifications made to the data in your PostgreSQL database, it will not restore changes made to configuration files (that is, , and ), since those are edited manually rather than through SQL operations. You might wish to keep the configuration files in a location that will be backed up by your regular file system backup procedures. See Section 19.2 for how to relocate the configuration files.
The archive command is only invoked on completed WAL segments. Hence, if your server generates only little WAL traffic (or has slack periods where it does so), there could be a long delay between the completion of a transaction and its safe recording in archive storage. To put a limit on how old unarchived data can be, you can set archive_timeout to force the server to switch to a new WAL segment file at least that often. Note that archived files that are archived early due to a forced switch are still the same length as completely full files. It is therefore unwise to set a very short — it will bloat your archive storage. settings of a minute or so are usually reasonable.
Also, you can force a segment switch manually with if you want to ensure that a just-finished transaction is archived as soon as possible. Other utility functions related to WAL management are listed in Table 9.79.
When is some SQL commands are optimized to avoid WAL logging, as described in Section 14.4.7. If archiving or streaming replication were turned on during execution of one of these statements, WAL would not contain enough information for archive recovery. (Crash recovery is unaffected.) For this reason, can only be changed at server start. However, can be changed with a configuration file reload. If you wish to temporarily stop archiving, one way to do it is to set to the empty string (). This will cause WAL files to accumulate in until a working is re-established.
25.3.2. Making a Base Backup
The easiest way to perform a base backup is to use the pg_basebackup tool. It can create a base backup either as regular files or as a tar archive. If more flexibility than pg_basebackup can provide is required, you can also make a base backup using the low level API (see Section 25.3.3).
It is not necessary to be concerned about the amount of time it takes to make a base backup. However, if you normally run the server with disabled, you might notice a drop in performance while the backup runs since is effectively forced on during backup mode.
To make use of the backup, you will need to keep all the WAL segment files generated during and after the file system backup. To aid you in doing this, the base backup process creates a backup history file that is immediately stored into the WAL archive area. This file is named after the first WAL segment file that you need for the file system backup. For example, if the starting WAL file is the backup history file will be named something like . (The second part of the file name stands for an exact position within the WAL file, and can ordinarily be ignored.) Once you have safely archived the file system backup and the WAL segment files used during the backup (as specified in the backup history file), all archived WAL segments with names numerically less are no longer needed to recover the file system backup and can be deleted. However, you should consider keeping several backup sets to be absolutely certain that you can recover your data.
The backup history file is just a small text file. It contains the label string you gave to pg_basebackup, as well as the starting and ending times and WAL segments of the backup. If you used the label to identify the associated dump file, then the archived history file is enough to tell you which dump file to restore.
Since you have to keep around all the archived WAL files back to your last base backup, the interval between base backups should usually be chosen based on how much storage you want to expend on archived WAL files. You should also consider how long you are prepared to spend recovering, if recovery should be necessary — the system will have to replay all those WAL segments, and that could take awhile if it has been a long time since the last base backup.
25.3.3. Making a Base Backup Using the Low Level API
The procedure for making a base backup using the low level APIs contains a few more steps than the pg_basebackup method, but is relatively simple. It is very important that these steps are executed in sequence, and that the success of a step is verified before proceeding to the next step.
Low level base backups can be made in a non-exclusive or an exclusive way. The non-exclusive method is recommended and the exclusive one is deprecated and will eventually be removed.
25.3.3.1. Making a non-exclusive low level backup
A non-exclusive low level backup is one that allows other concurrent backups to be running (both those started using the same backup API and those started using pg_basebackup).
Ensure that WAL archiving is enabled and working.
Connect to the server (it does not matter which database) as a user with rights to run pg_start_backup (superuser, or a user who has been granted EXECUTE on the function) and issue the command:
SELECT pg_start_backup('label', false, false);where is any string you want to use to uniquely identify this backup operation. The connection calling must be maintained until the end of the backup, or the backup will be automatically aborted.
By default, can take a long time to finish. This is because it performs a checkpoint, and the I/O required for the checkpoint will be spread out over a significant period of time, by default half your inter-checkpoint interval (see the configuration parameter checkpoint_completion_target). This is usually what you want, because it minimizes the impact on query processing. If you want to start the backup as soon as possible, change the second parameter to , which will issue an immediate checkpoint using as much I/O as available.
The third parameter being tells to initiate a non-exclusive base backup.
Perform the backup, using any convenient file-system-backup tool such as tar or cpio (not pg_dump or pg_dumpall). It is neither necessary nor desirable to stop normal operation of the database while you do this. See Section 25.3.3.3 for things to consider during this backup.
In the same connection as before, issue the command:
SELECT * FROM pg_stop_backup(false, true);This terminates backup mode. On a primary, it also performs an automatic switch to the next WAL segment. On a standby, it is not possible to automatically switch WAL segments, so you may wish to run on the primary to perform a manual switch. The reason for the switch is to arrange for the last WAL segment file written during the backup interval to be ready to archive.
The will return one row with three values. The second of these fields should be written to a file named in the root directory of the backup. The third field should be written to a file named unless the field is empty. These files are vital to the backup working, and must be written without modification.
Once the WAL segment files active during the backup are archived, you are done. The file identified by 's first return value is the last segment that is required to form a complete set of backup files. On a primary, if is enabled and the parameter is , does not return until the last segment has been archived. On a standby, must be in order for to wait. Archiving of these files happens automatically since you have already configured . In most cases this happens quickly, but you are advised to monitor your archive system to ensure there are no delays. If the archive process has fallen behind because of failures of the archive command, it will keep retrying until the archive succeeds and the backup is complete. If you wish to place a time limit on the execution of , set an appropriate value, but make note that if terminates because of this your backup may not be valid.
If the backup process monitors and ensures that all WAL segment files required for the backup are successfully archived then the parameter (which defaults to true) can be set to false to have return as soon as the stop backup record is written to the WAL. By default, will wait until all WAL has been archived, which can take some time. This option must be used with caution: if WAL archiving is not monitored correctly then the backup might not include all of the WAL files and will therefore be incomplete and not able to be restored.
25.3.3.2. Making an exclusive low level backup
The process for an exclusive backup is mostly the same as for a non-exclusive one, but it differs in a few key steps. This type of backup can only be taken on a primary and does not allow concurrent backups. Prior to PostgreSQL 9.6, this was the only low-level method available, but it is now recommended that all users upgrade their scripts to use non-exclusive backups if possible.
Ensure that WAL archiving is enabled and working.
Connect to the server (it does not matter which database) as a user with rights to run pg_start_backup (superuser, or a user who has been granted EXECUTE on the function) and issue the command:
SELECT pg_start_backup('label');where is any string you want to use to uniquely identify this backup operation. creates a backup label file, called , in the cluster directory with information about your backup, including the start time and label string. The function also creates a tablespace map file, called , in the cluster directory with information about tablespace symbolic links in if one or more such link is present. Both files are critical to the integrity of the backup, should you need to restore from it.
By default, can take a long time to finish. This is because it performs a checkpoint, and the I/O required for the checkpoint will be spread out over a significant period of time, by default half your inter-checkpoint interval (see the configuration parameter checkpoint_completion_target). This is usually what you want, because it minimizes the impact on query processing. If you want to start the backup as soon as possible, use:
SELECT pg_start_backup('label', true);This forces the checkpoint to be done as quickly as possible.
Perform the backup, using any convenient file-system-backup tool such as tar or cpio (not pg_dump or pg_dumpall). It is neither necessary nor desirable to stop normal operation of the database while you do this. See Section 25.3.3.3 for things to consider during this backup.
Note that if the server crashes during the backup it may not be possible to restart until the file has been manually deleted from the directory.
Again connect to the database as a user with rights to run pg_stop_backup (superuser, or a user who has been granted EXECUTE on the function), and issue the command:
SELECT pg_stop_backup();This function terminates backup mode and performs an automatic switch to the next WAL segment. The reason for the switch is to arrange for the last WAL segment written during the backup interval to be ready to archive.
Once the WAL segment files active during the backup are archived, you are done. The file identified by 's result is the last segment that is required to form a complete set of backup files. If is enabled, does not return until the last segment has been archived. Archiving of these files happens automatically since you have already configured . In most cases this happens quickly, but you are advised to monitor your archive system to ensure there are no delays. If the archive process has fallen behind because of failures of the archive command, it will keep retrying until the archive succeeds and the backup is complete. If you wish to place a time limit on the execution of , set an appropriate value, but make note that if terminates because of this your backup may not be valid.
25.3.3.3. Backing up the data directory
Some file system backup tools emit warnings or errors if the files they are trying to copy change while the copy proceeds. When taking a base backup of an active database, this situation is normal and not an error. However, you need to ensure that you can distinguish complaints of this sort from real errors. For example, some versions of rsync return a separate exit code for “vanished source files”, and you can write a driver script to accept this exit code as a non-error case. Also, some versions of GNU tar return an error code indistinguishable from a fatal error if a file was truncated while tar was copying it. Fortunately, GNU tar versions 1.16 and later exit with 1 if a file was changed during the backup, and 2 for other errors. With GNU tar version 1.23 and later, you can use the warning options to hide the related warning messages.
Be certain that your backup includes all of the files under the database cluster directory (e.g., ). If you are using tablespaces that do not reside underneath this directory, be careful to include them as well (and be sure that your backup archives symbolic links as links, otherwise the restore will corrupt your tablespaces).
You should, however, omit from the backup the files within the cluster's subdirectory. This slight adjustment is worthwhile because it reduces the risk of mistakes when restoring. This is easy to arrange if is a symbolic link pointing to someplace outside the cluster directory, which is a common setup anyway for performance reasons. You might also want to exclude and , which record information about the running postmaster, not about the postmaster which will eventually use this backup. (These files can confuse pg_ctl.)
It is often a good idea to also omit from the backup the files within the cluster's directory, so that replication slots that exist on the master do not become part of the backup. Otherwise, the subsequent use of the backup to create a standby may result in indefinite retention of WAL files on the standby, and possibly bloat on the master if hot standby feedback is enabled, because the clients that are using those replication slots will still be connecting to and updating the slots on the master, not the standby. Even if the backup is only intended for use in creating a new master, copying the replication slots isn't expected to be particularly useful, since the contents of those slots will likely be badly out of date by the time the new master comes on line.
The contents of the directories , , , , , and (but not the directories themselves) can be omitted from the backup as they will be initialized on postmaster startup. If stats_temp_directory is set and is under the data directory then the contents of that directory can also be omitted.
Any file or directory beginning with can be omitted from the backup. These files are removed on postmaster start and the directories will be recreated as needed.
files can be omitted from the backup whenever a file of that name is found. These files contain relation cache data that is always rebuilt when recovering.
The backup label file includes the label string you gave to , as well as the time at which was run, and the name of the starting WAL file. In case of confusion it is therefore possible to look inside a backup file and determine exactly which backup session the dump file came from. The tablespace map file includes the symbolic link names as they exist in the directory and the full path of each symbolic link. These files are not merely for your information; their presence and contents are critical to the proper operation of the system's recovery process.
It is also possible to make a backup while the server is stopped. In this case, you obviously cannot use or , and you will therefore be left to your own devices to keep track of which backup is which and how far back the associated WAL files go. It is generally better to follow the continuous archiving procedure above.
25.3.4. Recovering Using a Continuous Archive Backup
Okay, the worst has happened and you need to recover from your backup. Here is the procedure:
Stop the server, if it's running.
If you have the space to do so, copy the whole cluster data directory and any tablespaces to a temporary location in case you need them later. Note that this precaution will require that you have enough free space on your system to hold two copies of your existing database. If you do not have enough space, you should at least save the contents of the cluster's subdirectory, as it might contain logs which were not archived before the system went down.
Remove all existing files and subdirectories under the cluster data directory and under the root directories of any tablespaces you are using.
Restore the database files from your file system backup. Be sure that they are restored with the right ownership (the database system user, not !) and with the right permissions. If you are using tablespaces, you should verify that the symbolic links in were correctly restored.
Remove any files present in ; these came from the file system backup and are therefore probably obsolete rather than current. If you didn't archive at all, then recreate it with proper permissions, being careful to ensure that you re-establish it as a symbolic link if you had it set up that way before.
If you have unarchived WAL segment files that you saved in step 2, copy them into . (It is best to copy them, not move them, so you still have the unmodified files if a problem occurs and you have to start over.)
Create a recovery command file in the cluster data directory (see Chapter 27). You might also want to temporarily modify to prevent ordinary users from connecting until you are sure the recovery was successful.
Start the server. The server will go into recovery mode and proceed to read through the archived WAL files it needs. Should the recovery be terminated because of an external error, the server can simply be restarted and it will continue recovery. Upon completion of the recovery process, the server will rename to (to prevent accidentally re-entering recovery mode later) and then commence normal database operations.
Inspect the contents of the database to ensure you have recovered to the desired state. If not, return to step 1. If all is well, allow your users to connect by restoring to normal.
The key part of all this is to set up a recovery configuration file that describes how you want to recover and how far the recovery should run. You can use (normally located in the installation's directory) as a prototype. The one thing that you absolutely must specify in is the , which tells PostgreSQL how to retrieve archived WAL file segments. Like the , this is a shell command string. It can contain , which is replaced by the name of the desired log file, and , which is replaced by the path name to copy the log file to. (The path name is relative to the current working directory, i.e., the cluster's data directory.) Write if you need to embed an actual character in the command. The simplest useful command is something like:
restore_command = 'cp /mnt/server/archivedir/%f %p'which will copy previously archived WAL segments from the directory . Of course, you can use something much more complicated, perhaps even a shell script that requests the operator to mount an appropriate tape.
It is important that the command return nonzero exit status on failure. The command will be called requesting files that are not present in the archive; it must return nonzero when so asked. This is not an error condition. An exception is that if the command was terminated by a signal (other than SIGTERM, which is used as part of a database server shutdown) or an error by the shell (such as command not found), then recovery will abort and the server will not start up.
Not all of the requested files will be WAL segment files; you should also expect requests for files with a suffix of . Also be aware that the base name of the path will be different from ; do not expect them to be interchangeable.
WAL segments that cannot be found in the archive will be sought in ; this allows use of recent un-archived segments. However, segments that are available from the archive will be used in preference to files in .
Normally, recovery will proceed through all available WAL segments, thereby restoring the database to the current point in time (or as close as possible given the available WAL segments). Therefore, a normal recovery will end with a “file not found” message, the exact text of the error message depending upon your choice of . You may also see an error message at the start of recovery for a file named something like . This is also normal and does not indicate a problem in simple recovery situations; see Section 25.3.5 for discussion.
If you want to recover to some previous point in time (say, right before the junior DBA dropped your main transaction table), just specify the required stopping point in . You can specify the stop point, known as the “recovery target”, either by date/time, named restore point or by completion of a specific transaction ID. As of this writing only the date/time and named restore point options are very usable, since there are no tools to help you identify with any accuracy which transaction ID to use.
Note
The stop point must be after the ending time of the base backup, i.e., the end time of . You cannot use a base backup to recover to a time when that backup was in progress. (To recover to such a time, you must go back to your previous base backup and roll forward from there.)
If recovery finds corrupted WAL data, recovery will halt at that point and the server will not start. In such a case the recovery process could be re-run from the beginning, specifying a “recovery target” before the point of corruption so that recovery can complete normally. If recovery fails for an external reason, such as a system crash or if the WAL archive has become inaccessible, then the recovery can simply be restarted and it will restart almost from where it failed. Recovery restart works much like checkpointing in normal operation: the server periodically forces all its state to disk, and then updates the file to indicate that the already-processed WAL data need not be scanned again.
The ability to restore the database to a previous point in time creates some complexities that are akin to science-fiction stories about time travel and parallel universes. For example, in the original history of the database, suppose you dropped a critical table at 5:15PM on Tuesday evening, but didn't realize your mistake until Wednesday noon. Unfazed, you get out your backup, restore to the point-in-time 5:14PM Tuesday evening, and are up and running. In this history of the database universe, you never dropped the table. But suppose you later realize this wasn't such a great idea, and would like to return to sometime Wednesday morning in the original history. You won't be able to if, while your database was up-and-running, it overwrote some of the WAL segment files that led up to the time you now wish you could get back to. Thus, to avoid this, you need to distinguish the series of WAL records generated after you've done a point-in-time recovery from those that were generated in the original database history.
To deal with this problem, PostgreSQL has a notion of timelines. Whenever an archive recovery completes, a new timeline is created to identify the series of WAL records generated after that recovery. The timeline ID number is part of WAL segment file names so a new timeline does not overwrite the WAL data generated by previous timelines. It is in fact possible to archive many different timelines. While that might seem like a useless feature, it's often a lifesaver. Consider the situation where you aren't quite sure what point-in-time to recover to, and so have to do several point-in-time recoveries by trial and error until you find the best place to branch off from the old history. Without timelines this process would soon generate an unmanageable mess. With timelines, you can recover to any prior state, including states in timeline branches that you abandoned earlier.
Every time a new timeline is created, PostgreSQL creates a “timeline history” file that shows which timeline it branched off from and when. These history files are necessary to allow the system to pick the right WAL segment files when recovering from an archive that contains multiple timelines. Therefore, they are archived into the WAL archive area just like WAL segment files. The history files are just small text files, so it's cheap and appropriate to keep them around indefinitely (unlike the segment files which are large). You can, if you like, add comments to a history file to record your own notes about how and why this particular timeline was created. Such comments will be especially valuable when you have a thicket of different timelines as a result of experimentation.
The default behavior of recovery is to recover along the same timeline that was current when the base backup was taken. If you wish to recover into some child timeline (that is, you want to return to some state that was itself generated after a recovery attempt), you need to specify the target timeline ID in . You cannot recover into timelines that branched off earlier than the base backup.
25.3.6. Tips and Examples
Some tips for configuring continuous archiving are given here.
25.3.6.1. Standalone Hot Backups
It is possible to use PostgreSQL's backup facilities to produce standalone hot backups. These are backups that cannot be used for point-in-time recovery, yet are typically much faster to backup and restore than pg_dump dumps. (They are also much larger than pg_dump dumps, so in some cases the speed advantage might be negated.)
As with base backups, the easiest way to produce a standalone hot backup is to use the pg_basebackup tool. If you include the parameter when calling it, all the write-ahead log required to use the backup will be included in the backup automatically, and no special action is required to restore the backup.
If more flexibility in copying the backup files is needed, a lower level process can be used for standalone hot backups as well. To prepare for low level standalone hot backups, make sure is set to or higher, to , and set up an that performs archiving only when a switch file exists. For example:
archive_command = 'test ! -f /var/lib/pgsql/backup_in_progress || (test ! -f /var/lib/pgsql/archive/%f && cp %p /var/lib/pgsql/archive/%f)'This command will perform archiving when exists, and otherwise silently return zero exit status (allowing PostgreSQL to recycle the unwanted WAL file).
With this preparation, a backup can be taken using a script like the following:
touch /var/lib/pgsql/backup_in_progress psql -c "select pg_start_backup('hot_backup');" tar -cf /var/lib/pgsql/backup.tar /var/lib/pgsql/data/ psql -c "select pg_stop_backup();" rm /var/lib/pgsql/backup_in_progress tar -rf /var/lib/pgsql/backup.tar /var/lib/pgsql/archive/The switch file is created first, enabling archiving of completed WAL files to occur. After the backup the switch file is removed. Archived WAL files are then added to the backup so that both base backup and all required WAL files are part of the same tar file. Please remember to add error handling to your backup scripts.
25.3.6.2. Compressed Archive Logs
If archive storage size is a concern, you can use gzip to compress the archive files:
archive_command = 'gzip < %p > /var/lib/pgsql/archive/%f'You will then need to use gunzip during recovery:
restore_command = 'gunzip < /mnt/server/archivedir/%f > %p'25.3.6.3. Scripts
Many people choose to use scripts to define their , so that their entry looks very simple:
archive_command = 'local_backup_script.sh "%p" "%f"'Using a separate script file is advisable any time you want to use more than a single command in the archiving process. This allows all complexity to be managed within the script, which can be written in a popular scripting language such as bash or perl.
Examples of requirements that might be solved within a script include:
Copying data to secure off-site data storage
Batching WAL files so that they are transferred every three hours, rather than one at a time
Interfacing with other backup and recovery software
Interfacing with monitoring software to report errors
Tip
When using an script, it's desirable to enable logging_collector. Any messages written to stderr from the script will then appear in the database server log, allowing complex configurations to be diagnosed easily if they fail.
At this writing, there are several limitations of the continuous archiving technique. These will probably be fixed in future releases:
If a CREATE DATABASE command is executed while a base backup is being taken, and then the template database that the copied is modified while the base backup is still in progress, it is possible that recovery will cause those modifications to be propagated into the created database as well. This is of course undesirable. To avoid this risk, it is best not to modify any template databases while taking a base backup.
CREATE TABLESPACE commands are WAL-logged with the literal absolute path, and will therefore be replayed as tablespace creations with the same absolute path. This might be undesirable if the log is being replayed on a different machine. It can be dangerous even if the log is being replayed on the same machine, but into a new data directory: the replay will still overwrite the contents of the original tablespace. To avoid potential gotchas of this sort, the best practice is to take a new base backup after creating or dropping tablespaces.
It should also be noted that the default format is fairly bulky since it includes many disk page snapshots. These page snapshots are designed to support crash recovery, since we might need to fix partially-written disk pages. Depending on your system hardware and software, the risk of partial writes might be small enough to ignore, in which case you can significantly reduce the total volume of archived logs by turning off page snapshots using the full_page_writes parameter. (Read the notes and warnings in Chapter 30 before you do so.) Turning off page snapshots does not prevent use of the logs for PITR operations. An area for future development is to compress archived WAL data by removing unnecessary page copies even when is on. In the meantime, administrators might wish to reduce the number of page snapshots included in WAL by increasing the checkpoint interval parameters as much as feasible.
Archive:DVD installation for 11.0
| This article is being considered for deletion! Reason: openSUSE 11.0 is EOL --Zbuhman 01:13, 25 March 2011 (MDT). Please do not blank, merge, or move this article, or remove this notice. Refer to this article's discussion page and our deletion policy for more information. |
Installation
Place your openSUSE disc in the drive, and reboot your computer. Upon rebooting, you should encounter the boot screen.
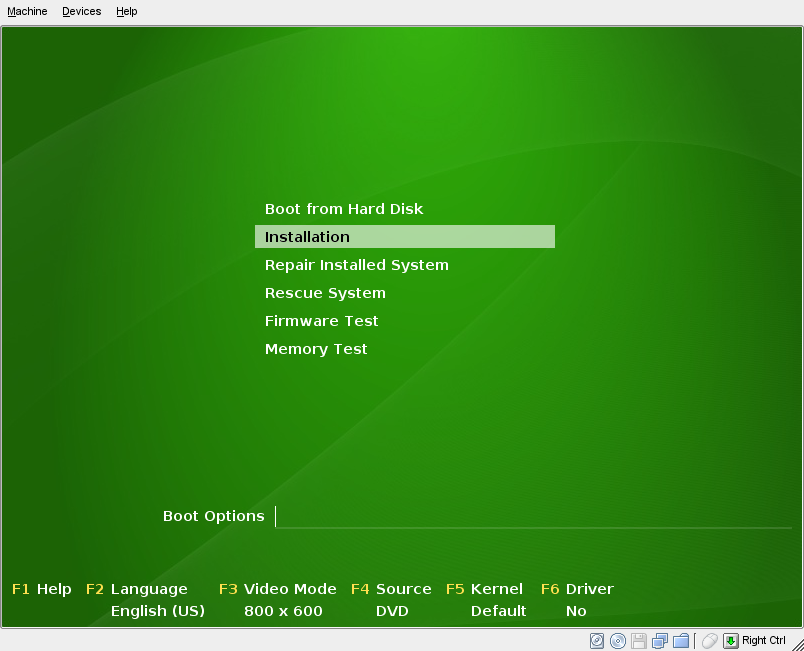
Choose Installation and wait for YaST, the openSUSE installation and configuration program, to load.
Step 1: Welcome screen
YaST will present you with the screen. All YaST pages follow the same interface: a list of where you are in the installation on the left, different functions in the main screen, and Help, Back, Abort, and Next buttons at the bottom.
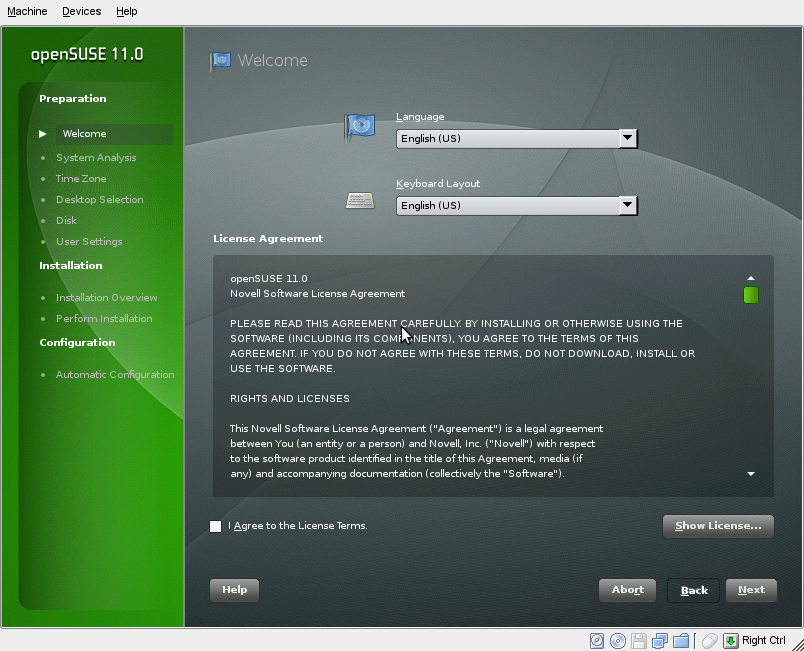
Choose your language in this screen. The keyboard layout is set automatically depending upon the language. If your keyboard layout is different from the one chosen by YaST, go ahead and correct it.
Also, you'll need to accept the license agreement. To expand the license agreement, click Show License. Once you accept the license, click Next.
[ja:Installation/11.0_DVD_Install]
Step 2: System Analysis
YaST will now analyze your computer to determine the settings it should use for installation.
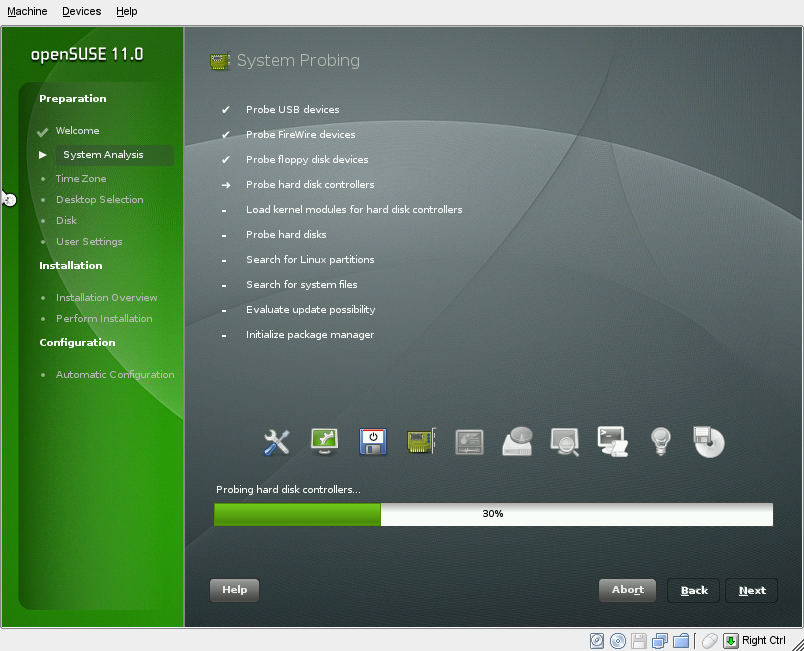
You can simply wait until it is finished.
Step 3: Installation Mode
Now you can choose between installation modes of openSUSE 11.0.
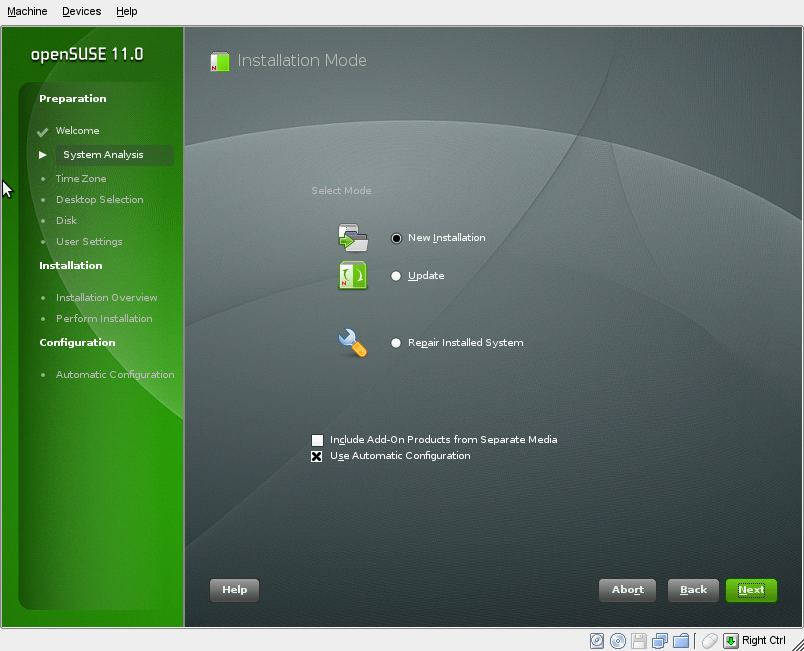
Most users should leave the options set to what they are. If you have a previous version of openSUSE installed, you can choose Update to upgrade that version to openSUSE 11.0. If you ever need to repair your installation of openSUSE 11.0, the Repair Installed System option can be used to assess and repair your installed openSUSE system.
If you want to fine-tune how the entire installation is set up, including hardware configuration, you can uncheck Use Automatic Configuration. This is recommended only for those who know what they are doing, and it also extends the time it takes to install openSUSE 11.0.
Step 4: Set the time & time zone
After that, you will be brought to a screen with a map on it. This is where you will give your time zone information for the clock.
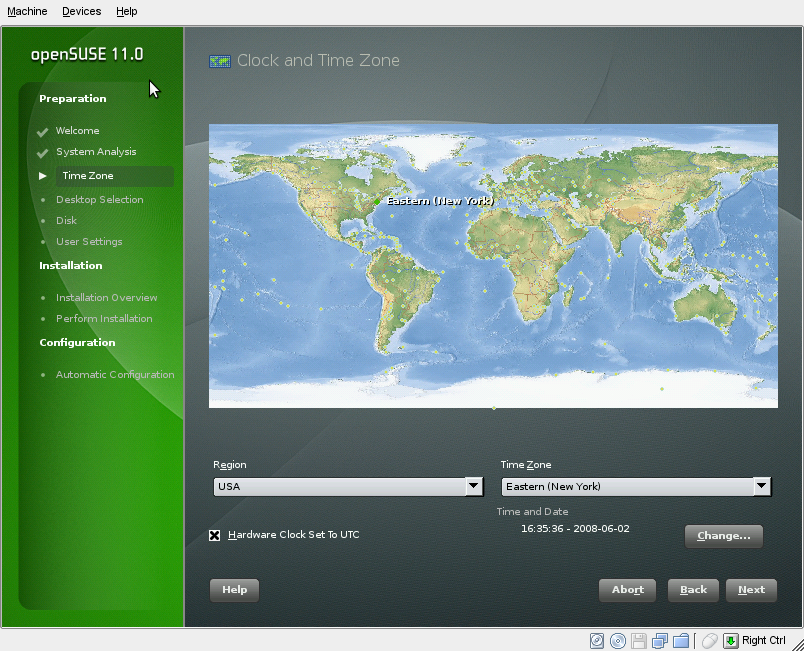
Zoom in on your region of the world, then choose one of the cities with a dot on them, either the closest one to your location, or any one in your time zone. You can confirm these settings at the bottom. If the time in the Time and Date section is not correct, choose Change... to correct it.
Step 5: Desktop selection
Here you can select which of the three desktop environments openSUSE includes you wish to install. Keep in mind this is just for the initial selection. Later in the installation process or even after you install, you can add GNOME, the other KDE, and even more X window managers like XFCE.
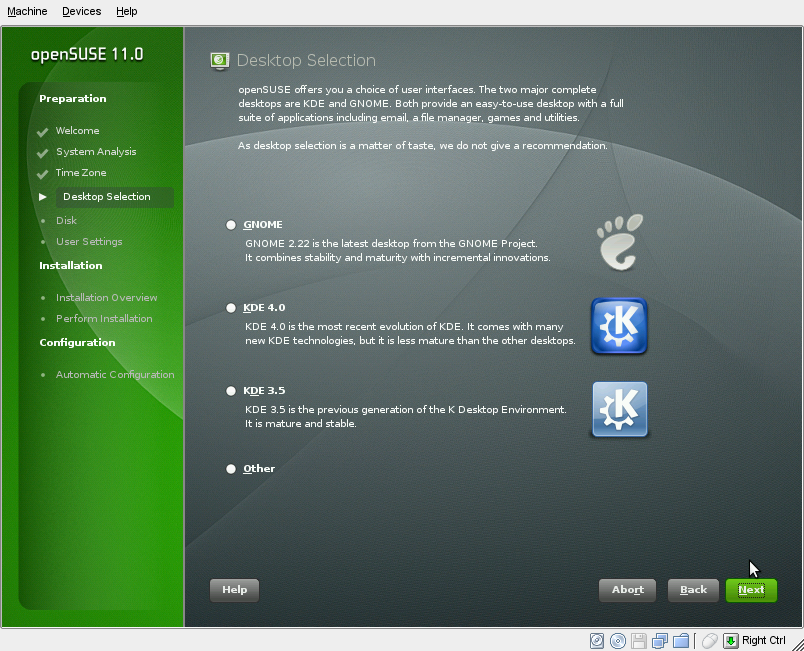
Since the choice is highly personal, we don't give a recommendation.
Step 6: Setting up your disk
Now YaST will set up your hard drive settings. If you have another operating system installed on the computer (for example, Microsoft Windows or another Linux), YaST will resize that operating system so that it still on your computer, but has enough room to install openSUSE 11.0.

YaST should propose settings that will satisfy most users. If you want to edit the proposed settings, click Edit Partition Setup.... If you'd like to redo the entire setup for your own settings, click Create Partition Setup.... If you want to keep the proposed settings, click Next.
Step 7: Create your user
Now you'll need to set up a user account for the primary user of the computer.
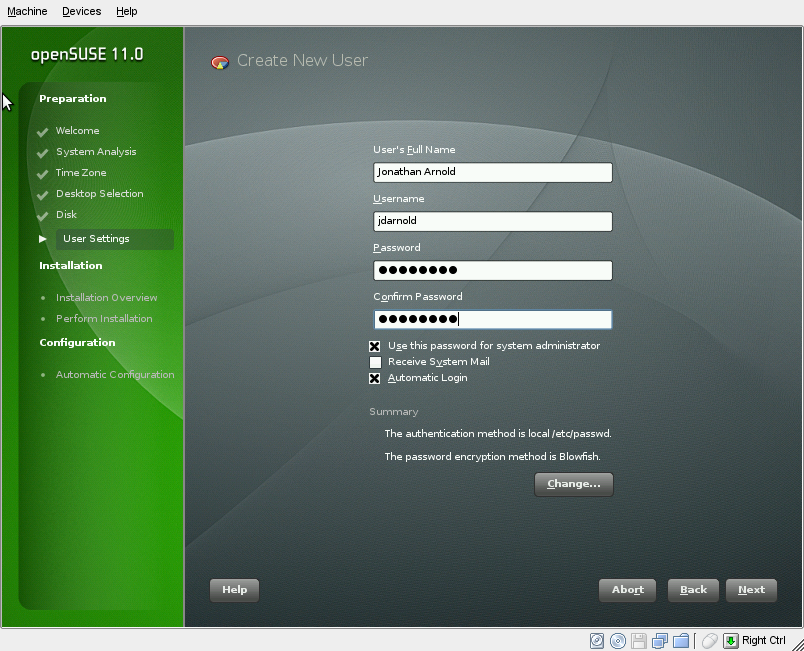
Enter your full name, a username (which is automatically chosen: you can change the name if you wish), and a password.
By default, the system is set so your password is the password of the system administrator (also known as root). Also, automatic login is turned on as well, which logs you into your computer automatically upon turning it on. You can uncheck these options for more security if you wish.
Step 8: Installation overview
Now you are presented with the overview of the installation. These are the details to what YaST is going to do to your system upon installation.
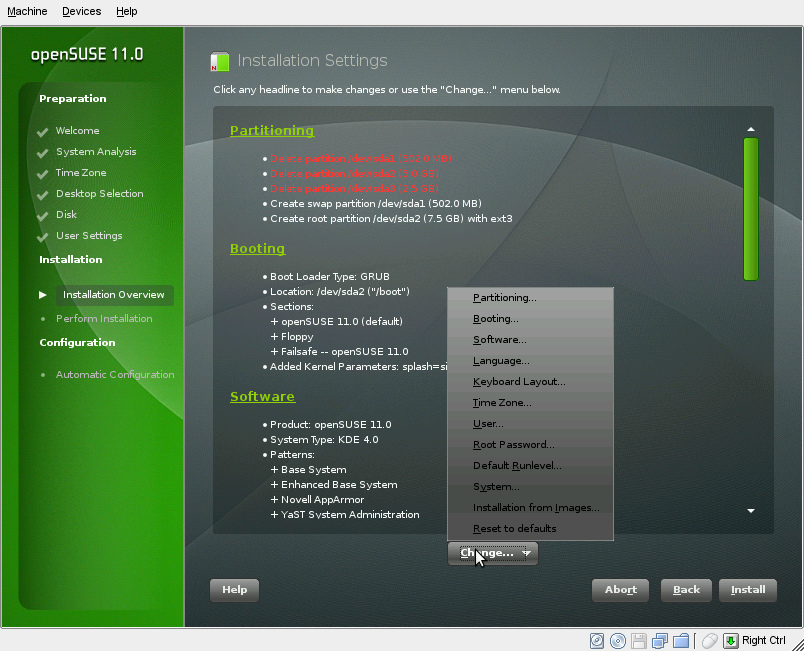
To change these details, select the headline of the option or choose it in the Change... menu as shown.
Software changes
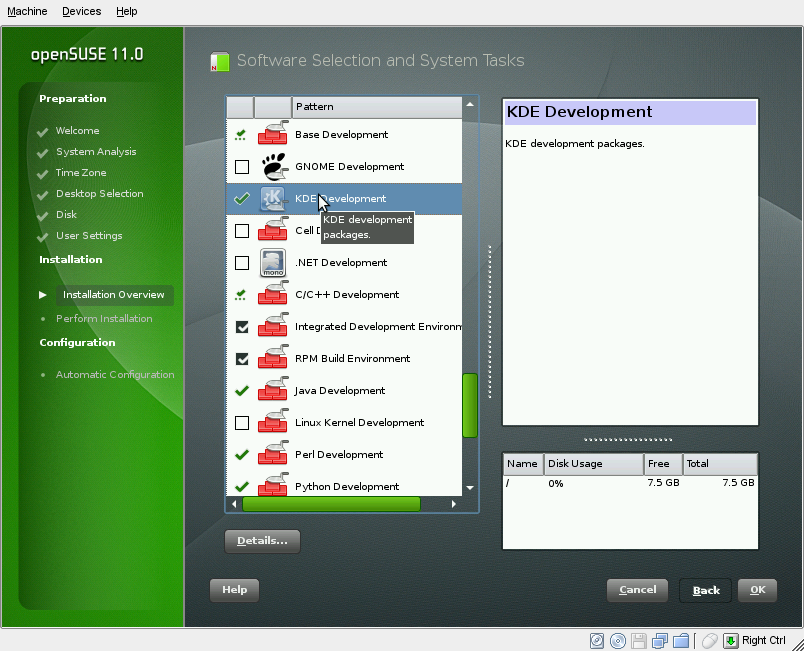
The most common setting users want to change is software. In YaST, software is installed in patterns, or groups of software that achieve a similar goal.
The appropriate software patterns for a basic openSUSE installation have already been chosen by default, but you may want to add additional ones (e.g., developer tools or extra office applications). If so, simply check the pattern on the left. Disk space permitting, all associated software will be installed along with the rest of the system.
Step 9: Install openSUSE!
If you're ready to install, click Install.
You'll be asked again if you want to install. This is the point of no return. After you accept this dialog, installation will begin.
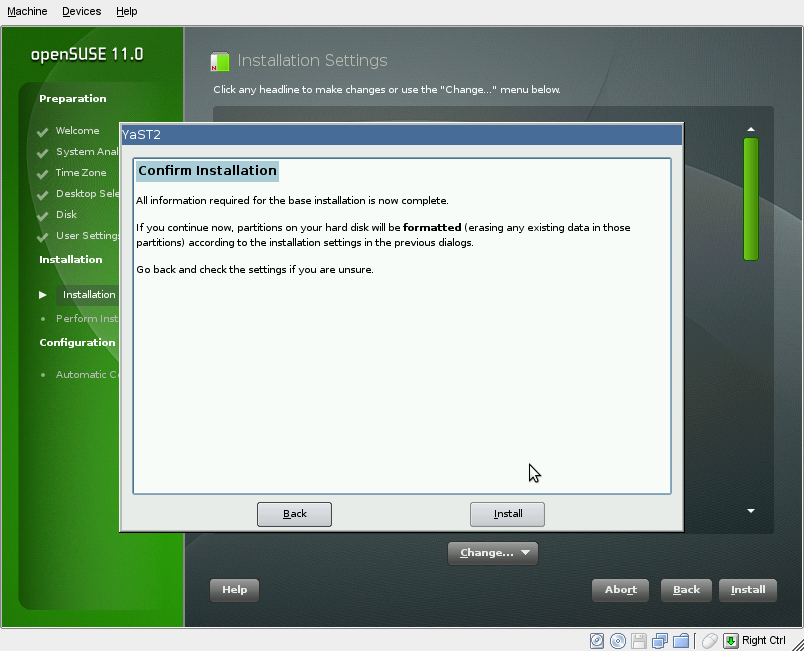
Click Install to begin the installation.
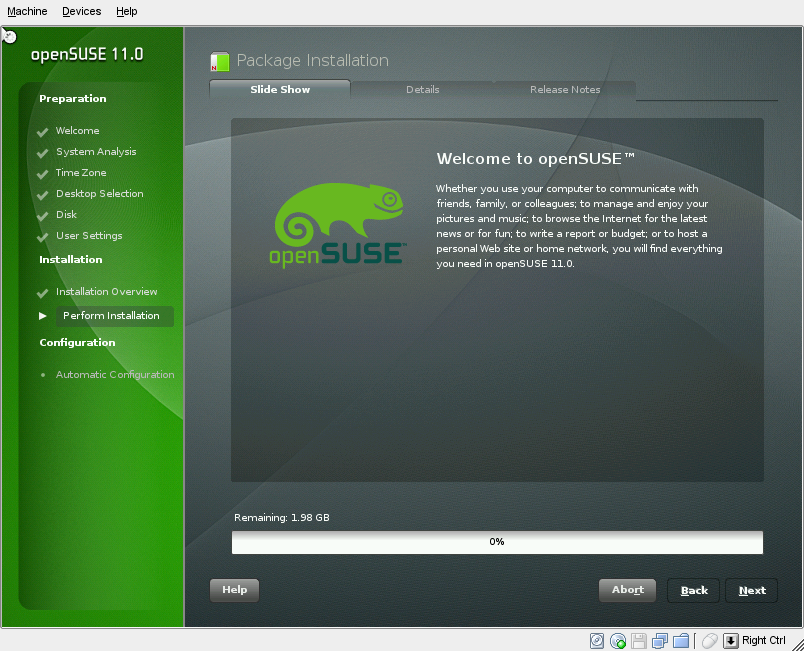
Now the installer will work to install openSUSE. Several progress bars will come and go, until you are at the openSUSE installation slideshow:
After the installation is complete, the computer will reboot.
Automatic Configuration
After the system has rebooted into your new openSUSE 11.0 system, the installation is over. However, before you can start your desktop, it must run a one-time automatic configuration of your hardware and network connection.
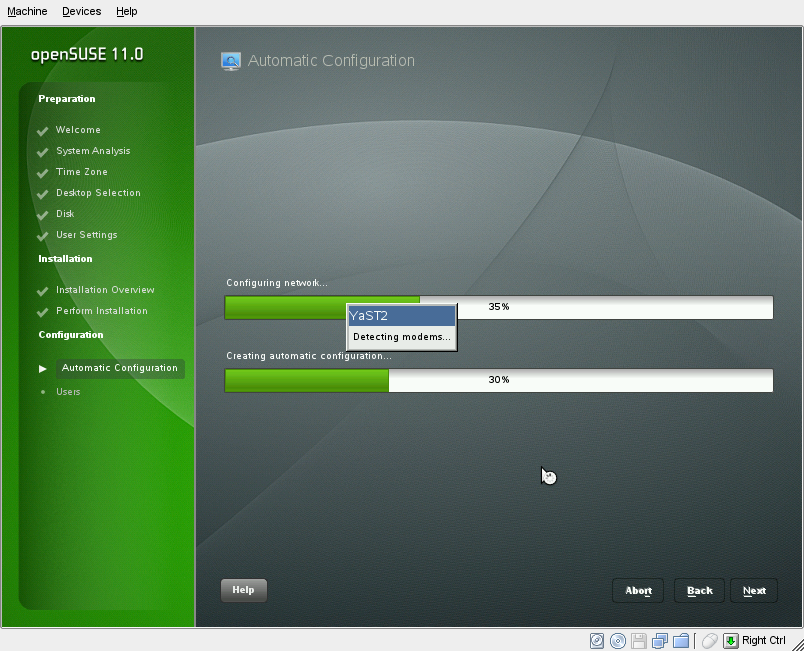
As it's name suggests, it's automatic. You don't have to do anything here.
Completion of Installation
openSUSE 11.0 is now installed! Once you login, you'll be greeted by the openSUSE Greeter with all sorts of information about openSUSE on it, and you'll be directed to setting up your online update system.
See also
How to create .ipa file from Xcode project file
9 Replies
Hello KMT:
Finally, I found out what the problem was.
I had installed a new Xcode toolchain for Swift 5.1.3 which wasn't the DEFAULT tool chain. Once I set it to the default, everything went like a breeze.
Thanks.
OK. I will do that an let you know.
Thanks.
Quoting that link:
Configure App Sandbox (macOS)
App Sandbox is a macOS access control technology designed to contain damage to the system and the user’s data if an app becomes compromised. An app distributed through the Mac App Store must enable App Sandbox.
No I didn't. Is that required?
Hello KMT:
There is something fundamental that is preventing me being unable to upload my app to the app store:
I have previously uploaded an iOS app with no problem.
Now I am trying to upload a MAC os app and have'nt got any success:
1. I have done the preliminary setup at app store connect. The last step is to upload the build.
2. I build the app and an archive is created
3. The archive organizer shows only 3 options:
i. Developer ID --> Distribute directly to customers
ii. Development --> Distribute to members of your team
iii. Copy App --> Export a copy of the archived app
I AM EXPECTING AN OPTION TO "Distribute with App Store Connect" as when I upload my iOS app, but that option isn't there.
I have tried all three available options but none lead to uploading to App Store Connect
I don't know what to do next.
By the way when I try using Apple Transporter it gives this error: "Failed to get the app's bundle id."
From my notes...
-=-
Use Xcode's "Product/Archive" to submit to the App Store. After the app finishes building, locate that archive in Organizer - you want the Submit option from there.
Remember, you can't archive if:
- a simulator is selected instead of a device*
- there is an error when building*
- you haven't finished the 'Prepare for Submission’ stage for that app in App Store Connect
- See: https://developer.apple.com/library/ios/documentation/LanguagesUtilities/Conceptual/iTunesConnect_Guide/Chapters/ChangingAppStatus.html
- you've recently renewed your (required) apple developer account, and not yet updated the provisions to reflect that activity
* You must have at least one device registered in the Member Center, but it doesn’t have to be connected to your Mac/Xcode when building, in which case select ‘generic iOS/tvOS device'
- - - If this is just about testing to a device and you're getting a message that Xcode can't archive, try deleting all older versions of that app on the target device first
Also see TN2215: Why is the Archive menu item grayed out in Xcode ?
-=-
Hello KMT:
I have spent the entire day reading up Xcode Help on the topic. I have tried the instructions but I cannot Validate the archive because the Validate button is greyed out.
I have not been able to figure out what is meant by this Note:
Note: If the Validate App button is disabled, verify that the archive contains a single top-level app.
Perhaps you can help me to understand how that is implemented in Xcode.
Thanks.
A .ipa file is just a zip file, renamed.
That said, Xcode should already have a built in archive process to accomplish your goal (mac application to/for the store). No need to get creative or scratch around.
See Xcode Help for details.
What’s New in the Reason 11.0 Archives?
Screen Shot

System Requirements for Reason 11.0 Archives
- First, download the Reason 11.0 Archives
-
You can download its setup from given links:


