
Vray 3 rhino Archives

vray 3 rhino Archives
Help & Problem Solving
This section contains troubleshooting info and tips for software programs used in the computer labs, including how to recover corrupted files. Also check the Contact Info and Printing & Plotting pages. To set up your personal computer for use on the school’s network (including printing), check Studio Computing. If you cannot retrieve files from a hard drive or USB memory stick, contact the Architecture IT Staff. We have recovery software that might help.
Important Tips
- As you work on an important file, periodically save your file under a different name. This gives you a prior version to revert to in case the original becomes corrupted. For example, keep copies such as “myfile_1”, “myfile_2”, etc. If you store your files on your H drive, twice a day they are backed up and can be restored.
- Keep at least two backups of your files stored in different locations (i.e. keep one on your USB key and one on your hard drive or H drive). Your USB stick or hard drive could go bad at any time, causing the loss of your work.
- Before working with a file, copy it to the computer’s hard drive (such as the D drive on a lab computer). Don’t work on it directly from your USB memory stick or network drive. You’ll usually see a speed increase, plus there is less chance of file corruption. You can copy it back to the original location when done.
- If you get an error message when trying to save a file to your USB memory stick or H drive (Documents), make sure you have enough free space
Logon Problems
Try restarting the computer. This usually fixes errors such as “Logon server not available” and “The trust relationship between this station and the main domain fails.”
See us in Room 001 if you encounter errors such as “The user profile service failed the login” or “You cannot log on because the logon method you are using is not allowed on this computer.”
Printing Problems
If you are on a Mac trying to print to one of the laser printers (such as Koopa-Postscript) and can’t get tabloid (11x17) printing to work, make sure you are NOT using the generic postscript driver. Only use the HP drivers specific to the printers. If you forgot to install the HP drivers, go back and follow step 7. After you install the drivers, remove the printer and re-add it. During the last step in adding the printer, select Tray 3, which is 11x17.
Adobe Acrobat Pro
- Problem: Network printers do not appear in Acrobat using SURA (yet appear for other programs). The cause is a corrupted default printer setting in the Windows registry. Use this link to fix it. (Enter a different device name and be sure to reset the permissions on the Windows key.) You MUST restart after making the change. Then you can set a different default printer and coincidentally the network printers will now appear in Acrobat.
- How to print multiple pages per sheet: click File, Print to open the Print dialog box. Under Page Sizing & Handling, select ‘Multiple’. You can specify the number of pages per sheet and page order.
- How to increase/enlarge the dimensions of an existing PDF: click File, Print, and pick “Adobe PDF” as the printer. Click Properties, Paper/Quality tab, Advanced, set Page Size to “Postscript custom page size” and enter the larger size that you want. Then back out under the Print box, set the Page Sizing to ‘Fit’ and click Print. It will create a new PDF at the size you specified.
- How to print odd/even pages: click File, Print to open the Print dialog box. Under Pages to Print, click More Options, which reveals the Odd or Even Pages setting.
- How to print crop/trim marks: click File, Print to open the Print dialog box. Click the Advanced button. On the left click Marks and Bleeds. Place a checkmark in the box next to ‘Trim Marks’. This only works for the POSTSCRIPT printer drivers. If the trim marks don’t show on the printout, you may need to crop your PDF to make it smaller, or print to a larger size paper (the reason why the trim marks don’t print is that they are outside the printable margin of the page).
- If you crop a PDF, the cropped part is hidden, not deleted. The file size is not reduced when printing, and it still sends the entire file, including the hidden crop. Therefore, it’s best to DELETE the hidden crop, save the file as a new name, and then print it. You will save print time and reduce potential problems because the file size will be smaller. To remove the hidden crop in Acrobat DC, on the secondary toolbar, click Tools > Redact. On the Redact toolbar, click Remove Hidden Information. The Remove Hidden Information panel will appear on the left side. Make sure “Delete cropped content” is checked and then click the Remove button.
- If you try to open a PDF in Illustrator and it seems to hang, you may want to use the Remove Hidden Information tool to clear out hidden parts of the drawing. This was used successfully with USGS maps. To remove the hidden parts in Acrobat DC, click Tools > Redact (For older versions click Tools > Protection). On the Redact toolbar, click Remove Hidden Information. The Remove Hidden Information panel will appear on the left side. Wait for it to examine the file, then place checkmarks next to the hidden content. Make sure to UNcheck the other parts such as metadata, text, overlapping items. Then click the Remove button. Wait for it to finish, save the new file as a new name, and then try again to open it in Illustrator.
- When printing to the large plotters or smaller laser printers in the plot room, make sure to UNCHECK the following: 1) ‘choose paper source by PDF page size’ and 2) ‘print to file’. Otherwise, your print may be rotated or sized incorrectly, or not print at all. Complete instructions on how to plot from Acrobat are located here.
- If your PDF file seems to ‘hang’ when trying to send to the printer, it may be too complex. Was the file originally created in Illustrator? Are there hundreds or thousands of line segments? If so, a workaround is to go back into Illustrator and export the file as a TIF. Then bring the TIF into Acrobat to create a PDF, and the file should print. Similarly, if the file was originally created in InDesign, go back into InDesign and export the file as a high quality JPG (TIF isn’t an option).
- Why is my PDF printing in grayscale when it should be in color? In Acrobat, click File > Print. In the print settings box, click the Advanced button. Click ‘Output’ and then make sure the Color is set to ‘Composite’, not ‘Composite Gray’. Another place to check: in the print settings box, click the Properties button. Click the Color tab. Make sure it’s not set to grayscale.
- I have a PDF sized 28” x 192”. How would I have it auto divide when printing? I am sending it to a large plotters such as Peach-Postscript.
- Open in Acrobat, rotate the document on screen to match how it will come out of the printer (i.e. make it portrait where the width is 28 and the height is 192). To rotate click Document > Rotate Pages.
- The next step is to crop the drawing in order to print one section at a time. This is safer than trying to print it all at once because if something goes wrong during printing you only lose one section, not the whole multiple section job.
- To crop click Document > Crop Pages. In the crop window, look for Bottom and type in a number. Do you want to print it in two pieces of 28 x 96 ? If so, enter 96 for Bottom. Then click in one of the other boxes so you can see the change in the preview. You will now be printing the top half. Click OK to close the crop box.
- Do you know how to set up the print so that it doesn’t cut off your drawing? For ‘postscript custom page size’ you would specify 28 for width and 96 for length, and short edge first. It should also be set to portrait. Ask the plot monitor to review these settings if you want to be sure.
- When you are done printing the top half, in Acrobat click Edit, Undo to undo the crop. Then go back into the crop page settings and this time do the bottom. In this case you would enter 96 in the Top. This will crop the top off and you will be left with the bottom half.
- Before printing, make sure to optimize the PDF if the file size is large. Otherwise it may not print correctly and/or take a long time to print.
- 96” is still a very large size to print. It would be even safer to do it in three sections, each 28 x 64. Also make sure to send to Peach-Postscript rather than Peach.
Adobe Illustrator
- How to recover a file from a program crash: click Edit > Preferences > File Handling. Under the Data Recovery section, it will have a path to the recovery folder. If you can’t see the full path, it’s usually a hidden folder similar to C:\Users\[username]\AppData\Roaming\Adobe\Adobe Illustrator 21 Settings\en_US\x64\DataRecovery. Close Illustrator and then browse to this folder and look for any files. If you find files that match the time when the crash occurred, try changing the ending to .ai and open with Illustrator. By default Illustrator won’t save recovery info for complex files.
- How to crop a drawing. This is often used with printing or making a PDF of the cropped area for printing with Acrobat. In Illustrator: 1) draw a rectangle around the area to be cropped; 2) select the rectangle; 3) click Object > Crop Area > Make; 4) the rectangle will disappear; 5) click File > Print and choose the printer, or if creating a PDF, choose Adobe PDF as the printer; 5) click Setup and set ‘Crop Artwork’ to ‘Crop Area’; 6) click the Print button to print the file or create the PDF.
If you don’t crop before creating the PDF, you may find that when using Acrobat to print, the print system prices your job at “$0.00” and fails to print. This is usually because your Illustrator drawing extends beyond the margins of the artboard. - How to save a drawing in an earlier version of Illustrator. Click File > Save A Copy. Name the drawing and click the Save button. The Illustrator Options window will appear. At the top is a Version drop down list. You can pick an earlier version.
- Illustrator can only open DWG files saved as AutoCAD 2007 format or earlier. In AutoCAD Architecture or AutoCAD, click File > Save As, and change the File type to ‘AutoCAD 2007 Drawing’.
Adobe InDesign
- Files created in InDesign can’t be opened in a previous version unless they are saved in the InDesign markup language format (IDML). To create an IDML file, click File, Export and pick the InDesign markup format.
- If your images appear low-resolution and pixelated on the screen, this link describes possible reasons and solutions.
Adobe Photoshop
- If you scanned a file on Luma and it is squished or distorted in Photoshop, click Image, Pixel Aspect Ratio, Square. Then resave it.
- Photoshop CS can give ‘out of memory’ errors when trying to open large TIF files that were scanned on Luma. A workaround is to open the TIF in Irfanview, then resave it. Then Photoshop should be able to open it.
- Photoshop is a memory intensive program; it creates huge temporary files during use. If you open a file in Photoshop and work directly from your H drive on the server or from a USB stick, the temporary files may sometimes be created on that media. This can lead to problems and sluggish performance. To avoid such problems, copy your files to C:\Student before you begin working with them. The computer will often run faster and with less problems. Make sure you take your files with you when you are done.
- You should not print to the lab printers or plotters directly from Photoshop. Before you print, create a PDF in Photoshop by clicking File, Save As and changing the file type to PDF. To reduce the PDF file size (and speed up printing) flatten all layers before saving as a PDF. Then close Photoshop and open the PDF file in Acrobat for printing. See the section on printing from Acrobat for further tips on how to optimize the file size.
- Should I be using RGB or CMYK data when printing? If a file is already CMYK, leave it in CMYK. If the file is RGB or if you have control over how it is created (such as starting a new file), use RGB. With the HP PostScript RIP and HP large format printing materials, both RGB and CMYK are handled equally well. (from HP’s web site)
Adobe Premiere
- Project settings are very important to determine the ultimate file size of the end movie. Play around with the different compressors that are available, the movie size, and the final frame rate. When audio is included, the file size will be very high as opposed to when it is just video.
- If specific compressors or codecs are not available on other computers, it may be impossible to open the file on those computers. The free VLC media player has built in decoders for many types of movies.
ArcGIS
- If ArcGIS crashes when you try to run it (such as trying to run ArcMap), delete the following folders:
- C:\Users\[your username]\appdata\local\ESRI
- C:\Users\[your username]\appdata\roaming\ESRI
- To export an ArcGIS map to AutoCAD (DWG) open the map in ArcMAP and click Geoprocessing > Arc Toolbox > Conversion Tools > To CAD > Export to CAD.
- ArcGIS datasets are now available in the computer lab. They are located under the G drive in the Student Resources > Drawing & Map Archive > ArcGIS map data folder. Included are maps of North America, Europe and a base world map.
- There is a plugin installed to allow for exporting of maps to the Google Earth KML format. This works from within ArcMap. The ‘Export to KML’ button can be found on the ArcMap toolbar all the way to the right.
- Extensions such as 3D Analyst, ArcScan, Geostatistical Analyst and Spatial Analyst are enabled. To turn on the toolbars associated with these extensions, open ArcMap and click View > Toolbars.
- If using 3D Analyst or other extension generates a ‘Tool Not Licensed’ or other license error, click Customize > Extensions. Enable the extension by checking the box next to it. Then retry the extension.
- If you move from one computer to another and the drive letter changes on your memory stick, you may find that ArcGIS can’t find referenced data or the data source. To solve this, set the data source to use relative pathnames (rather than the default, which is absolute pathnames). Click File > Document Properties > Data Source Options. Choose ‘Store relative path names…’. A more complete discussion of relative vs. absolute pathnames is here.
- Obtain digital aerial photos of New York State at the NYS GIS Clearinghouse. The images are in JP2 (JPEG 2000) format, 1 ft/pixel in urban and 2 ft/pixel in rural areas, and all are in natural color. 2009 Onondaga County images are here. 2007 Seneca County images are here. JP2 images can be viewed in Photoshop CS6, or ArcGIS 10.
- Columbia University has many useful tutorials for using ArcGIS.
AutoCAD / AutoCAD Architecture
- If AutoCAD is not working correctly (won’t start, flickering interface, menus and toolbars have disappeared, errors about not finding certain files), try the reset tool. Close AutoCAD, then click the Start button > AutoCAD Architecture > Reset Settings to Default. Now try to start AutoCAD.
- Recovering AutoCAD - there are several options for dealing with corrupted AutoCAD files:
- Try to locate the autobackup or backup files. AutoCAD has a built in autosave feature which will periodically save autobackup files (.sv$ or .ac$) to the c:\temp folder (on your personal computer, the location is usually c:\documents and settings\[your user account name]\local settings\temp). Regular backup files (.bak) are made whenever you save your drawing. They contain the previous version of the file and will reside in the folder where your dwg file is located. Either the autobackup or the file save backup can be opened in AutoCAD by changing the file extension to dwg. To do this, Windows must be configured to show extensions (such as .dwg). If extensions are hidden, you can reveal them by opening My Computer and clicking Tools, Folder Options. Under the View tab, de-select ‘hide file extensions for known file types’. Then you can change the file extension by right clicking the specific file and choosing Rename.
- Try to recover the drawing. In AutoCAD, click File, Drawing Utilities, Recover and then select the corrupted file. Sometimes it can recover part or all of the drawing.
- AutoDesk has an extensive document on recovering corrupted AutoCAD files.
- If the toolbars and menus have disappeared, try this to get them back: on the command line type _menuload. When the customization window opens, click the Browse button. Pick the file ‘acad.CUI’ then click Open. Now click the Load button, then Close. The menus should reappear.
- How to switch to the AutoCAD interface in AutoCAD Architecture: start Architecture, click the red ‘A’, then Options. Click the Profile tab. If you see an available profile called ‘AutoCAD’, select it and click ‘Set Current’, then click OK. The menus and ribbon should change. You can further change it to the classic AutoCAD interface by clicking Tools > Workspaces > AutoCAD Classic.
- If you can’t get smooth tracking with the mouse, or the cursor appears to jump around, it may be that you have ‘snap to grid’ turned on. There is a small button on the left side of the bottom toolbar that turns it on or off.
- How to assign a plot style and pen weights: type ch on the command line to open the Properties panel. Under the Plot Style section look for Plot Style Table and click the drop down box to pick one of the standard ones. Under the General section you can adjust color and line weights. To add a new plot style, click File, Plot Style Manger and then double click the Add-a-Plot Style Table Wizard.
- If you can’t edit the plot style table to change colors, it might be because your drawing is based on named plot styles (STB) instead of color dependent plot styles (CTB). This can occur if you start your drawing in Architectural Desktop and then bring it into AutoCAD. To convert from named plot styles (STB) to color dependent plot styles (CTB) issue CONVERTPSTYLES on the command line. To convert from CTB to STB use CONVERTCTB. Make a copy of the file first, so you don’t lose the original.
- Pen Weights are set through the pen style table (click File, Plot to open the Plot window, then click the small round arrow next to the Help button to show the plot style table box). A pen style table is assigned to a drawing. It will say ‘none’ if this has not been done. You can choose from those available, or create a new one by selecting New from the drop down list, and choosing ‘Start from scratch’.
- You cannot change the pen style table in the plot menu, you must do it through the drawing’s properties or else the plot will still come out with the old settings. With nothing selected type ch in the command line and change the plot style table on the appropriate line when the properties panel pops up.
- You can change the location where Autocad saves and looks for plot styles. If you change it to your H drive, then you will be able to access your own plot styles from any lab computer. Once you change it, you will no longer see the default plot styles, so you may want to copy them to your H drive so you have the best of both worlds. Here is how to change the plot style location: 1) create a folder on your H drive called ‘Acad Plot Styles’; 2) in Autocad, click Tools > Options > Files tab; 3) scroll down the list to Printer Support File Path and expand it; 4) find Plot Style Table Search Path and expand it; 5) notice the default path C:\Documents and Settings\All Users\Application Data\Autodesk\ACD-A\enu\Plot Styles. Change it to H:\Acad Plot Styles\ (you can type it in or browse to it); 6) click OK and you are finished. Now when you click File > Plot Style Manager, you will be in the new location. If you want to copy the default styles to your H drive, you can find them here: C:\Documents and Settings\All Users\Application Data\Autodesk\ACD-A\enu\Plot Styles.
- If you are working in 3D space in AutoCAD Architecture and are having trouble printing a model, you can change to 2D view by clicking View, Visual Styles, 2D Wireframe.
- Most importantly, use the preview function within the plot command panel to avoid wasting paper.
Autodesk 3ds Max
- Max does not provide an easy way to save in an earlier version. However, by using FBX export/import, you can usually get good results, although some cleanup work may be necessary.
Autodesk Revit Architecture
- Check the Revit wiki for learning tools, as well as the forums.
- To open Revit files in earlier versions, export the file as IFC (File->Export->IFC), then in the earlier version of the program, click File->Import->IFC.
Bentley AECOsim
Digital Project (CATIA)
- The online documentation for Digital Project requires that you create a free account at the GTWiki. Once you create an account, you can login to access the documentation.
Microsoft Office - PowerPoint, Word, Excel
- Recovering PowerPoint/Word/Excel - Contact Andy or Chuck. We have recovery software that may be able to help.
- PowerPoint has a built-in feature to reduce the size of the ppt file, allowing it to open faster and take up less room on your disk. This only works on the Windows version of PowerPoint. To reduce the size:
- Open your ppt file.
- Find a slide with a picture and double click the picture.
- This should open the Format Picture box and locate you on the Picture tab.
- Look for and click the Compress button to open the Compress Pictures box.
- Under Apply To, click All Pictures.
- Under Change Resolution, click Web/Screen (or click Print if you want slightly better quality for printing at the expense of a larger file size).
- Under Options make sure both are checked, then click OK and wait for it to finish.
- Save the file under a different name so as not to overwrite your original.
Rhino
Extracting split archives
Some of our products are too big to be distributed as a single file. That's why we have to split these archives and this is a way ho to properly extract and use them.
01/ Download all corresponding files - usually named 1/3, 2/3 and 3/3, or 001, 002 and 003 and store them together in a separated folder in your computer.
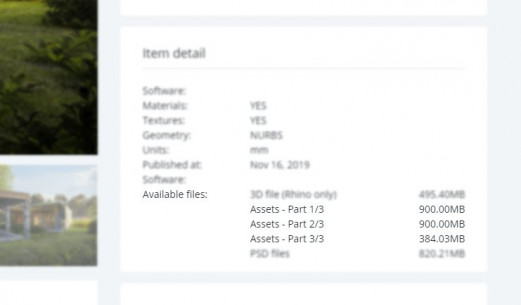
02/ Open the folder to make sure all of the downloaded files are present.
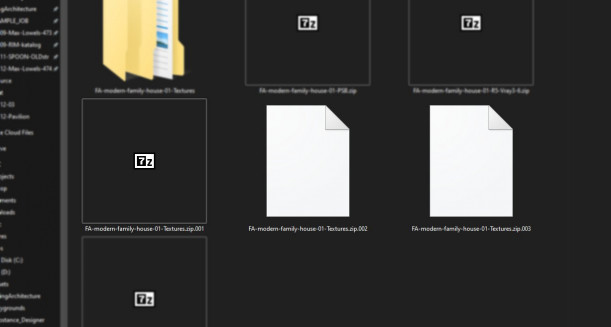
03/ Open the first one - usually with an extension 001. We prefer to use 7zip software to do that. Once you have it open, click Extract.
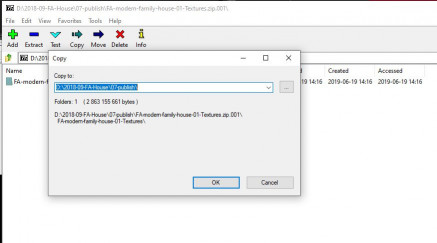
04/ Check the newly extracted files, if they are present in the folder. Now you can remove all previously downloaded partial files (001, 002 and 003) - No need to open the 002 and 003 anymore, since 002 and 003 were opened inside 001 already. (Yep, that's a magic!)
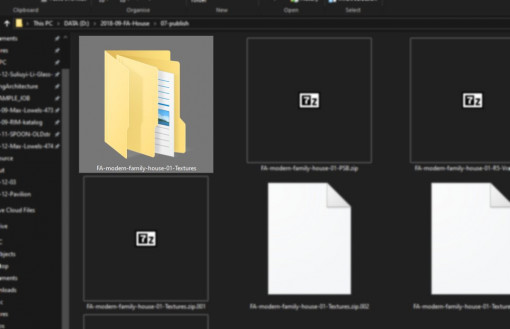
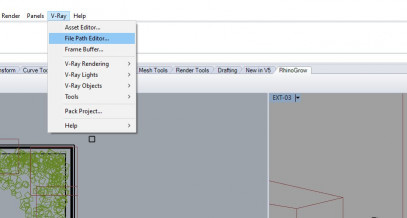
05/ Open the Rhino scene, navigate to V-Ray menu > File Path Editor
06/ Check the state of all assets - they should appear as a green squares in the beginning of each row, if the paths are linked properly. If you spot a red one, it needs to be resolved.
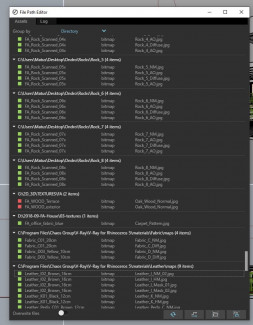
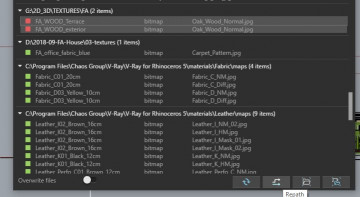
07/ Select the red ones and click the Repath button (right bottom row) and select the folder that was previously created when you provided an extraction of the archive. Repeat for all red-marked rows, until you resolve all paths.
08/ That's all folks, render should run properly now :) Just make sure you use the correct V-Ray version!
Let us know if you had any issues with split archives.
V-Ray File Path Editor
This page provides information on the V-Ray File Path Editor.
Page Contents
Overview
The V-Ray File Path Editor manages all your scene files in one place. It lets you set file paths, create scene archives, and keep track of assets like textures, IES files, and proxy objects.
This asset manager gives you a neat overview of all available files in the scene, so you don't lose sight of any.

UI Path: ||V-Ray|| > File Path Editor

Assets
The Assets tab lets you see and manage all associated files in the scene.

The files in this tab can have three different color marks that notify of the status of their file path:
Green – The file is available and its path is visible by V-Ray.
Yellow – The file is available, but is embedded in a temporary cache file.
Red – The file is missing or inaccessible.
Options
Group By – Displays the scene assets sorted by Directory, State, Type or None.
Overwrite files– Enables overwriting already existing files when re-pathing assets.
Refresh – Refreshes display of the scene assets.
Repath – Updates the file path of the selected asset.
Archive – Writes on disk the currently selected asset.
Repath & Archive – Lets you save the selected asset on disk and automatically repaths it to the chosen destination.
Log
The Log tab prints messages for all operations done with the assets. You can change the position of both Assets and Log tabs by left-clicking and dragging the tab label.
 .
.
What’s New in the vray 3 rhino Archives?
Screen Shot

System Requirements for Vray 3 rhino Archives
- First, download the Vray 3 rhino Archives
-
You can download its setup from given links:


